Table of Contents
Advertisement
Advertisement
Table of Contents

Related Manuals for Pandigital PhotoLink PANSCN03


Summary of Contents for Pandigital PhotoLink PANSCN03
-
Page 1: User Guide
LIDE AND EGATIVE CANNER User Guide PANSCN03, PANSCN03EU... -
Page 2: Table Of Contents
Table of Contents Important Safety Precautions ..............3 Introduction ..................... 4 What’s in the Box .................. 4 Overview of the Scanner ..............4 Install Driver & PhotoImpression Software .......... 5 Loading Negatives .................. 7 Loading Positive Slides ................8 Connect Scanner to PC ................8 Launch PhotoImpression Software ............ -
Page 3: Important Safety Precautions
Important Safety Precautions Always follow these basic safety precautions when using your scanner. This will reduce the risk of fire, electric shock, and injury. Important: Do not expose this product to rain or moisture. Caution: To avoid risk of electric shock, do not disassemble this unit. -
Page 4: Introduction
Introduction Thank you for purchasing the Pandigital Slide and Negative Scanner. Now you can preserve your slides and photo negatives by scanning them directly into your computer or onto a memory card as .jpg files. What’s in the Box Check your package for the following items: Scanner with connected USB cable Driver &... -
Page 5: Install Driver & Photoimpression Software
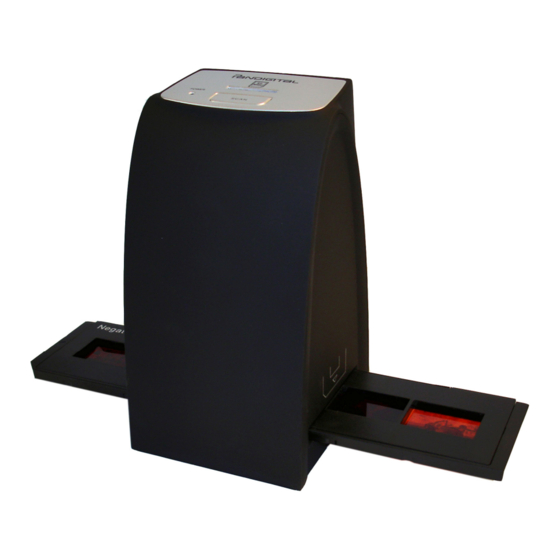
Power LED Red light indicates scanner is connected to PC USB cable Memory card slot connected to scanner button SCAN Used to perform scan Back Positive Slide Tray Negative Film Tray Cleaning Brush Install Driver & PhotoImpression Software System Requirements Windows XP SP2, SP3 Vista 32-bit, Vista 64-bit Not supported on Macintosh... - Page 6 Close all software windows you are not currently using. The ArcSoft PhotoImpression software that is included with the Pandigital Slide and Negative Scanner allows you to scan images directly into the PC or onto a memory card. The software can also be used to preview, organize, edit, and share your scanned images.
-
Page 7: Loading Negatives
3. Click Driver & PhotoImpression 4. After the driver installation, you can select a different language for PhotoImpression if desired. 5. Follow the install wizard to install the PhotoImpression software. 6. When the screen appears with the list of file types for PhotoImpression software to be used as the default viewer, click the button or de-select the files types that you... -
Page 8: Loading Positive Slides
Close the negative tray and press the edges so that it locks into place. Loading Positive Slides Handle slides with care; any dust, scratches, or finger prints will appear on your saved images. If possible, use cotton gloves when handling slides. It is recommended to use compressed air to remove any dust on the slides (not included). -
Page 9: Launch Photoimpression Software
Windows XP: 1. Connect the scanner’s USB cable to a 2.0 USB port on your PC; the power LED will be red. 2. The first time the PC recognizes the scanner, the Hardware Wizard will automatically launch. 3. The wizard will sync the scanner with the previously installed driver. - Page 10 3. Select , and then select Get Photos Acquire from Scanner from the drop-down menu. 4. The first time you launch the software, a calibration must be performed; the following message appears: Remove the slide/film tray if necessary, click , and then wait for the calibration process to complete.
- Page 11 TIPS: 1) Only TIF format can be saved as 48bit color depth. 2) Click the folder icon to choose the location for saving your scanned images on your computer or memory card (if you have inserted a memory card in the scanner).
- Page 12 NOTE: Up to 12 images can be scanned before transferring them to your computer or memory card. If you scan a image before transferring the images, it will overwrite the 1 image. Click to save the scanned images displayed on the Transfer film strip to your computer or memory card.
-
Page 13: Manage Scanned Images
Manage Scanned Images You can now use the PhotoImpression software to preview, edit, organize, and share your scanned images. Click on an image to select it, and then use the PhotoImpresion tools to modify as desired. For more detailed information and features, use the function in HELP the PhotoImpression’s main window. -
Page 14: Technical Specifications
Q: Why doesn’t my computer recognize the scanner now, even though it previously scanned properly? A: When reconnecting the scanner, always use the same USB port that you used when installing the scanner driver. If you still have trouble, unplug the scanner, restart your computer, and then connect the scanner to a USB 2.0 port on your computer. -
Page 15: Limited Warranty
PARTS: For a period of one (1) year from the date of purchase, if this product is found to be defective, Pandigital will supply at no cost, new or rebuilt replacement parts, at its option, at no charge. After this one (1) year period, parts will be charged for on a case by case basis. - Page 16 This warranty gives you specific legal rights, and you may have other rights, which vary from state to state. All content included on the Pandigital website as well as Pandigital products, including pre-loaded demonstration images, digital media, digital cookbooks, text, graphics, logos, designs, photographs, button...
Need help?
Do you have a question about the PhotoLink PANSCN03 and is the answer not in the manual?
Questions and answers