Table of Contents
Advertisement
Quick Links
Advertisement
Table of Contents

Subscribe to Our Youtube Channel
Related Manuals for Ecom Ex-Handy 05


Summary of Contents for Ecom Ex-Handy 05
- Page 1 Ex-Handy 05 / Ex-GSM 02 Operating Instructions...
-
Page 2: Table Of Contents
Contents Functional description/operating instructions Your phone package - Accessories Description Navigation principles Initial screen Activating your phone Getting started 1.6.1 Setting time and date 1.6.2 First call Using your phone Phonebook Messages 1.10 Multimedia 1.11 1.12 Applications 1.13 Organizer 1.14 Settings 1.14.1 Sounds 1.14.2 Display... -
Page 3: Functional Description/Operating Instructions
The following (optional) accessories can be used or ordered: - Spare battery Ex-AMH 05 for Ex-Handy 05 / Ex-AM GSM 02 for Ex-GSM 02 - Spare charger LGH 05 - Car charger ALH 05... -
Page 4: Description
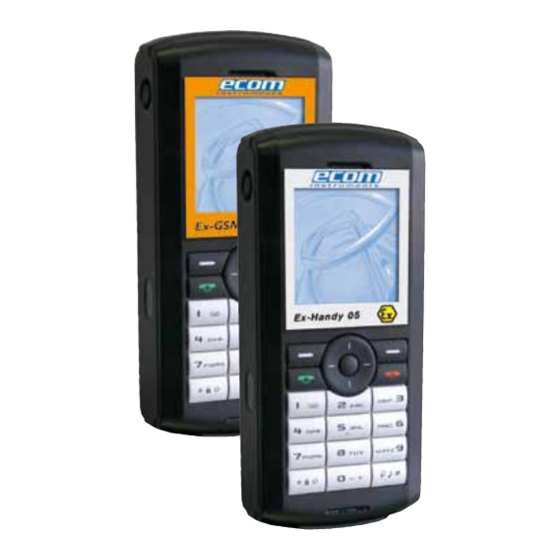
- Leather case in yellow - Various fixtures for the leather case - Bluetooth hands free kit CK1 - Various vehicle mounts - Screwdriver Torx T6 1.2 Description General view 1. Metall knob 2. Charging socket 3. SIM card 4. IrDA 5. -
Page 5: Navigation Principles
The four-directional navigation stick allows you to: - Move the cursor on the screen by pushing the stick toward the corresponding direction - Confirm your selection by pressing the stick - In initial screen: Pressing and holding the button to the left (depending on model): access to tasks in the form of speech;... -
Page 6: Initial Screen
key is used to go from a menu to a sub-menu. key is used to go a sub-menu to a menu. key (press briefly) is used to go back to the initial screen (current function is abandoned). In some menus there is a Help menu ( ), which informs you on the various functions of the sub-menus. -
Page 7: Activating Your Phone
Please keep your SIM-card out of reach of young children. First use: Installing the SIM-card 1. Open the lower cover carefully on the Ex-Handy 05 / Ex-GSM 02 to insert the SIM card. 2. Slide the SIM-card into the card holder until it locks in place. When doing this make sure that the tapered side of the card is facing the same way as illustrated in the diagram (or the type plate on the rear). -
Page 8: Getting Started
If your phone is stolen, you may be requested to specify this number. You can also use this number on the ecom instruments GmbH website under Service > Device information to find out your phone‘s serial number without removing the battery. -
Page 9: Setting Time And Date
WARNING If a wrong PIN number is entered three times in succession, your SIM-card is blocked. You must then: - Enter „**05*“. - Enter the PUK (Personal Unblocking Key) code provided by your operator and validate. - Enter your PIN number and validate. - Enter your PIN number again and validate. -
Page 10: First Call
1.6.2 First call Dial the number of your correspondent. Press the key. During the call, the call in progress icon flashes on screen and tones may indicate the establish- ment of the call. Once communication has been established, the call icon stops flashing. -
Page 11: Using Your Phone
1.7 Using your phone Freeing the antenna The antenna is integrated in your phone. It is located under the back cover at the top. Avoid putting your fingers on this area when the phone is switched on. If your fingers obstruct the antenna, the phone may have to operate with a higher power level than usual;... - Page 12 To display the various options select a contact and press [Options]. Storing a new contact: - Display the Phonebook, press [Options], then select Add SIM contact or Add phone contact. - Enter the last name and press the navigator. - Enter the number and press the navigator [OK]. Note: you can fill other fields if you store the contact in the phone memory (email, address, ring tone, photo, etc.).
-
Page 13: Messages
a contact in the list. Memory Select SIM or Telephone and validate. Telephone: the screen displays the amount of memory used. The memory capacity is shared between the phonebook and various other features. If you lack memory, check if you can free some space. SIM: available memory for contacts only. - Page 14 When typing a text, a counter showing the number of characters deducted is dis- played at the top of the screen. This counter is not displayed if an icon or sound is inserted into the SMS. When the text has been entered [Options] is used to access the functions offered.
- Page 15 MMS option. When the text has been entered in the Message field, [Options] is used to access the functions offered. Saving the message Select Save. It is saved in the Drafts menu. Select Save as Template. It is saved in the Templates menu. Sending the message - Once the text entered, press the navigation stick or press [Options] and select Send.
- Page 16 Sentbox If you activated the Store sent messages option in the Options menu, the Sent- box menu is used to store all your sent messages. Too many messages saved will quickly fill up the available memory. This means, no further messages will be received. For each message, its characteristics (shown with an icon) and the time (or date) of sending are displayed on the screen.
-
Page 17: Multimedia
receiver’s phone screen, with that message. - Display Bcc: Display the recipients of an MMS message to other recipients. - Max. size: Specify the maximum size for an MMS message (the larger the message, the longer the send/receive process). Calling Voice Mail This function allows you to call your voicemail. -
Page 18: Wap
To display the different options, press [Options]: - New Sound: allows you to record a new sound. - Send By: allows you to send a sound by MMS, IrDA or Bluetooth (depending on model). - Use as: allows you to add a sound to the ring tones list. - Rename: allows you to rename a sound. - Page 19 Go to URL: this menu allows you to input an Internet address directly. Inbox: this menu allows you to check the messages sent by the Internet site. Save objects: is used to save a WAP site item. Snapshots: takes a snapshot of the currently displayed page. Save Page: saves the currently displayed page.
-
Page 20: Applications
- Mode (digital, analog or automatic) GPRS parameter - User - Password - IP address of WAP gateway - Port type (secure or insecure) - APN: if no APN has been defined, press [Options], then the APN menu. Select or add an APN. Once all the settings have been entered, you can activate the chosen service provider. - Page 21 The alarm icon appears on the initial screen. The alarm works even when the phone is switched off. Timer This menu is used to set and activate the timer. On the Applications menu, select the Timer menu and [OK]. Select Activate or Deactivate and validate. Set the duration (hours/minutes) by entering the numbers directly and validate.
-
Page 22: Organizer
Converter On the Applications menu, select the Converter menu and [OK]. Enter a value and move the navigation stick upwards to convert from one currency to another, or downwards to convert back. 1.13 Organizer Help This option provides information about the phone‘s organizer functions. This menu gives you access to your agenda and to a day, week, month or specific date. -
Page 23: Display
Select the vibrate mode from the proposed choices and validate. Silent mode On the Sounds menu, select the Silent mode and [Select]. Select Activate or Deactivate and validate. Silent mode can also be accessed via the initial screen by holding down the key. -
Page 24: Languages
Contrast On the Display menu, choose the Contrast menu and [Select]. Adjust the contrast using the navigation stick. Energy saving On the Display menu, choose the Energy saving menu and [Select]. Screen only: only the screen is lit up. Full backlight: both the screen and the keypad are lit up. After a longer period of inactivity, the screen will enter an economy mode where the time is displayed. - Page 25 Counters This menu allows you to consult the duration of the last calls. It can also be used to check the volume of data exchanged via GPRS. On the Calls menu, select the Counters menu and [Select]. Display number On the Calls menu, select the Display number menu and [Select]. Choose one of the options given: Anonymous mode, My number, Callers’...
-
Page 26: Security
1.14.6 Security Keypad locking On the Security menu, choose the Keypad locking menu and [Select]. Select Activate or Deactivate and validate. Now select a time for the automatic keypad lock to be activated. After expiration of the defined period the symbol for the keypad lock will be displayed on the initial screen. -
Page 27: Networks
Call barring (Operator-dependent service) This menu allows you to block the sending or reception of certain calls. Before you can use this service, a password will be provided by your operator when you take out your subscription. On the Security menu, choose the Call barring menu and [Select]. Select Activate or Deactivate and validate. -
Page 28: Wap Settings
1.15 Connectivity Bluetooth The following Bluetooth profiles are supported by the Ex-Handy 05 / Ex-GSM 02: - DUN („Dial-up Networking Profile“ = Internet dial-up connection) - FAXP („FAX Profile“ = Faxing) - HFP („Hands Free Profile“ = Cordless telephony in a car) - HSP („Head Set Profile“... - Page 29 The circle designates the position of the Bluetooth symbol in the display. Bluetooth is deactivated. Bluetooth is activated and the phone is visible to other Bluetooth devices. This mode can be selected in the Options menu under „On & visible“. This means the phone can recognise and be recognised by other devices.
- Page 30 Bluetooth is activated, but the phone cannot be found by other unknown Bluetooth devices. Known or paired devices function normally.This mode can be selected in the Options menu under „On & hidden“. The phone can detect other Bluetooth devices, but it cannot be paired with them.
- Page 31 GmbH reserves the right to make changes to this document or to withdraw it any time without prior notice.
Need help?
Do you have a question about the Ex-Handy 05 and is the answer not in the manual?
Questions and answers