Table of Contents
Advertisement
Quick Links
Table of Contents
Dimensions. . . . . . . . . . . . . . . . . . . . . . . . . . . p.2
Reference Drawings. . . . . . . . . . . . . . . . . . . p. 3
Important Safety Instructions. . . . . . . . . . . p. 4
Before You Begin. . . . . . . . . . . . . . . . . . . . . . p. 5
Preparations. . . . . . . . . . . . . . . . . . . . . . . . . . p.6
Assembly Instructions. . . . . . . . . . . . . . . . . p.7-19
Features. . . . . . . . . . . . . . . . . . . . . . . . . . . . . . p. 20
Setup. . . . . . . . . . . . . . . . . . . . . . . . . . . . . . . . . p 21-22
Component Replacement. . . . . . . . . . . . . . . p 23-26
Mainframe Parts List. . . . . . . . . . . . . . . . . . . p.28
Hardware List. . . . . . . . . . . . . . . . . . . . . . . . . p.29-30
Hardware (To Scale). . . . . . . . . . . . . . . . . . . p. 31
Exploded View Diagram. . . . . . . . . . . . . . . . p.32-33
Notes. . . . . . . . . . . . . . . . . . . . . . . . . . . . . . . . . p. 34-35
&
A s s e m b l y
I n s t r u c t i o n s
O W N E R ' S
M A N U A L
v. 101310
Advertisement
Table of Contents

Related Manuals for Endurance ESB250


Summary of Contents for Endurance ESB250
-
Page 1: Table Of Contents
Table of Contents Dimensions......p.2 Reference Drawings....p. 3 Important Safety Instructions. -
Page 2: Dimensions
D i m e n s i o n s The room layout diagram below will help you decide the best placement for your ESB250. The overall space needed for operation may be more depending on the user. Minimum Usage Space –... -
Page 3: Reference Drawings
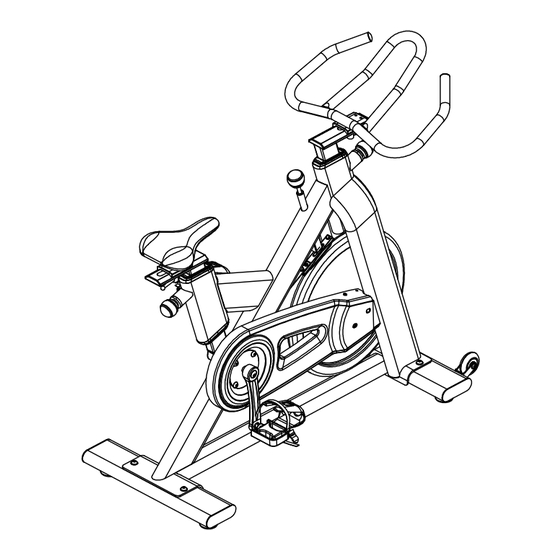
Use the following diagrams as a point of reference when assembling your ESB250. Becoming familiar with the unit and the orientation of its components will help ease installation. Please use the following diagrams to become more accustomed with your ESB250 and its applications. -
Page 4: Important Safety Instructions
Such attachments might cause injuries. damaged the equipment. Wear proper exercise clothing and shoes for your Assemble and operate the ESB250 on a solid, level workout, no loose clothing. surface. Locate the unit a few feet from the walls or furniture to provide easy access. -
Page 5: Before You Begin
Should additional information be required, or should situations arise that are not covered by this manual, the matter should be directed to your local Endurance representative, or the Service Department at Endurance in Forest Park, Illinois. -
Page 6: Preparations
Do not attempt assembly by yourself. You must review and follow the instructions in this Owner’s Manual. If you do not assemble and use the ESB250 according to these guidelines, you could void the Endurance warranty. Installation Requirements CAUTION ! -
Page 7: Assembly Instructions
(in actual size) along with the corresponding component num- While you may be able to assemble the ESB250 us- bers in the assembly instructions. ing the illustrations only, important safety notes and other tips are included in the text. - Page 8 S T E P Be careful to assemble all components in the sequence they are presented. Connect Front Base (E) to Main Frame (A) using: Two 58 (M10x65 round allen head bolt) Four 68 (M10 washer) Two 64 (M10 nylon nut) Connect Rear Base (F) to Main Frame (A) using: Two 58 (M10x65 round allen head bolt) Four 68 (M10 washer)
- Page 9 S T E P Above shows Step 1 assembled and completed.
- Page 10 S T E P Be careful to assemble all components in the sequence they are presented. Screw (counterclockwise) Left Pedal (26) onto Left Crank (24). NOTE: To install pedals, always screw on towards the handlebar direction. Screw (clockwise) Right Pedal (25) onto Right Crank (23). NOTE: To install pedals, always screw on towards the handlebar direction.
- Page 11 S T E P Above shows Step 2 assembled and completed.
- Page 12 S T E P Be careful to assemble all components in the sequence they are presented. Loosen Pop Pin (8) and insert Handlebar (B) into the Handlebar Post Housing on Mainframe (A). NOTE: Silicone oil may be used to ease gliding on Handlebar (B). Retighten Pop Pin (8).
- Page 13 S T E P Above shows Step 3 assembled and completed.
- Page 14 S T E P Be careful to assemble all components in the sequence they are presented. Connect Handlebar (D) to Handlebar Post (B) using: One 39 (handle) One 66 (M10 washer)
- Page 15 S T E P Above shows Step 4 assembled and completed.
- Page 16 S T E P Be careful to assemble all components in the sequence they are presented. Loosen Pop-Pin (8) and insert Seat Post (C) into the Seat Post Housing on Mainframe (A). NOTE: Silicone oil may be used to ease gliding on Seat Post (C). Retighten Pop-Pin (8)
- Page 17 S T E P Above shows Step 5 assembled and completed.
- Page 18 S T E P Be careful to assemble all components in the sequence they are presented. Secure Seat Slider (G) onto Seat Post (C) using: One 39 (handle) One 66 (M10 washer) Slightly loosen both Hex Nuts (53). Insert Seat (7) onto Seat Glider (G). Tighten both Hex Nuts (53) to secure the seat assembly.
- Page 19 S T E P Above shows Step 6 assembled and completed.
-
Page 20: Features
F e a t u r e s The ESB250 is a very bene cial cardio machine yet easy and practical to use. Below are the features included with your ESB250 Spin Bike. Understanding all the features on this unit will improve and bene t your workout. -
Page 21: Setup
The ESB250 is designed to use minimal oor space and to t nicely in your home or o ce. To make exercise a desirable daily activity for you, the ESB250 should be placed in a comfortable and at- tractive setting. - Page 22 HORIZONTAL SEAT ADJUSTMENT To adjust seat height: To adjust the seat horizontally: Mount onto the ESB250 spin bike. Mount onto the ESB250 spin bike. Step on one pedal after having brought it to the Position the pedals so that one pedal is towards the lowest position.
-
Page 23: Component Replacement
Carefully read the instructions below when replacing wear parts on your ESB250 Spin Bike. HANDLEBAR REPLACEMENT To replace the handlebar: Loosen Handle (39) while holding onto Handlebar (D). - Page 24 C o m p o n e n t R e p l a c e m e n t REPLACING THE BRAKE KNOB To replace the brake knob: Remove Socket Head Bolts (61) and Washers (67) to disassemble the brake assembly. See Diagram 1.
- Page 25 C o m p o n e n t R e p l a c e m e n t BELT REPLACEMENT To remove the belt: Remove ve Phillips Pan Head Screws (54) from Chain Cover B (2). See Diagram 1. Unscrew both Phillips Pan Head Bolts (56) from Flywheel Left Cover (72).
- Page 26 C o m p o n e n t R e p l a c e m e n t BELT REPLACEMENT To replace the belt: Hang the new belt on the right Flywheel Bracket. NOTE: Remember to check that Spindle Cover (19) is secured to Flywheel (16) and should cover both sides of the ywheel spindle.
-
Page 27: Warning, Safety & Maintenance
Routine inspection and maintenance is of critical importance to ensure maximum safety and perfor- If the spring sticks or has lost its rigidity, replace it mance. Endurance uses the highest quality materials immediately. available, but wear is inevitable. Therefore, you must... -
Page 28: Mainframe Parts List
M a i n f r a m e P a r t s L i s t Part# Description MAIN FRAME HANDLEBAR POST 30 x 60 x 2T x 330L SEAT POST 30 x 60 x 2T x 360L HANDLEBAR FRONT BASE 40x120x2Tx498L (FLAT OVAL) -
Page 29: Hardware List
H a r d w a r e L i s t Part# Description CHAIN COVER A CHAIN COVER B BASE LEVELER BUSHING 40x120x2T 30x60 (FLAT OVAL) (SQUARE TUBE) END CAP 30x60x2T 40x120x2T 30x60 BUSHING (FLAT OVAL) (SQUARE TUBE) SEAT POP PIN M16x1 ½... - Page 30 WASHER x 24 x 1T ½ FLYWHEEL LEFT COVER WAVE WASHER x 27 x 0.3T ½ ENDURANCE LOGO ESB250 LOGO ENDURANCE 250 BADGE FLYWHEEL STICKER INSTALLATION WRENCH PHILLIPS/#13/#15/#17 INSTALLATION WRENCH #13/#15 INSTALLATION ALLEN WRENCH Part numbers are required when ordering parts.
-
Page 31: Hardware (To Scale)
H a r d w a r e ( T o S c a l e ) Part# 58 M10x65 Round Allen Head Bolt Qty. 4 Part# 64 Nylon Nut Qty. 4 Part# 68 Washer Qty. 8 Part# 66 M10x30OD Washer Qty. -
Page 32: Exploded View Diagram
E x p l o d e d V i e w D i a g r a m... -
Page 34: Notes
N o t e s... - Page 35 N o t e s...
- Page 36 Serial Number is Located on the Frame ESB250 Model Name Purchase Date : _______________________________ Serial Number : _______________________________ 1900 S. Des Plaines Ave. Forest Park, Il 60130 (800) 556-3113 Hours: M-F 8:30 - 5:00...
Need help?
Do you have a question about the ESB250 and is the answer not in the manual?
Questions and answers