Table of Contents
Advertisement
Advertisement
Table of Contents

Related Manuals for 3DR IRIS-M Pro


Summary of Contents for 3DR IRIS-M Pro
- Page 1 IMPORTANT Read before flying! Operation Manual...
-
Page 2: Table Of Contents
Contents 01 Meet IRIS-M 03 Parts 04 Charging the Battery 05 Battery Safety 06 Attaching Propellers 07 Camera Operation 07 DroneDeploy Account Setup 08 Safety 10 Quickstart: 1-Click Map 12 Learning More about DroneDeploy 13 Manual Flight 16 Modes 18 Return to Launch 18 Controller Flight Data 19 Manual Flight Procedure 24 Camera Setup... -
Page 3: Meet Iris-M
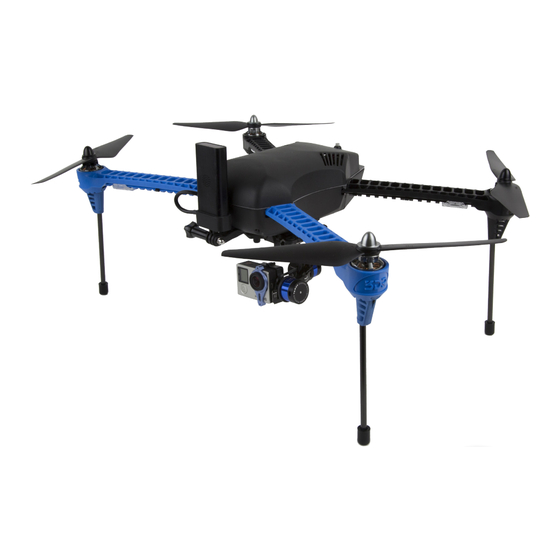
Meet IRIS-M Thank you for purchasing IRIS-M IRIS-M is a professional aerial survey platform powered by 3DR autonomous technology and DroneDeploy mapping software. Please read this manual carefully before your first flight and pay close attention to safety information. Happy flying! - Page 4 Front Safety button (safety switch) DroneDeploy CoPilot Front arms (blue) Gimbal Rear USB port Status LED Rear arms (black) Battery compartment...
-
Page 5: Parts
Parts IRIS-M quadcopter with Tarot Gimbal Controller Your direct link to IRIS-M Ground station radio with USB and Android adapters Battery kit Three batteries, guard bag, and charger with international travel adapters Propellers and tool kit Four propellers and four spares with propeller tool and small, medium, and large hex keys (1.5 mm, 2 mm, 2.5 mm, and 3 mm) Tablet... -
Page 6: Charging The Battery
Charging the Battery IRIS-M includes three rechargeable lithium polymer (LiPo) batteries. Store the batteries at half charge then charge fully before flying. Batteries ship at half charge, so please charge before your first flight. Each full battery provides up to 10 minutes of flight time.* Connect charger to the Connect the red cable to the power adapter cable and... -
Page 7: Battery Safety
Secure battery inside the guard bag while charging. Charge until the status indicator displays green. Charging Complete Battery Safety Protect the batteries from extreme heat, extreme cold, puncturing, and flammable surfaces. Always charge the batteries in the guard bag. Charge the batteries using the designated LiPo balance charger only. -
Page 8: Attaching Propellers
Attaching Propellers IRIS-M uses four propellers: two with black nuts and two with silver nuts. Attach the propellers with black nuts to the motors with black tops and the propellers with silver nuts to the motors with silver tops. Each propeller has locking and unlocking direction symbols. attach, spin the propeller in the direction of the locking symbol. -
Page 9: Camera Operation
Camera Operation Before creating a map, power on the camera and enable the WiFi. The camera’s WiFi allows it to communicate with the CoPilot during flight. To power on the camera, press and hold the power button on the front of the camera until it triple- beeps, flashes red and displays the startup screen. -
Page 10: Safety
Safety Familiarize yourself with these safety instructions before your first flight. Injury Prevention IRIS-M has powerful motors and high-speed propellers. Never place your hands near propellers while IRIS-M is armed or the safety button displays solid red. Always press the safety button visual line 400 ft of sight... - Page 11 Safety (cont.) RC Signal Management Always use the controller as a primary or backup control system when flying. Ensure that the controller is turned on any time IRIS-M is powered. Flying behind solid objects, like buildings and trees, blocks radio signals. Always maintain visual contact with the copter to ensure that the radio signal is unobstructed.
-
Page 12: Quickstart: 1-Click Map
Quickstart: 1-Click Map Before you start, make sure: - You have one fully charged battery. (See page 4.) - You’ve attached the propellers to IRIS-M. (See page 6.) - The camera is powered and the WiFi is turned on. (See page 7.) - You’ve created a DroneDeploy account, logged in, and familiarized yourself with the DroneDeploy app. - Page 13 Set Camera to Face Down Do not touch the gimbal while it is starting up. Ensure that the camera is powered on with the WiFi enabled. (See page 7 for instructions.) Turn the tilt knob fully to the left to tilt the camera straight down. Start Mission When powered, IRIS-M and DroneDeploy CoPilot automatically connect to your...
-
Page 14: Learning More About Dronedeploy
See Map Monitor the mission using the DroneDeploy dashboard. As the IRIS-M captures images, DroneDeploy overlays the map onto the satellite image as it processes. After landing, press and hold the safety button until it displays blinking red before picking up IRIS-M. Mission Imagery View When the map is completely processed, select the Map button next to your flight from the main dashboard to view the completed map. -
Page 15: Manual Flight
Manual Flight left stick: right stick: throttle pitch & yaw & roll Left Stick Left Stick Maneuver IRIS-M in flight using the controller sticks. Left Stick Throttle Move the left stick up and down to control altitude. left stick To take off and to Left Stick gain altitude, raise the throttle stick slightly... - Page 16 ver + Land ver + Land wer just slightly wer just slightly hover Move the left stick horizontally to rotate IRIS-M and change orientation. Left Left Stick hover Left Stick Left For a slow rotation, move the stick slightly away from the center in either direction.
- Page 17 Pitch and Roll The right stick allows you to control IRIS’ position in the air. Move the right stick to tell IRIS-M to move in that direction: forward (toward the blue arms), back (toward the black arms), left (toward the left arms), or right (towards the right arms).
-
Page 18: Modes
Modes F u l l A u t o n o m y mode switch IRIS-M includes three flight modes: manual flight (STD-altitude hold), hover mode (LTR-loiter), and mission flight (AUTO). Use the switch on the R e t u r n t o L a u n c h right side of the controller to select a flight mode. - Page 19 Auto mode AUTO Altitude Hold fly a mission Select auto mode to fly an autonomous mission. IRIS-M will automatically fly the series of waypoints saved to the autopilot. Select AUTO mode to fly a DroneDeploy mapping mission. Loiter Full Autonomy Gimbal control TILT tilt the camera up and down...
-
Page 20: Return To Launch
Return to Launch (RTL) Altitude Hold land at the launch point Set the RTL switch to ON to end your flight and return IRIS-M to the launch point automatically. Ensure that the RTL switch is set to OFF before takeoff. Loiter hover 5 seconds 15 meters... -
Page 21: Manual Flight Procedure
Manual Flight Procedure Select an open area for flying, away from people and buildings, and remember to bring the Flight Checklist and a fully charged battery. Determine the boundaries of your flying area before takeoff, and select a level, unobstructed space as a launch point. Follow these preflight and postflight steps in the order shown here and on the Flight Checklist every time you fly. - Page 22 Connect the radio to your ground station, and select Connect. A ground station (recommended) lets you view live data in flight and unlock IRIS-M’s advanced autonomous features. To download a ground station app for you laptop or Android device, visit 3dr.com/irism.
- Page 23 Pre-arm safety check failure. Connect and review the GPS failsafe to a ground station and see the trouble- information on page 9. shooting guide at 3dr.com/irism. Arm motors. To activate the motors, IRIS-M will spin its propellers when armed. Ensure that the...
- Page 24 Flight Left Stick Take off and gain altitude by raising the left stick slightly above center. Set the left stick to Rotate counter- center to maintain clockwise and the current altitude. clockwise by moving the left L e f t S t i c k stick left and right.
- Page 25 Postflight Disarm Press safety motors. button. Press the safety After landing, hold button until it the left stick down- displays blinking left until the motors red to make IRIS- stop spinning. M safe to handle. Disconnect Power off battery. controller. Your first flight is now complete! Follow the steps shown here and on the Flight Checklist every time...
-
Page 26: Camera Setup
Camera Setup Attach the GoPro HERO to the gimbal. ® Remove the two screws securing the blue face plate to the gimbal, and remove the plate. remove remove face plate Slide the camera into the housing with the lens nearest the top-right corner. - Page 27 Specifications Autopilot: Pixhawk v2.4.5 Firmware: ArduCopter 3.2 GPS: 3DR uBlox GPS with Compass (LEA-6H module, 5 Hz update) Telemetry radio: 3DR Radio Telemetry v2 (915 mHz or 433 mHz) Motors: 950 kV Frame type: Propellers: 9.5 x 4.5 T-Motor multirotor self-tightening counterclockwise (2) 9.5 x 4.5 T-Motor multirotor self-tightening clockwise (2)
- Page 28 Learn More Visit 3dr.com/irism to learn about: 3PV™ Follow Me and Tower » Replacing the arms and motors » Updating firmware » LED meanings and tones » Calibrations » Visit copter.ardupilot.com to learn about: Additional flight modes » Configuring parameters, including yaw behavior during »...
Need help?
Do you have a question about the IRIS-M Pro and is the answer not in the manual?
Questions and answers