Advertisement
Table of Contents
- 1 Important Safety Instructions
- 2 Table of Contents
- 3 Using the Ninja
- 4 Assembly and Use for the 72 Oz. Pitcher
- 5 Assembly and Use for the Nutri Ninja ® Cup
- 6 Assembly and Use for the 64 Oz. Bowl
- 7 Assembly and Use for the Disc Attachments
- 8 Speed Setting & Uses
- 9 Care & Maintenance
- 10 Troubleshooting Guide
- 11 Replacement Parts
- 12 Warranty & Registration
- Download this manual
Advertisement
Table of Contents

Related Manuals for Ninja BL773CO Mega Kitchen System


Summary of Contents for Ninja BL773CO Mega Kitchen System
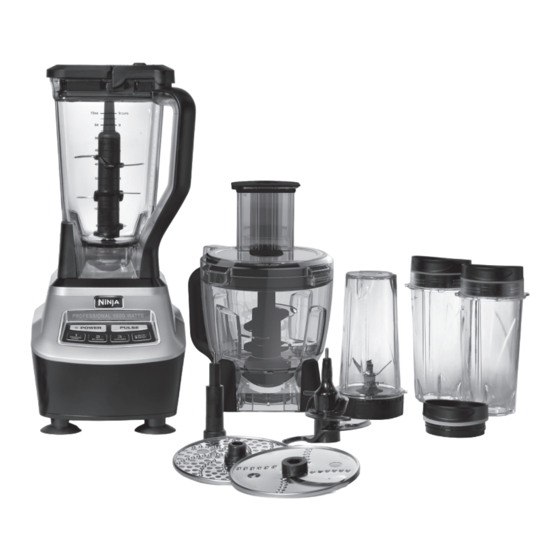
- Page 1 ® Mega Kitchen System ® BL773CO OWNER’S GUIDE www.ninjakitchen.com 1-877-646-5288...
-
Page 2: Important Safety Instructions
7. DO NOT let the power cord hang over the edge of table or counter or touch hot surfaces such as the stove. 8. Always use appliance on a dry, level surface. Euro-Pro, Mega Kitchen System, Nutri Ninja, and Ninja are trademarks of Euro-Pro Operating LLC. TOLL FREE: 1-877-646-5288... - Page 3 Power: 1500 Watts 20. CAUTION: DO NOT PROCESS HOT FOODS OR Pitcher Capacity: 72 oz. (9 cups, 2.1 L) HOT LIQUIDS Bowl Capacity: 64 oz. (8 cups, 1.9 L) Nutri Ninja Capacity: 16 oz. (2 cups, 470 mL) ® www.ninjakitchen.com...
-
Page 4: Table Of Contents
® purchasing Assembly and Use for the 72 oz. Pitcher ................5 the Ninja ® Assembly and Use for the Nutri Ninja Cup .................7 ® Mega Kitchen Assembly and Use for the 64 oz. Bowl ................8 Assembly and Use for the Disc Attachments ..............10 System ®... -
Page 5: Using The Ninja
Remove all packaging material and labels from the appliance. Wash the lids, pitcher, bowl, Nutri Ninja cups and ® blade assemblies in warm, soapy water with a soft cloth. Use caution when washing the blade assemblies as the blades are very sharp. -
Page 6: Assembly And Use For The 72 Oz. Pitcher
Assembly and Use for the 72 oz. Pitcher Assembly Fig. 3a Fig. 1 Fig. 4 Fig. 5 Fig. 3b Fig. 2 NOTE: The Stacked Blade Assembly will fit loosely on the CAUTION: Blade assemblies are sharp, not locked drive gear. in place and removable, handle with care. - Page 7 WARNING: Never leave the appliance unattended while in use. REMOVAL Fig. 6 Fig. 7 Fig. 8 Select the speed that best suits your needs. (Fig. 6) 12 Depending on the consistency of the contents in the container, open the pour spout cap and use the spout NOTE: Pulse ingredients for even chopping by pressing to empty liquid contents.
-
Page 8: Assembly And Use For The Nutri Ninja ® Cup
For best results, use short “PULSES”... Practice makes perfect!! Once you have reached your desired consistency, Use caution when handling the blade turn the power button off. Turn the Nutri Ninja ® assemblies. counterclockwise and pull straight up to remove. -
Page 9: Assembly And Use For The 64 Oz. Bowl
Assembly and Use for the 64 oz. Bowl WARNING: Never leave the appliance unattended while in use. ASSEMBLY Fig. 1 Fig. 3a Fig. 4 Fig. 2 Fig. 3b Fig. 5 Add the ingredients to the bowl, making sure that they Use caution when handling the blade assemblies. - Page 10 Assembly and Use for the 64 oz. Bowl - cont. REMOVAL Fig. 2 Fig. 4 Fig. 1 Fig. 3 USING THE CHOPPING BLADE ASSEMBLY USING THE DOUGH BLADE WARNING: Never leave the appliance unattended while Holding the chopping blade assembly by the shaft, in use.
-
Page 11: Assembly And Use For The Disc Attachments
Assembly and Use for the Disc Attachments Use caution when handling the discs as the blades are very sharp. NOTE: The feed chute lid features a two part pusher to guide food through the chute. Use the full pusher for larger items such as cucumbers. Twist and pull to remove the smaller pusher and use the narrow chute for smaller items such as carrots. -
Page 12: Speed Setting & Uses
Speed Setting & Uses SPEED FUNCTION CONTAINER BLADE ASSEMBLY TYPE OF FOOD BUTTON Nutrient & Vitamin Fruits Nutri Ninja Nutri Ninja Blade Nutri Ninja ® ® ® Extraction Vegetables Onion Mincing Nutri Ninja Nutri Ninja Blade Nutri Ninja Garlic ®... -
Page 13: Care & Maintenance
CAUTION: DO NOT immerse the motor base into water the bowl with the Chopping Blade assembly inside and or any other liquid. the lid on top. Store the Nutri Ninja cup with the blade ® NOTE: All jars, lids, discs and blades are dishwasher assembly attached to the cup and all other attachments safe. -
Page 14: Troubleshooting Guide
® cup assembled to the motor base. This function was designed specifically not work. for the Nutri Ninja Cups to operate at the ideal speed. Replacement Parts ORDERING REPLACEMENT PARTS To order additional parts and attachments, please visit our website: www.ninjakitchen.com or feel free to contact customer service: 1-877-646-5288. -
Page 15: Warranty & Registration
We recommend you insure the package (as damage in shipping is not covered by your Limited Warranty). Mark the outside of your package “ATTENTION CUSTOMER SERVICE”. PRODUCT REGISTRATION Please visit www.ninjakitchen.com or call 1-877-646-5288 to register your new Ninja product within ten ®... - Page 16 Ville St-Laurent, QC H4S 1A7 1-877-646-5288 www.ninjakitchen.com Euro-Pro, Mega Kitchen System, Nutri Ninja, and Ninja are trademarks of Euro-Pro Operating LLC. Illustrations may differ from actual product. We are constantly striving to improve our products, therefore the specifications contained herein are subject to change without notice.
Need help?
Do you have a question about the BL773CO Mega Kitchen System and is the answer not in the manual?
Questions and answers