Table of Contents
Advertisement
Advertisement
Table of Contents

Related Manuals for La Crosse Technology WS-7394U-IT


Summary of Contents for La Crosse Technology WS-7394U-IT
- Page 1 WS-7394U-IT Wireless 915 MHz Wireless Weather Station Instruction Manual...
-
Page 2: Table Of Contents
TABLE OF CONTENTS Topic Inventory of Contents/ Additional Equipment About WWVB Quick Set Up Guide Detailed Set Up Guide Battery Installation Start Up Sequence Explanation of LCD Information Function Key Layout Program Mode Overview of Programming Sequence LCD Contrast Setting Time Zone Setting DST ON/OFF Setting Radio-controlled Time ON/OFF Setting... -
Page 3: Inventory Of Contents/ Additional Equipment
This product offers: INVENTORY OF CONTENTS 1. WS-7394U-IT— Wireless Weather Station (Figure 1) 2. TX29U-IT—remote temperature sensor (figure 2) 3. Instruction manual and warranty card ADDITIONAL EQUIPMENT (not included) 1. Five fresh AA 1.5V alkaline batteries. 2. One wall-mounting screw (optional) ABOUT WWVB (radio-controlled time) The NIST (National Institute of Standards and Technology—Time and... -
Page 4: Quick Set Up Guide
antenna in the Wireless Weather Station. However, due to the nature of the Earth’s Ionosphere, reception is very limited during daylight hours. The Wireless Weather Station will search for a signal every night when reception is best. The WWVB radio station derives its signal from the NIST Atomic clock in Boulder, Colorado. -
Page 5: Detailed Set Up Guide
DETAILED SET-UP GUIDE BATTERY INSTALLATION (When one temperature sensor is being used) First, insert the batteries to the temperature sensor (see “A. Remote Temperature Sensor” below). Within 2 minutes of powering up the sensor, insert the batteries to the Weather Station (see “B. -
Page 6: Start Up Sequence
Sensor signal reception icon* * When the signal is successfully received by the Weather Station, the icon will be switched on. (If not successful, the icon will not be shown in LCD) So the user can easily see whether the last reception was successful (icon on) or not (icon off). -
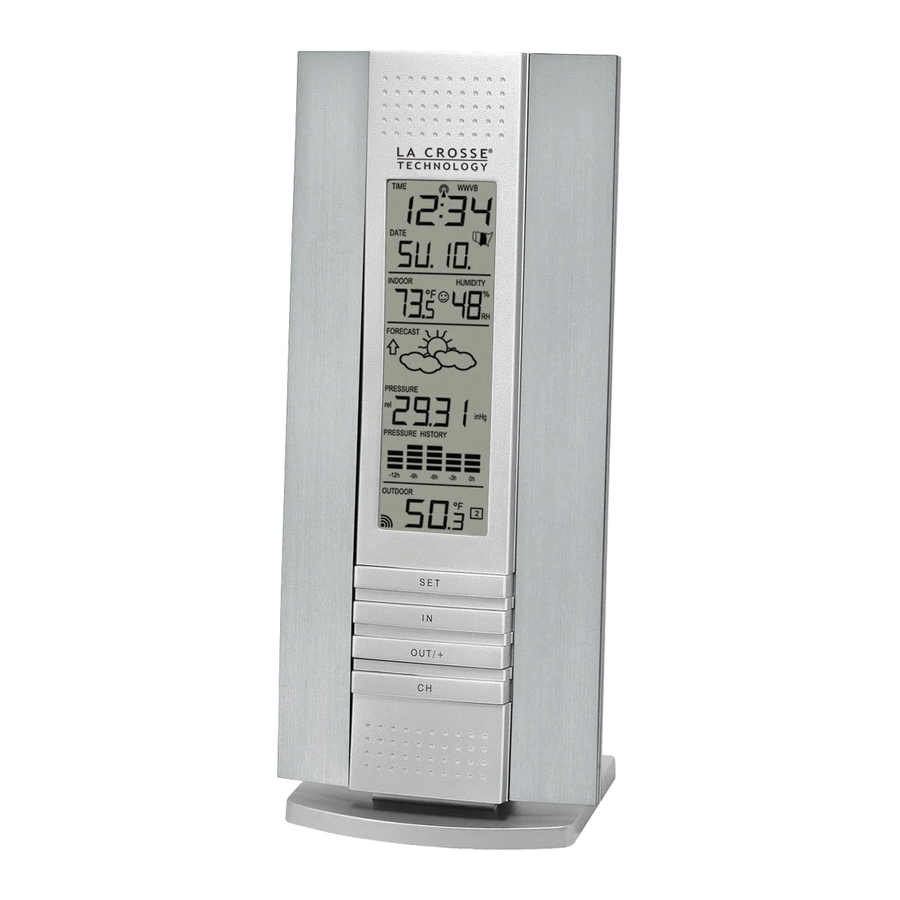
Page 7: Explanation Of Lcd Information
4. The time and date can be manually set. Once the signal is captured, it will override any time and date set to the time zone selected. Once the time and date are set, the Wireless Weather Station will conduct a search every night at midnight and correct to the accurate time and date (Daylight Saving Time is automatic). -
Page 8: Function Key Layout
B. There are many different modes the indoor weather station can be set to. The LCD shown is the normal operating mode, and your actual data shown will be different based on your local settings and conditions. IV. Function Key Layout A. -
Page 9: Time Zone Setting
4. Press and release the “SET” button to confirm the LCD contrast setting and continue to the Time Zone setting. C. Time Zone Setting 1. Press and hold the “SET” button for five seconds. 2. “lcd” will appear at the top of the display and a number will flash next to 3. -
Page 10: 12/24-Hour Time Mode Setting
4. “RCC” will appear above the indoor temperature/humidity display and “ON” or “OFF” will flash above that. 5. Press and release the “OUT/+” button to select radio-controlled time ON/OFF setting. 6. Press and release the “SET” button to confirm the radio-controlled time ON/OFF setting and continue to the 12/24-hour Time Mode setting. -
Page 11: Setting The Time/Date Manually
H. Setting The Minutes Manually 1. Press and hold the “SET” button for five seconds. 2. “lcd” will appear at the top of the display and a number will flash next to it. 3. Press and release the “SET” button six more times to advance to the Manual Minutes setting. -
Page 12: Temperature Measuring Units (ºf/ºc)
3. Press and release the “SET” button nine more times to advance to the Manual Date setting. 4. The date will begin to flash below the time display. 5. Press and release the “OUT/+” button to select the desired date. 6. -
Page 13: Forecast Sensitivity Setting
3. Press and release the “SET” button twelve more times to advance to the Relative Pressure setting. 4. The barometric air pressure will flash in the middle of the display, just below the forecast icon 5. Press and release the “OUT/+” or “IN” button to select the desired relative air pressure value. -
Page 14: Features And Operation
FEATURES AND OPERATIONS A. Minimum and Maximum Temperature and Humidity 1. Indoor Minimum and Maximum Temperature and Humidity The indoor weather station automatically stores the minimum and maximum indoor temperature and humidity. The minimum and maximum values are updated automatically when a new minimum or maximum is recorded, or until manually reset. -
Page 15: Multiple Remote Temperature/Humidity Sensors
The WS-7394U-IT is able to receive signals from 2 additional temperature sensors. The following are instructions for the set-up of temperature sensor units with the WS-7394U-IT. These extra sensors can be purchased through the same dealer as this unit. Remove all the batteries from the receiver and sensor(s) and wait 60 seconds. -
Page 16: Comfort Icon
b. The minimum and maximum temperature of the additional remote sensor can be displayed by pressing the “OUT/+” button. To reset the minimum and maximum temperature readings press and hold the “SET” button for 3 seconds and that temperature record for that remote sensor will be reset only. Each remote sensor will have its own minimum and maximum values stored. -
Page 17: Weather Tendency Arrows
2. The icons change in order, from “sunny” to “sun with clouds” to “clouds with rain” or the reverse. 3. It will not change from “sunny” directly to “clouds with rain”, although it is possible for the change to occur quickly. 4. -
Page 18: Mounting
Note: For accurate barometric pressure trends, the Weather Station should operate at the same altitude for example, it should not be moved from the ground to the second floor of the house. Should the unit be moved to a new location, discard readings for the next 48-60 hours. -
Page 19: Wall Mounting
Note: Mounting with adhesive tape is not recommended as a permanent mounting solution. Only use the adhesive tape during set-up process. B. Mounting the WS-7394U-IT Wireless Weather Station The Wireless Weather Station can be mounted in two ways: • with the table stand •... -
Page 20: Specifications
D. Immediately remove all low powered batteries to avoid leakage and damage. E. Opening the casings invalidates the warranty. Do not try to repair the unit. Contact La Crosse Technology for repairs. TROUBLESHOOTING Problem: The LCD is faint. Solution: 1) Set the LCD contrast to a higher level. -
Page 21: Troubleshooting Guide
La Crosse Technology, Ltd or La Crosse Technology, Ltd’s authorized service center. La Crosse Technology, Ltd will repair or replace this product, at our option and at no charge as stipulated herein, with new or reconditioned parts or products if found to be defective during the limited warranty period specified above. - Page 22 USA address only. Your La Crosse Technology, Ltd warranty covers all defects in material and workmanship with the following specified exceptions: (1) damage caused by accident, unreasonable use or neglect (including the lack of reasonable and necessary maintenance);...
- Page 23 FCC ID: OMOTX29U (sensor) RF Exposure mobile: The internal / external antennas used for this mobile sensor must provide a separation distance of at least 20 cm (8 inches) from all persons and must not be co-located or operating in conjunction with any other antenna or sensor." Statement according to FCC part 15.19: This device complies with Part 15 of the FCC Rules.
Need help?
Do you have a question about the WS-7394U-IT and is the answer not in the manual?
Questions and answers