Table of Contents
Advertisement
Available languages
Available languages
FCC ID: OMOTX29U (transmitter)
RF Exposure mobile:
The internal / external antennas used for this mobile transmitter must
provide a separation distance of at least 20 cm (8 inches) from all
persons and must not be co-located or operating in conjunction with
any other antenna or transmitter."
Statement according to FCC part 15.19:
This device complies with Part 15 of the FCC Rules. Operation is sub-
ject to the following two conditions: (1) this device may not cause harmful
interference, and (2) this device must accept any interference received,
including interference that may cause undesired operation.
Statement according to FCC part 15.21:
Modifications not expressly approved by this company could void the
user's authority to operate the equipment.
Statement according to FCC part 15.105:
NOTE: This equipment has been tested and found to comply with the
limits for a Class B digital device, pursuant to Part 15 of the FCC Rules.
These limits are designed to provide reasonable protection against
harmful interference in a residential installation. This equipment
generates, uses and can radiate radio frequency energy and, if not
installed and used in accordance with the instructions, may cause
harmful interference to radio communications.
However, there is no guarantee that interference will not occur in a
particular installation. If this equipment does cause harmful interfer-
ence to radio or television reception, which can be determined by turn-
ing the equipment off and on, the user is encouraged to try to correct
the interference by one or more of the following measures:
•
Reorient or relocate the receiving antenna.
•
Increase the separation between the equipment and receiver.
•
Connect the equipment into an outlet on a circuit different from that
to which the receiver is connected.
Consult the dealer or an experienced radio/TV technician for help
WS-7394U-IT
Wireless 915 MHz
Wireless Weather Station
Instruction Manual
Advertisement
Chapters
Table of Contents

Related Manuals for La Crosse Technology WS-7394U-IT


Summary of Contents for La Crosse Technology WS-7394U-IT
- Page 1 WS-7394U-IT Wireless 915 MHz Wireless Weather Station Instruction Manual FCC ID: OMOTX29U (transmitter) RF Exposure mobile: The internal / external antennas used for this mobile transmitter must provide a separation distance of at least 20 cm (8 inches) from all persons and must not be co-located or operating in conjunction with any other antenna or transmitter.”...
- Page 2 Contents Language Page English French Spanish...
-
Page 3: Table Of Contents
Battery Installation in real-time! Start Up Sequence INVENTORY OF CONTENTS Explanation of LCD Information 1. WS-7394U-IT- Wireless Weather Station (Figure 1) Function Key Layout 2. TX29U-IT-remote temperature sensor (figure 2) Program Mode 3. Instruction manual and warranty card Overview of Programming Sequence... -
Page 4: Quick Set Up Guide
tion is very limited during daylight hours. The Wireless Weather Sta- This allowance is typically enough for a frame wall with non-metallic tion will search for a signal every night when reception is best. The siding; however certain materials can reduce range even further. Metal WWVB radio station derives its signal from the NIST Atomic clock in siding, stucco, and some types of glass can reduce signal range by as Boulder, Colorado. -
Page 5: Start Up Sequence
3. Observing the correct polarity install 2 AA batteries. The batteries II. Start Up Sequence will fit tightly (to avoid start-up problems make sure they do not spring free). A. Initial Start 4. Replace the battery cover by sliding upwards. Be sure battery cover 1. -
Page 6: Explanation Of Lcd Information
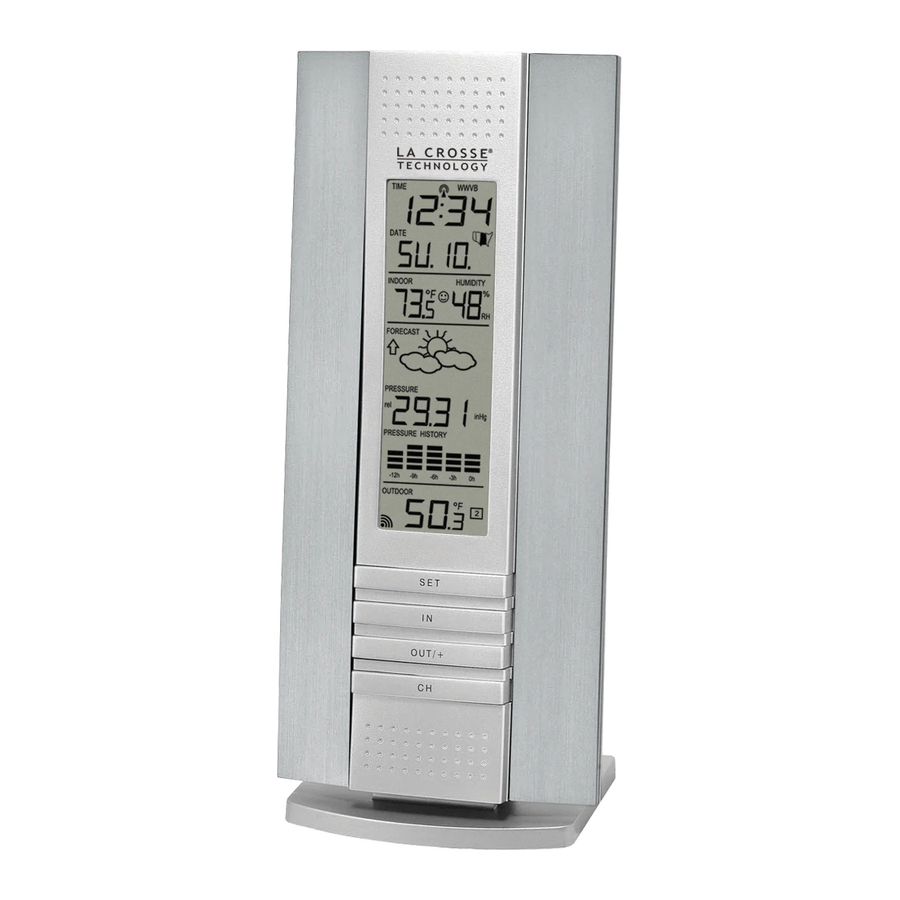
III. Explanation of LCD Information IV. Function Key Layout A. The below picture highlights the LCD features. A. The below picture shows the four function keys used in program- ming and operation of your indoor weather station Radio-controlled WWVB Reception time Indicator Date Display... -
Page 7: Time Zone Setting
C. Time Zone Setting setting and continue to the radio-controlled Time ON/OFF setting. E. Radio-Controlled Time ON/OFF Setting 1. Press and hold the “SET” button for five seconds. 2. “lcd” will appear at the top of the display and a number will flash next to it. -
Page 8: Setting The Time/Date Manually
Note: In 12h mode “PM” will appear to the left of the time during PM hours. If the time is not within the PM hours nothing will be displayed. Be sure to set the time to the correct AM/PM time to ensure automatic reception. -
Page 9: Temperature Measuring Units (˚F/˚C)
L. Temperature Measuring Units Selection (˚F or ˚C) 1. Press and hold the “SET” button for five seconds. 2. “lcd” will appear at the top of the display and a number will flash next to it. 3. Press and release the “SET” button twelve more times to advance 3. -
Page 10: Features And Operation
B. Multiple Remote Temperature Sensors A. Minimum and Maximum Temperature and Humidity The WS-7394U-IT is able to receive signals from 2 additional tem- perature sensors. The following are instructions for the set-up of tem- 1. Indoor Minimum and Maximum Temperature and Humidity perature sensor units with the WS-7394U-IT. -
Page 11: Weather Forecast And Pressure Trend Indicators
7. Insert the batteries to the third sensor as soon as the “channel 2” 1. Weather Icons icon and outdoor data are displayed on the Weather Station. Then There are 3 possible weather icons that will be displayed at various within 2 minutes, the channel 3 outdoor data from the third sensor times in the center of the indoor weather station. -
Page 12: Air Pressure History Bar Chart
H. Air Pressure History Bar Chart 1. MOUNTING WITH SCREWS 1. The bar chart indicates the air pressure history trend over the last 12 hours in 5 steps, 0h, -3h, -6h, -9h, and -12h. 2. The “0h” represents the current full hour air pressure recording. 3. -
Page 13: Maintenance And Care
5. The indoor weather station and remote sensors are calibrated at b. Fix a screw (not included) into the desired wall, leaving approxi- the factory. If there is a consistent problem, please call La Crosse mately 3/16 of an inch (5mm) extended from the wall. -
Page 14: Specifications
(“OFL” displayed if outside this range) ranty period specified above. All replaced parts and products become Relative humidity range the property of La Crosse Technology, Ltd and must be returned to La Indoor 1% to 99% with 1% resolution Crosse Technology, Ltd. Replacement parts and products assume (Display “- -”... - Page 15 All trademarks and patents are acknowledged. LA CROSSE TECHNOLOGY, LTD WILL NOT ASSUME LIABILITY FOR INCIDENTAL, CONSEQUENTIAL, PUNITIVE, OR OTHER SIMI- LAR DAMAGES ASSOCIATED WITH THE OPERATION OR MAL- FUNCTION OF THIS PRODUCT. THIS PRODUCT IS NOT TO BE USED FOR MEDICAL PURPOSES OR FOR PUBLIC INFORMATION.
- Page 16 Séquence de mise en route Explication des informations affichées à l’écran LCD INVENTAIRE Disposition des touches de fonction 1. La station météo WS-7394U-IT (Figure 1) Mode Programmation 2. Le capteur de température distant TX29D-IT (Figure 2) Récapitulatif de la séquence de programmation 3.
-
Page 17: Guide De Paramétrage Rapide
GUIDE DE PARAMÉTRAGE DETAILLE tion météo. Cependant, cette réception est très restreinte pendant la journée, à cause des effets de l’ionosphère terrienne. Chaque nuit, lorsque les conditions de réception sont optimales, la station météo I. INSTALLATION DES PILES (Quand on utilise un capteur de recherchera le signal. -
Page 18: Séquence De Mise En Route
B. Station météo intérieure 2. Toutes les informations s’affichent alors en mode normal, l’heure 1. Retirez le couvercle du compartiment à piles (le couvercle porte un par défaut étant “12:00” et la date par défaut “SA.1” (l’année est texte en blanc). 2006). -
Page 19: Explication Des Informations Affichées À L'écran Lcd
III. Explication des informations affichées à l’écran LCD IV. Disposition des touches de fonction A. Le schéma ci-dessous présente les fonctionnalités de l’écran LCD. A. Le schéma ci-dessous présente les quatre touches de fonction Indicateur de utilisées pour la programmation et le fonctionnement de votre sta- réception WWVB tion météo intérieure Heure... -
Page 20: Activation/Désactivation De L'heure Radiocommandée
3. Appuyez sur la touche “OUT/+” pour sélectionner le niveau de 6. Appuyez sur la touche “SET” pour confirmer l’activation ou la contraste désiré. désactivation de l’heure d’été et passer en mode activation/ 4. Appuyez sur la touche “SET” pour confirmer le niveau du contraste désactivation de l’heure radiocommandée. -
Page 21: Réglage Manuel De L'heure/Date
gauche de l’heure. En dehors de ces heures, rien n’est affiché. Prenez 1. Appuyez sur la touche “SET” pendant cinq secondes. soin de sélectionner l’heure correspondante, AM ou PM, afin d’assurer 2. “lcd” s’affiche en haut de l’écran, accompagné d’un chiffre clignotant. la réception automatique. -
Page 22: Unités De Mesure De La Pression Atmosphérique (Inhg/Hpa)
1. Appuyez sur la touche “SET” pendant cinq secondes. 1. Appuyez sur la touche “SET” pendant cinq secondes. 2. “lcd” s’affiche en haut de l’écran, accompagné d’un chiffre clignotant. 2. “lcd” s’affiche en haut de l’écran, accompagné d’un chiffre clignotant. 3. -
Page 23: Fonctionnalités Et Fonctionnement
B. Capteurs de température distants multiples minimum et maximum de température et d’humidité intérieures. Les Le WS-7394U-IT peut recevoir les signaux de 2 capteurs capteur de valeurs minimums et maximums sont automatiquement mises à jour température supplémentaires. Suivre les instructions suivantes pour lorsqu’un nouveau minimum ou maximum est relevé... -
Page 24: Prévisions Météo Et Indicateurs De Tendance Météo
4. La flèche montante indique que la pression monte et que le temps estimée à environ 75%. La station météo WS-7394U-IT calcule une devrait s’améliorer ou rester beau. moyenne des relevés de pression atmosphérique antérieurs et fournit 5. -
Page 25: Historique De La Pression Atmosphérique
2. La pression atmosphérique relative est étalonnée par l’utilisateur A. Fixation du capteur de température distant au moyen du mode de programmation. 3. Pour paramétrer cette fonctionnalité, veuillez vous référer aux in- Le capteur distant peut être fixé de deux façons : structions à... -
Page 26: Entretien Et Soin
à l’aide d’une vis (non-fournie) fuite et de dommages. E. L’ouverture des boîtiers entraîne la nullité de la garantie. Ne tentez pas de réparer l’appareil. Pour toute réparation, contactez La Crosse Technology. DÉPISTAGE DES PANNES Problème : L’écran LCD est faible Solution : 1. -
Page 27: Caractéristiques Techniques
SAV agréé par La Crosse Technology, Ltd. Le ticket de caisse d’origine Plage de mesure de la température doit être présenté sur demande à La Crosse Technology, Ltd ou à son Intérieur -9,9˚C à 59,9˚C à une résolution de 0,1˚C centre de SAV comme preuve d’achat. - Page 28 Votre garantie La Crosse Technology, Ltd couvre tous les défauts de e-mail : matières et de fabrication exceptés : (1) les dégâts causés par les support@lacrossetechnology.com accidents, une utilisation déraisonnable ou négligence (y compris un (interventions sous garantie) manque d’entretien raisonnable et nécessaire) ; (2) les dégâts survenant pendant le transport (toute réclamation doit être faite au...
- Page 29 Secuencia de los pasos para la Puesta en Funcionamiento INVENTARIO DEL CONTENIDO DEL PAQUETE Explicación de la Información de la pantalla LCD 1. La estación meteorológica WS-7394U-IT (Figura 1) Distribución de las Teclas de Funcionamiento 2. Un sensor de temperatura remoto TX29U-IT (Figura 2) Modo de Programación...
-
Page 30: Guía Rápida Para La Puesta En Funcionamiento
GUIA DETALLADA PARA LA PUESTA EN las horas diurnas debido a la naturaleza de la Ionosfera de la Tierra. FUNCIONAMIENTO La Estación Meteorológica buscará la señal durante las noches cuando se dan las mejores condiciones para recibir una buena recepción. La estación de radio WWVB deriva su señal de la estación del reloj Atómico I. - Page 31 B. Estación Meteorológica en Interiores II. Pasos de la Secuencia de Programación 1. Retire la tapa de las pilas (la tapa tiene un letrero blanco). 2. Observe la polaridad correcta e instale dos pilas alcalinas del tipo A. Primera Puesta en funcionamiento 1.
-
Page 32: Explicación De La Información De La Pantalla Lcd
5. Una vez que la hora y fecha sean ajustadas correctamente, la B. La Estación puede ser ajustada de varias maneras diferentes. La Estación hará un rastreo de la señal todas las noches a media pantalla es mostrada en el modo de visualización normal, pero los noche y en caso necesario corregirá... -
Page 33: Ajuste De Las Zonas Horarias
relampagueará a su lado. 3. Pulse la tecla “SET” dos veces más para pasar al modo de ajuste de la hora de verano DST ON/OFF (Encendido/Apagado).. 4. El icono “DST” aparecerá sobre la lectura de la temperatura/ humedad en interiores y la palabra “ON” o “OFF” titilará sobre ‘DST’. 5. -
Page 34: Ajuste Del Formato De La Hora En Las 12/24 Horas
1. Pulse la tecla “SET” durante cinco segundos. 3. Pulse la tecla “SET” seis veces más para pasar al modo de ajuste 2. El icono “lcd” aparecerá en la parte alta de la pantalla y un número manual de los minutos. relampagueará... -
Page 35: Unidad De Medición De La Presión Atmosférica (Inhg/Hpa)
K. Ajuste Manual de la Fecha 3. Presione la tecla “SET” once veces más para pasar al modo de 1. Presione la tecla SET” durante cinco segundos.. ajuste y/o selección de la unidad de medición de la presión 2. El icono “lcd” aparecerá en la parte alta de la pantalla y un número Atmosférica. -
Page 36: Funciones Y Operación
B. Múltiples Sensores Remotos de la Temperatura a. Desde la forma de visualización normal de la pantalla, pulse la La estación WS-7394U-IT puede recibir la señal de otros dos sensores tecla “IN” una vez para visualizar los datos de la máxima temperatura adicionales de temperatura A continuación le indicamos las... - Page 37 La estación estación, el símbolo “canal 2” y los datos de la temperatura exterior. meteorológica WS-7394U-IT promedia los registros anteriores/previos Luego en 2 minutos se visualizan en la pantalla los datos en de la presión atmosférica para suministrarle un pronóstico exacto, es exteriores del tercer canal y el símbolo del canal se devuelve a “1”...
-
Page 38: Lectura Barométrica De La Presión Atmosférica
1. Iconos del Tiempo F. Lectura Barométrica de la presión Atmosférica a. Hay la posibilidad de ver 3 iconos del tiempo los cuales serán 1. La lectura barométrica de la presión atmosférica actual es visualizados en la mitad de la estación del tiempo en diferentes visualizada directamente por debajo de los iconos de las previsiones momentos. - Page 39 • utilizando la cinta adhesiva B. FIJANDO LA ESTACION METEOROLOGICA EN INTERIORES 1. FIJANDO CON LOS TORNILLOS WS-7394U-IT La Estación meteorológica en Interiores puede ser instalada de dos maneras: • Sobre una mesa con el soporte/stand •...
- Page 40 2. Retire la estación de cualquier aparato eléctrico que pueda causar reparar la unidad. Para las reparaciones contacte directamente a interferencia “La Crosse Technology”. 3. Coloque la estación en una ventana que este en Dirección hacia Colorado. PROBLEMAS Y SOLUCIONES 4.
-
Page 41: Presión Atmosférica
Ltd hasta un centro de servicio autorizado de La Crosse Technology, Actualización de las Lecturas del Transmisor (en el sensor) Ltd. La Crosse Technology, Ltd le pagará los costos de envío de re- Temperatura al aire libre Cada 4 segundos torno al propietario del una dirección de EEUU sólo. - Page 42 Para trabajos de la garantía, asistencia técnica o información, por favor contacte: La Crosse Technology 2809 Losey Blvd. S. La Crosse, WI 54601 Phone: 608.782.1610 Fax: 608.796.1020 e-mail: support@lacrossetechnology.com (Trabajo de la garantía) sales@lacrossetechnology.com...
Need help?
Do you have a question about the WS-7394U-IT and is the answer not in the manual?
Questions and answers