Table of Contents
Advertisement
Advertisement
Table of Contents

Related Manuals for La Crosse Technology WS-7395U


Summary of Contents for La Crosse Technology WS-7395U
- Page 1 WS-7395U Wireless 433 MHz Radio-controlled Weather Station Instruction Manual...
-
Page 2: Table Of Contents
TABLE OF CONTENTS Topic Inventory of Contents/Additional Equipment About WWVB Quick Set-Up Guide Detailed Set-Up Guide Battery installation Program Mode Program Sequence and Default Settings Function Keys Setting the LCD Contrast Setting the Time Zone Daylight Saving Time Setting Radio-controlled Time Setting 12/24-hour Time Setting Setting the Time Setting the Year, Day and Month... -
Page 3: Inventory Of Contents/Additional Equipment
Collins, Colorado, and transmits the exact time and date signal continuously throughout the United States at 60 kHz. The signal can be received up to 2,000 miles away through the internal antenna in the Weather Station. However, due to the nature of the Earth’s Ionosphere, reception is very limited during daylight hours. -
Page 4: Quick Set-Up Guide
If a button is pressed before the indoor weather station receives the signal from the remote temperature/humidity sensor, you will need to follow the battery installation procedure again. To complete the set up of your new wireless weather station after the 15 minutes have passed please follow the steps that follow in the Detailed Set-Up Guide. -
Page 5: Detailed Set-Up Guide
BATTERY INSTALLATION The first step to powering up the weather station is to insert the connector (RJ11) at the end of the wire attached to the wind speed sensor to the remote temperature/humidity sensor. Please ensure when doing this that the connector is inserted with the proper orientation. -
Page 6: Program Mode
PROGRAM MODE Programming Note: If 30 seconds are allowed to pass, or the WIND/SNZ button is pressed during the programming mode, the unit will confirm/set the last information entered—the display will stop flashing and return to normal time-date readings. If you don’t leave the program mode during the programming of sections IV through XI, you can advance to step 4 of the next program setting. -
Page 7: Setting The Time Zone
3. Press and release the ALM/+ button to select the level you desire. 4. Press and release the SET button to confirm and advance to the Time Zone setting. IV. TIME ZONE SETTING 1. Press and hold the SET button for 5 seconds. “LCD”... -
Page 8: 12/24-Hour Time Setting
6:00 am—when there is less atmospheric interference. To keep your time as accurate as possible, the indoor weather station conducts a WWVB search every night between these hours, and overrides any manually set time. The WWVB tower icon (appearing in the TIME LCD) will flash when a signal-search is in progress and a signal is being received, and will remain steady when the signal has been received. -
Page 9: Setting The Year, Day And Month
IX. SETTING THE YEAR, DAY AND MONTH Note: Reception of the WWVB signal will also set the date and day. The reception of the signal will override any programmed date and day. 1. Press and hold the SET button for 5 seconds. 2. -
Page 10: Setting The Forecast Sensitivity
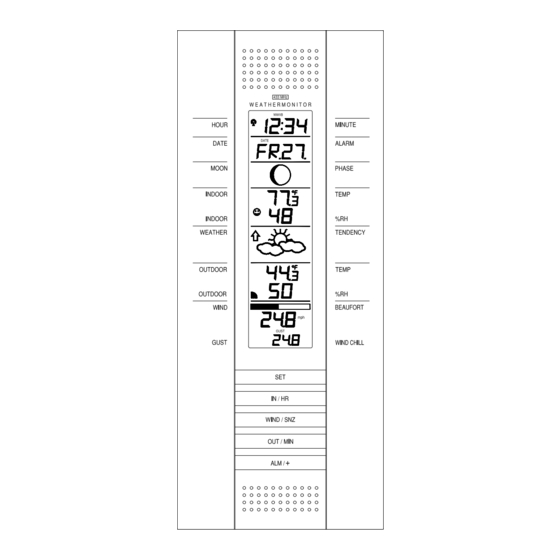
FORECAST LCD. 5. Press and release the ALM/+ button to select the forecast sensitivity 6. Press and release the SET button to confirm the forecast sensitivity and complete the programming. FEATURES OF THE WS-7395U WWVB Tower Icon (indicates time reception) -
Page 11: Weather Forecast Icons And Tendency Arrows
The weather forecasting feature is estimated to be 75% accurate and is for the next 12 to 24 hours. The weather forecast is based solely upon the change of air pressure over time. The WS-7395U averages past air-pressure readings to provide an accurate forecast—creating a necessity to disregard all weather forecasting for 12-24 hours after the unit has been set-up,... - Page 12 2. Press and release the IN/HR button again (once while “MAX” is still displayed, twice otherwise). “MIN” appears to the right of the indoor temperature, indicating that the minimum temperature (along with the humidity measured at that time) and the time and date of occurrence are displayed. 3.
-
Page 13: Moon Phase
MOON PHASE There are 12 moon phases shown on the indoor weather station; the black portion signifies the portion of the moon visible in the sky. Thus, when the moon icon is all black, it is a full moon. VI. VIEWING THE CURRENT, MAXIMUM AND MINUMUM DEW POINT To view the current dew point: 1. -
Page 14: Beaufort Scale
To view the current wind chill: 1. Press and release the WIND/SNZ button. 2. The wind chill value will display at the bottom of the WIND SPEED LCD. To view the maximum and minimum wind/wind chill values: 1. Press and hold the WIND/SNZ button for 3 seconds. 2. - Page 15 <1 8-12 13-18 19-24 25-31 32-38 39-46 47-54 km/hr knots <1 <1 Calm Light Air knots 6-11 Light Breeze knots 12-19 7-10 Gentle Breeze knots 20-28 11-16 Moderate Breeze knots 29-38 17-21 Fresh Breeze knots 39-49 22-27 Strong Breeze knots 50-61 28-33 Moderate or Near Gale...
-
Page 16: Time Alarm
55-63 64-72 IX. TIME ALARM To set the time alarm: 1. Press and hold the ALM/+ button for 5 seconds. 2. The alarm time will begin to flash in the DATE LCD. 3. Press and release the IN/HR button to adjust the hour. Note: When in the 12-hour mode and setting an alarm for a time between noon and midnight, “PM”... - Page 17 Note: Before permanently mounting ensure that the indoor weather station is able to receive WWVB signals from the desired location. Also, extreme and sudden changes in temperature will decrease the accuracy of the indoor weather station, and changes in elevation will result with inaccurate weather forecasting for the next 12 to 24 hours. These changes will require a 12 to 24 hour wait before obtaining reliable data.
- Page 18 1) Fix a screw (not included) into the desired wall, leaving approximately 3/16 of an inch (5mm) extended from the wall. 2) Place the indoor weather station onto the screw using the hanging hole on the backside. 3) Gently pull the indoor weather station down to lock the screw into place.
-
Page 19: Troubleshooting
Problem: No reception of WWVB time signal. Solution: 1) Wait overnight for signal. 2) Be sure indoor weather station is at least 6 feet from any electrical devices, such as televisions, computers, or other radio- controlled clocks. 3) Remove batteries for five minutes, reinsert and leave the unit alone overnight without pressing buttons. -
Page 20: Specifications
Wind speed checking interval: Average of 128 seconds with highest gust Outdoor temperature, humidity Every 128 seconds and wind speed reception (indoor weather station): Transmission range: 80 feet (in open space) Power Supply: Indoor weather station: 3 x AA, IEC LR6, 1.5V Remote temperature/humidity 2 x AA, IEC LR3, 1.5V... -
Page 21: Warranty Information
La Crosse Technology provides a 1-year warranty on this weather station. Contact La Crosse Technology immediately upon discovery of any defects covered by this warranty. Before sending the Weather Station in for repairs, contact La Crosse Technology. The Weather Station will be repaired or replaced with the same or similar model. - Page 22 All trademarks and patents are acknowledged.
Need help?
Do you have a question about the WS-7395U and is the answer not in the manual?
Questions and answers