Table of Contents
Advertisement
Advertisement
Table of Contents

Related Manuals for La Crosse Technology WS-7390TWC


Summary of Contents for La Crosse Technology WS-7390TWC
- Page 1 WS-7390TWC Wireless 433 MHz Radio-controlled Weather Station Instruction Manual...
-
Page 2: Table Of Contents
Topic Inventory of Contents/Additional Equipment About WWVB Quick Set-Up Guide Detailed Set-Up Guide Battery Installation Program Mode Time and Date Function Keys 12/24 hour Time Setting Time Setting Time Zone Setting Daylight Saving Time (DST) Setting Setting Day, Date, and Year Selecting °F or °C Setting the LCD Contrast Features... -
Page 3: Inventory Of Contents/Additional Equipment
INVENTORY OF CONTENTS 1. The indoor weather station 2. Remote temperature sensor (model TX4U) 3. Instruction manual and warranty card ADDITIONAL EQUIPMENT (not included) 1. Four fresh AA 1.5V alkaline batteries 2. Phillips screwdriver (for mounting) -
Page 4: About Wwvb
ABOUT WWVB The NIST (National Institute of Standards and Technology—Time and Frequency Division) radio station, WWVB, is located in Ft. Collins, Colorado and transmits the exact time signal continuously throughout the United States at 60 kHz. The signal can be received up to 2,000 miles away through the internal antenna in the indoor weather station. -
Page 5: Quick Set-Up Guide
Hint: Use good quality Alkaline Batteries and avoid rechargeable batteries. 1. Have the indoor weather station and remote thermo/hygro sensor 3 to 5 apart. 2. Batteries should be out of both units for 10 minutes. 3. Place the batteries into the remote thermo/hygro sensor first then into the indoor weather station. -
Page 6: Battery Installation
after the 10 minutes have passed please follow the steps in the Detailed Set Up Guide. Note: The remote thermo/hygro sensor transmits a signal every 3 minutes; after the batteries have been installed, the indoor weather station will search for the signal for a duration of 5 minutes. If there is no temperature reading in the OUTDOOR LCD after 5 minutes, make sure the units are within range of each other, or repeat the battery installation procedure. -
Page 7: Detailed Set-Up Guide
BATTERY INSTALLATION A. Remote Thermo/hygro Sensor 1. Pull the cylindrical rain cover off the remote thermo/hygro sensor. 2. Remove the battery cover (located on the backside of the remote thermo/hygro sensor, above the mounting post and bracket). 3. Press the arrow and slide the battery cover off. 4. -
Page 8: Program Mode
is achieved easiest at night), it will display the correct time (factory setting is Eastern time zone). PROGRAM MODE Programming Note: If 20 seconds is allowed to pass during programming modes, the unit will confirm/set the last information entered—the display will stop flashing and return to normal time- date readings TIME AND DATE There are two methods by which the time and date can be set:... -
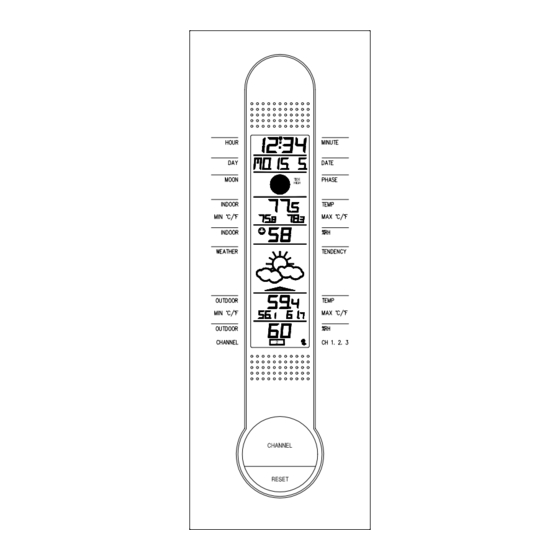
Page 9: Function Keys
When programming, the manual setting of time and date is not necessary and can be skipped. Any time information programmed will be over-written by the reception of the WWVB signal. FUNCTION KEYS There are four buttons on the WS-7390U, two on the front and two on the back. -
Page 10: Time Setting
Note: This is only necessary if you do not wish to wait for the WWVB reception. All manual set data will be over-ridden by the reception of the WWVB signal based on the time zone selected. 1. Press and hold the “SET” button (on the back of the clock) for 2 seconds or until “12h”... -
Page 11: Daylight Saving Time (Dst) Setting
desired time zone. The TIME LCD displays the 3 letter abbreviations for the time zones found in North America. Observe the chart below, showing corresponding abbreviations, time zones, and codes. Display Time Zone Atlantic EST; Eastern CST; Central MST; Mountain PST;... -
Page 12: Setting Day, Date, And Year
not follow Daylight Saving Time. 5. Press and release the “SET” button to confirm and advance to the Date setting mode (skip step 1and 2 in section V if continuing). V. Setting the Day, Date and Year Note: This is only necessary if you do not wish to wait for the WWVB reception. -
Page 13: Selecting °F Or °C
year and to advance to °F and °C selection (skip step 1 and 2 in section VI if continuing). VI. Selecting °F OR °C 1. Press and hold the “SET” button for 2 seconds or until “12h” or “24h” flashes. 2. -
Page 14: Weather Forecast Icons
I. Weather Forecast The weather forecasting feature is estimated to be 75% accurate. By adjusting the sensitivity setting, you can achieve a better accuracy of forecast. The weather forecast is based solely upon the change of air pressure over time. In areas where the weather is not affected by the change of air pressure, this feature will be less accurate. -
Page 15: Indoor Temperature, Humidity, & Comfort
slow and gradual. If this happens on a regular basis, it may be necessary to adjust the weather forecast sensitivity. 2. Weather Tendency Arrows Other possible displays in the TENDENCY LCD are 2 weather tendency arrows, one that points up and one that points down. -
Page 16: Outdoor Temperature & Humidity
The outdoor temperature and humidity is viewed in the OUTDOOR LCD. When there is more than one remote sensor unit in operation a “boxed” number will appear to the right of the temperature. This indicates which remote sensor unit (1, 2, or 3) is currently displaying its data in the OUTDOOR LCD. -
Page 17: Additional Remote Thermo/Hygro Sensors
The WS-7390U is able to receive signals from 3 different remote sensors. These extra remote sensors can be purchased through the same dealer as this unit. A TX4U will monitor the temperature and humidity, a TX3U will monitor temperature and display the temperature on its LCD and the TX3UP will monitor the temperature via a probe for measuring soil or water temperatures. - Page 18 1. To view the temperature of a different remote sensor press and release the “CHANNEL” button. A shift from one “boxed” number to the next should be observed in the OUTDOOR LCD. 2. The minimum and maximum temperature of the additional remote sensor will be displayed below the current temperature of the remote sensor in the OUTDOOR LCD.
-
Page 19: Mounting
Note: Before permanently mounting ensure that the indoor weather station is able to receive WWVB signals from the desired location. changes in temperature will decrease the accuracy of the indoor weather station. Changes in elevation will result with inaccurate weather forecasting for the next 12 to 24 hours. - Page 20 6. Align the mounting bracket with the started screw holes. 7. Screw mounting bracket onto the mounting surface. The screws should be flush with the bracket. 8. Fit the mounting post (on the back of the remote thermo/hygro sensor) into the receptor of the mounting bracket.
- Page 21 1. The WS-7390U is a wall mount only indoor weather station. To mount the display on your wall: 2. Fix a screw (not included) into the desired wall, leaving approximately 3/16 of an inch (5mm) extended from the wall. 3. Place the indoor weather station onto the screw using the hanging hole on the backside.
-
Page 22: Troubleshooting
Problem: No reception of WWVB time signal Solution: 1) Wait overnight for signal. 2) Be sure indoor weather station is at least 6 feet from any electrical devices, such as televisions, computers, or other radio-controlled clocks. 3) Remove batteries for five minutes, reinsert and leave alone without pressing buttons overnight. -
Page 23: Maintenance & Care
• Extreme temperatures, vibration, and shock should be avoided to prevent damage to the units. • Clean displays and units with a soft, damp cloth. Do not use solvents or scouring agents; they may mark the displays and casings. • Do not submerge in water. -
Page 24: Specifications
Temperature measuring range: Indoor 32°F to 139.8°F with 0.2°F resolution. (0°C to 59.9°C with 0.1°C resolution) “OFL” displayed if outside this range Outdoor -21.8°F to 157.2°F with 0.2°F resolution. (-29.9°C to 69.9°C resolution) “OFL” displayed if outside this range Relative humidity measuring range 19% to 95% with 1% resolution (“- -”... -
Page 25: Warranty Information
WARRANTY INFORMATION La Crosse Technology provides a 1-year warranty on this indoor weather station. Contact La Crosse Technology immediately upon discovery of any defects covered by this warranty. Before sending the indoor weather station in for repairs, contact La Crosse Technology. - Page 26 La Crosse Technology at: La Crosse Technology 1116 South Oak Street La Crescent, MN 55947 Phone: 507.895.7095 Fax: 507.895.8000 e-mail support@lacrossetechnology.com (warranty work) sales@lacrossetechnology.com (information on other products) www.lacrossetechnology.com FCC ID: OMO-01RX THIS DEVICE COMPLIES WITH PART 15 OF THE FCC RULES. OPERATION IS SUBJECT TO THE FOLLOWING TWO CONDITIONS: 1.
Need help?
Do you have a question about the WS-7390TWC and is the answer not in the manual?
Questions and answers