Table of Contents
Advertisement
Advertisement
Table of Contents

Related Manuals for DeWalt DWS780-XE


Summary of Contents for DeWalt DWS780-XE
- Page 1 INSTRUCTION MANUAL DWS780-XE 305 mm (12") DOUBLE BEVEL SLIDING COMPOUND MITER SAW...
- Page 3 • SECURE THE WORKPIECE. Use clamps or a vise to hold the workpiece on the table and against the fence Definitions: Safety Guidelines or when your hand will be dangerously close to the blade (within 6"). It is safer than using your hand and it The definitions below describe the level of severity for each signal word.
- Page 4 • STABILITY. Make sure the miter saw is placed on a secure supporting surface and does not slip or move • TURN OFF THE MACHINE and allow the blade to come to a complete stop before raising the arm and prior to during use.
-
Page 5: Electrical Connection
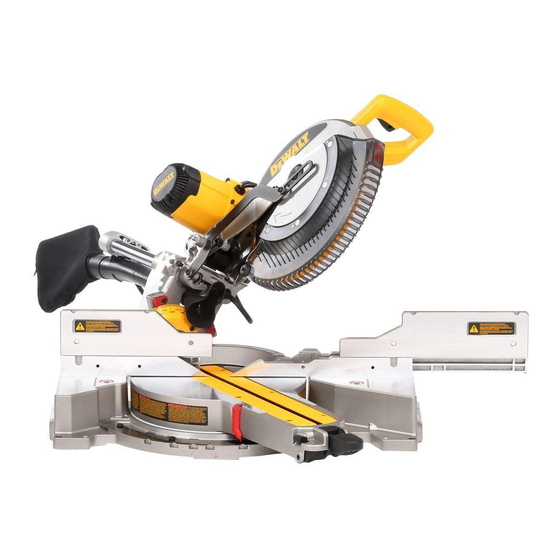
Electrical Connection Description (fig. 1) The electric motor has been designed for one voltage only. Always check that the power supply corresponds to the A. Lower guard M. Fence adjustment knob Y. XPS on/off switch voltage on the rating plate. 230 V AC means your tool will operate on alternating current. As little as 10% lower voltage B.Guard bracket screw N. -
Page 6: Specifications
Optional Accessories (fig. 2–8) FIG. 3 FIG. 2 The following accessories, designed for your saw, may be helpful. In some cases, other locally obtained work supports, length stops, clamps, etc., may be more appropriate. Use care in selecting and using accessories. II. - Page 7 Changing or Installing a New Saw Blade (Fig. 10A-10C) ANGLE MAXIMUM CAPACITY OF CUT RESULT WARNING: To reduce the risk of serious personal injury, turn off the tool and disconnect it from the power Height 112 mm (4.4") Width 231 mm (9.1") source before attempting to move it, change accessories or make any adjustments.
- Page 8 NOTE: When using blades with a 5/8" (15.88 mm) diameter blade hole, When at 0°, the override locks in place. To operate the override, bevel the FIG. 11 the blade adapter will not be used and should be stored in a safe place for saw slightly to the left.
- Page 9 2. Place a square against the saw’s fence and blade, as shown. (Do not indicate exactly 22.5°, turn the crown adjustment screw contacting FIG. 14 not touch the tips of the blade teeth with the square. To do so will the pawl with a 10 mm (7/16") wrench until the bevel pointer indicates cause an inaccurate measure ment.) exactly 22.5°.
- Page 10 FIG. 17A • Do not attempt to cut excessively small pieces. FIG. 17B • Allow the blade to cut freely. Do not force. • Allow the motor to reach full speed before cutting. • Make sure all locking knobs and clamp handles are tight. •...
- Page 11 Cutting Picture Frames, Shadow Boxes And Other Four- 3. When the saw comes up to speed, lower the arm smoothly and FIG. 20 FIG. 21 slowly to cut through the wood. Let the blade come to a full stop Sided Projects (fig. 20, 21) before raising arm.
- Page 12 • Set your saw to the prescribed angles and make a few trial cuts. FIG. 24A FIG. 24B Practise fitting the cut pieces together. Example: To make a 4-sided box with 26º exterior angles (Angle A, fig. 22), use the upper right arc. Find 26° on the arc scale. Follow the horizontal intersecting line to either side to get mitre angle setting on saw (42°).
- Page 13 Alternative Method for Cutting Crown Moulding FIG. 28A FIG. 26A Cutting crown moulding using this method does not require a bevel cut. Minute changes in the mitre angle can be made without affecting the bevel angle. When corners other than 90º are encountered, the saw can be quickly and easily adjusted for them.
-
Page 14: Service Information
DUST DUCT CLEANING In case of workpiece fragments jammed between the saw blade and WARNING: Ensure the saw is mounted firmly to a stable flat surface. guards, disconnect the machine from the power supply and follow the Failure to do so could cause the saw to be unstable and fall causing With the saw unplugged and the saw head raised fully, low pressure air or instructions given in Changing or Installing a New Saw Blade. - Page 15 TABLE 1: COMPOUND MITER CUT (POSITION WOOD WITH BROAD FLAT SIDE ON THE TABLE AND THE NARROW EDGE AGAINST THE FENCE) SET THIS MITER ANGLE ANGLE OF ON SAW SIDE OF BOX (ANGLE A) BEVEL DEGREE SETTING SET THIS BEVEL ANGLE ON SAW...
- Page 16 Stanley Black & Decker 701 East Joppa Road, Baltimore, MD 21286 • 82 Taryn Drive, Epping, VIC 3076 Australia 1800 444 224 (Aust) or 0800 339 258 (NZ) www.dewalt.com.au • www.dewalt.com.nz. (SEP11) Part No. N137372 DWS780-XE Copyright © 2011 D...
Need help?
Do you have a question about the DWS780-XE and is the answer not in the manual?
Questions and answers