Hytera MD78X Manual
Digital mobile radio
Hide thumbs
Also See for MD78X:
- Service manual (638 pages) ,
- User manual (28 pages) ,
- Upgrade manual (44 pages)
Table of Contents
Advertisement
Quick Links
Preface
Thank you for purchasing Hytera Digital Mobile Radio. As a product built to the
standard, It is endowed with ergonomic design, all-round digital functions and
remarkable quality to increase your management efficiency and enable you to be
responsive to emergent situations.
To derive optimum performance from your product, please read this manual and the
supplied Safety Information Booklet carefully before use.
The manual is applicable to the following model:
MD78X
MD78XG
Advertisement
Table of Contents

Related Manuals for Hytera MD78X


Summary of Contents for Hytera MD78X
- Page 1 Preface Thank you for purchasing Hytera Digital Mobile Radio. As a product built to the standard, It is endowed with ergonomic design, all-round digital functions and remarkable quality to increase your management efficiency and enable you to be responsive to emergent situations.
-
Page 2: Copyright Information
Hytera is the trademark or registered trademark of Hytera Communications Co., Ltd. (“Hy tera”) in PRC and/or other Term Explanation countries or areas. Hytera retains the ownership of its trademarks and product names. All other trademarks and/or product names Key Operation that may be used in this manual are properties of their respective Short press: to press a key and release it quickly. -
Page 3: Fcc Regulations
RF Radiation Information of this product shall not be deemed to grant, either directly or by implication, any rights to the purchaser with respect to Hytera RF Radiation Profile computer programs. Any Hytera computer programs may not be Radio Frequency (RF) is a frequency of electromagnetic radiation copied, modified, distributed, decompiled, or reverse-engineered in the range at which radio signals are transmitted. - Page 4 Operational Instructions and Training Guidelines To ensure optimal per for manc e and c omplianc e with the occupational/controlled environment RF energy exposure limits in the above standards and guidelines, users should transmit no more than 50% of the time and always adhere to the following procedures: (1) Gain of antenna must not exceed 5dBi (UHF) and 3.5 dBi (VHF).
-
Page 5: Table Of Contents
Contents Checking Items in the Package ----------------------------- 2 Settings -------------------------------------------------------------- 15 Accessories ---------------------------------------------------------- 17 Product Overview ----------------------------------------------- 3 Functions and Operations------------------------------------18 Front Panel ------------------------------------------------------------ 3 Home Screen -------------------------------------------------------- 18 Rear Panel ------------------------------------------------------------ 3 Scan ------------------------------------------------------------------- 18 Programmable Keys ------------------------------------------------- 4 Public Address ----------------------------------------------------- 18 Installation -------------------------------------------------------- 5 Talk Around --------------------------------------------------------- 19... -
Page 6: Checking Items In The Package
Checking Items in the Package Please unpack carefully and check that all items listed below are received. If any item is missing or damaged, please contact your dealer. Radio Unit Palm Microphone Microphone Hanger and Screws Power Cord Fuse Mounting Bracket Kit GPS Antenna Owner’s Manual /Quick Reference Guide/Safety Information Booklet... -
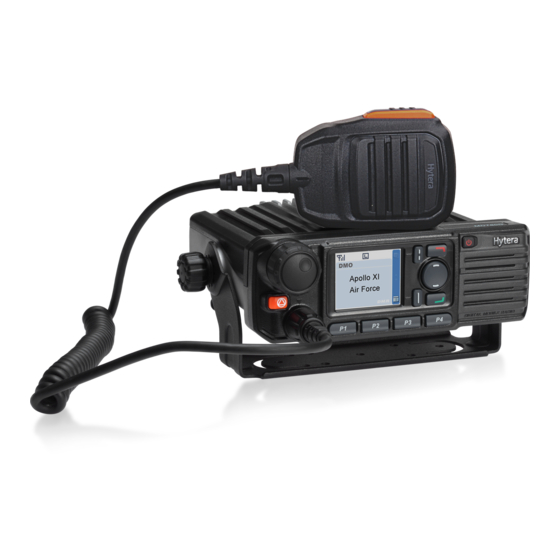
Page 7: Product Overview
Product Overview Front Panel Rear Panel Part Name Part Name Part Name Part Name RF Antenna Volume Control / Channel Power Inlet Connector LED Indicator Selector Knob GPS Antenna Accessory Jack LCD Display OK/Menu Key Connector Power On/Off Back Key Note: T h e G P S A n t e n n a C o n n e c t o r i s o n l y Up Key Down Key... -
Page 8: Programmable Keys
Product Overview Programmable Keys To receive signals on other Scan channels For enhanced convenience, you may request your dealer to Nuisance Temporary To temporarily ignore unwanted Delete channel activity program the keys P1, P2, P3, P4, To summon help in emergent shortcuts to the functions listed below: Emergency situations... -
Page 9: Installation
And make Install the microphone hanger in a location where it can be sure the antenna and power cord is dedicated for Hytera reached easily. digital radios. - Page 10 Installation Part Name Part Name Radio Unit Locking Knobs Mounting Bracket 4.8×20mm Self-tapping Screws Palm Microphone 4 × 16mm Self-tapping Screws Microphone Hanger Power Inlet Black Power Cord Red Power Cord Fuse RF Antenna Connector GPS Antenna...
-
Page 11: Status Indication
Status Indication LCD Icon The Emergency mode (other than secret Status Icon Emergency emergency) is active or Icon Icon Name Icon Radio Status an emergency message is received No signal RSSI The knob currently More bars indicate better operates in channel signal strength Knob selection mode... -
Page 12: Led Indicator
Status Indication Operation Mode Icon Icon Name Icon Operation Mode Direct Mode: Under this mode, radios communicate with each other directly O p e r at i o n Mode Icon Re p e ate r M o d e: U n d e r t h i s mode, radios communicate with each other via a repeater LED Indicator... -
Page 13: Basic Operations
Basic Operations Turning the Radio On/Off Selecting a Channel To turn the radio on, long press the Power On/Off key until the Press the Volume Control / Channel Selector knob to switch it radio shows power-up screen and sounds power-up alert, and to channel selection mode (the radio displays the icon ), and the LED flashes green. -
Page 14: Call
Call To ensure optimal volume of the receiving radio, hold the palm Input a Private Call number you want to call using the microphone approximately 2.5 to 5 centimeters away from your microphone with a keypad. Hold down the PTT key to transmit the Private Call. mouth. -
Page 15: All Call
Call Receiving and Responding to a Group Call When a Group Call is received, your radio will display the icon You may hold down the PTT key within the preset time period to call back. All Call Transmitting an All Call Methods are the same as those in Transmitting a Group Call. -
Page 16: Menu Navigation
Menu Navigation You can send to a Private Call contact the following commands: alert call, radio check, remote monitor, radio enable or radio disable. See the “Manual Dial” below for details. Editing a Contact You can edit the number and alias of each Private Call contact. Viewing a Contact You can view details of each contact. -
Page 17: Message
Menu Navigation to a Private Call contact and confirm whether it is powered on or Quick Text running on your current channel. Under this option there are some text messages (10 entries at most) preset by your dealer. You can choose to edit and send any R. -
Page 18: Call Logs
Menu Navigation For each message, you can choose to perform any of these To access this item, press the Menu key in the home screen and operations: Send, Save and Delete. then select “Scan”. To delete all messages in the Drafts, select “Message -> Drafts ->... -
Page 19: Zone
Menu Navigation Radio Set indicates priority channel 1, and indicates priority channel 2. You can optimize your radio performance by customizing related Deleting a Channel parameters according to actual needs and your preferences. To remove a channel from the active scan list. However, the first Power Level channel in the list can not be deleted. - Page 20 Menu Navigation Key Value Scrambler You can edit the key value, which can consist of numbers and To set whether to enable the Scrambler/Encrypt feature. letters A-F (within the predefined key length). Encrypt Save You can save and add the new key to the key list. To set whether to enable the Encrypt feature.
-
Page 21: Accessories
Menu Navigation transmission. The following options are available: Disable (no tone indication for transmission), Digital Only (tone indication for transmission on digital channels only), Analog Only (tone indication for transmission on analog channels only), and Enable (tone indication for transmission on both analog and digital channels). -
Page 22: Functions And Operations
Functions and Operations Home Screen on a non-priority channel, the LCD will display icon ; if on The feature allows you to quickly return to the previous menu or Priority Channel 1 or Priority Channel 2, the LCD will display the home screen. -
Page 23: Talk Around
Functions and Operations Operation: Note: When this feature is enabled, you can neither communicate with other users, nor ● Press the programmed Squelch Off key to enable the feature. enter the menu. Then the radio displays the icon and sounds background noise. - Page 24 Functions and Operations Emergency Type Description Emergency Mode Description In Emergency mode, the radio will In this mode, you can send alarm sound shrill alarm tone and display icon i n f o r m a t i o n t o y o u r c o m p a n i o n Siren Only Alarm or control center by pressing the...
- Page 25 Functions and Operations Alarm (None & HDC1200) If the preset Voice Cycles expire, you can hold down the PTT key to make the emergency call again (the radio displays Operation: Press the programmed Emergency key to send the icon , with red LED glowing). After the emergency alarm information.
- Page 26 Functions and Operations Operation: the icon , with red LED glowing). After the emergency Press the programmed Emergency key to send alarm call is transmitted, release the PTT key to receive (the radio information. The radio displays icon and text information displays the icon , with LED flashing orange rapidly).
-
Page 27: Ignition Sense
Functions and Operations To enable the PTT key, start the engine; to disable the PTT If the feature “Alarm with Call to Follow” is enabled, you can key, stop the engine. speak into the microphone to make an emergency call when Ignition or Switch: The radio powers on or off by following ●... -
Page 28: Busy Channel Lockout
Functions and Operations ● On an analog channel, go to “Main Menu -> Settings -> If the pre-alert function is set by your dealer, your radio will alert Radio Set -> Scrambler” and select “Enable” or “Disable; on a you to the TOT expiration in advance. digital channel, go to “Main Menu ->... -
Page 29: Channel Steering
Functions and Operations Channel Steering Go to “Main Menu -> Settings -> Radio Set-> Lone Worker” and select “Enable”; or Press the programmed Lone Worker This feature must be realized through further development. After key (a high-pitched tone sounds); or Turn on the radio if the successfully developed, you should request your dealer to enable feature is enabled via the programming software. -
Page 30: Signaling Introduction
Signaling Introduction The radio supports the following signaling. You can ask your ● Selective Call: After decoding, the radio provides the following dealer to make appropriate settings on your radio. For detailed indications: Alert:The radio will sound default alert. information, please contact your dealer. LED:The LED glows green. - Page 31 Signaling Introduction Group Call: ). If Auto Reset is enabled (by your dealer), your radio will enter the Auto Reset mode after successful encoding, with LED glowing orange, until the Auto Reset Time expires. Decoding: Your radio can automatically decode the 5-Tone signaling when receiving any matched one.
-
Page 32: Troubleshooting
Troubleshooting Phenomena Analysis Solution The radio can not be powered on. The power cord may be unconnected. Connect the power cord correctly. Increase the volume by rotating the Volume Control knob The volume may be set to a low level. clockwise. - Page 33 Troubleshooting There is no display. The LCD may fail to function temporarily. Restart the radio. The GPS antenna is improperly connected. Connect the GPS antenna correctly. T h e G P S c a n n o t l o c a t e y o u r position.
-
Page 34: Care And Cleaning
Care and Cleaning To guarantee optimal performance as well as a long service life of the product, please follow the tips below. Product Care ● Keep the product at a place with good ventilation and heat dissipation to facilitate normal work. ●... -
Page 35: Optional Accessories
Programming Cable (USB Port) PC37 Data Cable PC40 Keypad Microphone SM19A1 External Power Supply PS22002 Antenna Caution: Use the accessories specified by Hytera only. If not, Hytera shall not be liable for any losses or damages arising out of use of unauthorized accessories. -
Page 36: Appendix
Appendix Input Method Special Character To enter common punctuations and special characters, press You c an enter aliases, number s or messages using the To input a space, press microphone with a keypad. The radio supports the following input methods: Chinese Pinyin (simplified), English and Number. Note: You can use the Up/Down key to move the Chinese Pinyin (Simplified) cursor leftward/rightward in the entered...
Need help?
Do you have a question about the MD78X and is the answer not in the manual?
Questions and answers