Advertisement
Available languages
Available languages
P20
BLOOD PRESSURE
MONITORING SYSTEM
Quick Start User Guide
For self-testing. Read instructions before use.
Distributed by Fora Care
Fora Care Inc.
810 Lawrence Dr, Suite 104, Newbury Park, CA 91320 USA
Products made in Taiwan
Toll Free:
1-888-307-8188 ( 8:30am~5:00pm PST, Mon.~Fri. )
1-866-469-2632 ( 24 Hours, 7 days/week )
315-3132000-001
www.foracare.com/usa
3. Measurement Average Mode
Always apply the pressure cuff before turning on the monitor.
3.1
Press and hold
for three seconds. The monitor will turn on and
enter the averaging mode. Press
to select user "
"
(numbers from1 to 4) whose test reading will be stored in memory.
Then the cuff will begin to inflate automatically.
3.2
After the first measurement is completed, the monitor will start
counting down before the second measurement begins. The number
on the right represents the remaining countdown between each
measurement. The monitor will take three (3) measurements
consecutively with an interval of 20 seconds.
3.3
After taking three measurements, the results are averaged to produce
the blood pressure measurement. Press
to turn off the monitor.
Dear FORA P20 System Owner:
Thank you for choosing FORA P20 Blood Pressure Monitoring
System to take control of your blood pressure. Being a home
care device, this system is helpful in tracking your blood
pressure values.
Your Quick Start User Guide assists you in setting up the
system and running the test. Please read it carefully before
use. For complete information on system use and features,
please refer to the Owner's Manual.
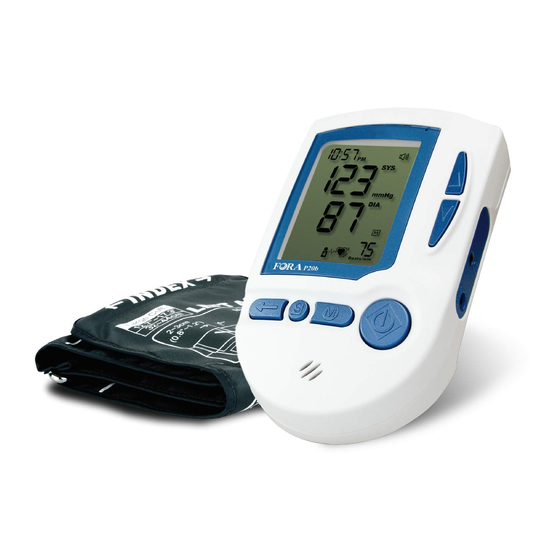
Front View of Monitor
BT Indication Light
(for P20b)
Up/Down Button
Pressure Cuff
USB Link Port
(for P20v)
Repeat Button
Earphone Jack
DC Adapter Port
M Button
LCD Screen
S Button
On/Off Button
Rear View of Monitor
Air jack
Battery
Compartment
4. Auscultatory Mode
Only trained healthcare professionals can perform manual operation.
4.1
Place a stethoscope on the patient's arm where there is a pulse. Wrap
the cuff around the patient's upper arm and hold in place with velcro.
4.2
Press
button to turn on the monitor then press
to enter the
M
Auscultatory Mode. A stethoscope symbol will appear on the display
with a beep. Then the cuff begins to inflate automatically.
1. Set The Monitor
1.1
1.2
Press
to start setting. Year
Press
to make changes.
flashes first.
Number can be advanced faster
by holding down
. Press
to proceed.
1.3
1.
2.
3.
4.
5.
6.
7.
Date flashes. Follow
to make changes. The sequence of settings is:
1.2
(1) the date
(2) time format
(3) time
(4) unit of measurement
(5) voice volume
(6) memory deletion
(7) language
4. Auscultatory Mode
4.3
The operator can adjust the inflation pressure if necessary. During the
measurement, press
at any time to stop the inflation and start
deflation, or press
to inflate again. After reaching the cuff
pressure, the deflation begins.
4.4
The systolic pressure is measured when the operator first hears the
pulse. This reading indicates the subject's systolic pressure.
4.5
The diastolic pressure is measured from the moment the operator is
unable to hear the sound of the pulse. This reading indicates the
subject's diastolic pressure.
To turn off the monitor, press
.
2. Take a Single Measurement
Always apply the pressure cuff before turning on the monitor. For
how to apply the pressure cuff, please see the Owner's Manual for
complete information.
2.1
Press
. All the LCD symbols will appear. Press
button to
select user "
" (numbers from1 to 4) whose test reading will be
stored in memory. Then the cuff will begin to inflate automatically.
2.2
2.3
The heart symbol "
" will flash
After the measurement, the
when a pulse is detected during
monitor displays the systolic
the inflation.
pressure, diastolic pressure,
and pulse rate.
2.4
NOTE
• If you press
during
measurement, the monitor will
be turned off.
• If the pulse rate symbol is shown
Press
to switch off. Or it will
as "
" instead of " ", this
switch off automatically after left
indicates that the monitor has
idle for 3 minutes.
detected an irregular heart beat.
5. Read Your Result
Reference values:
Systolic Pressure
Diastolic Pressure
Classification
(mmHg)
(mmHg)
Hypotension
< 90
< 60
*1
Normal
*2
< 120
< 80
Pre-hypertension
*2
120–139
80–89
Stage 1 Hypertension
*2
140–159
90–99
Stage 2 Hypertension
≥ 160
≥ 100
*2
*1
: National Heart, Lung, and Blood Institute, Diseases and Conditions
*2
: The Seventh Report of the Joint National Committee on Prevention, Detection, Evaluation,
and Treatment of High Blood Pressure. NIH Publication. 2003. No. 03-5233
Advertisement
Table of Contents

Related Manuals for Fora P20


Summary of Contents for Fora P20
- Page 1 Always apply the pressure cuff before turning on the monitor. For how to apply the pressure cuff, please see the Owner’s Manual for Thank you for choosing FORA P20 Blood Pressure Monitoring complete information. System to take control of your blood pressure. Being a home care device, this system is helpful in tracking your blood pressure values.
- Page 2 Gracias por adquirir el Sistema de Vigilancia de Presión Arterial Manual del Usuario para obtener mayors detalles. FORA P20 para controlar su presión arterial. Al ser un aparato para ser utilizado en el hogar, este sistema le ayudará a vigilar sus niveles de su presión arterial.
Need help?
Do you have a question about the P20 and is the answer not in the manual?
Questions and answers