
Subscribe to Our Youtube Channel
Related Manuals for Fora P30 Plus Series


Summary of Contents for Fora P30 Plus Series
- Page 1 Blood Pressure Monitoring System Sistema de Control de Presión Arterial (Model: P30 Plus / P30 Plus BLE) Owner’s Manual Manual del Propietario...
- Page 2 Ver. 1.0 2024/02 311-3129000-022...
-
Page 3: Table Of Contents
TABLE OF CONTENTS Important Safety Precautions Before You Begin Intended Use Test Principle Contents of System Meter Overview Display Screen Setting the meter Testing Your Blood Pressure Fitting the Cuff Properly Proper measurement position Taking a Single Measurement Averaging Measurement Mode Auscultatory Mode Recalling Past Readings Reviewing Test Results... -
Page 4: Important Safety Precautions
KEEP THESE INSTRUCTIONS IN A SAFE PLACE Before You Begin Intended Use The FORA P30 Plus Series Blood Pressure Monitoring System (Model: P30 Plus / P30 Plus BLE) is a device intended to measure non-invasively the systolic and diastolic blood pressure and pulse rate of an adult individual. -
Page 5: Contents Of System
It may produce reading error. Contents of System The FORA P30 Plus Series system kit includes: Meter Quick Start User Guide / Owner’s Manual Warranty Card Protective Wallet... -
Page 6: Meter Overview
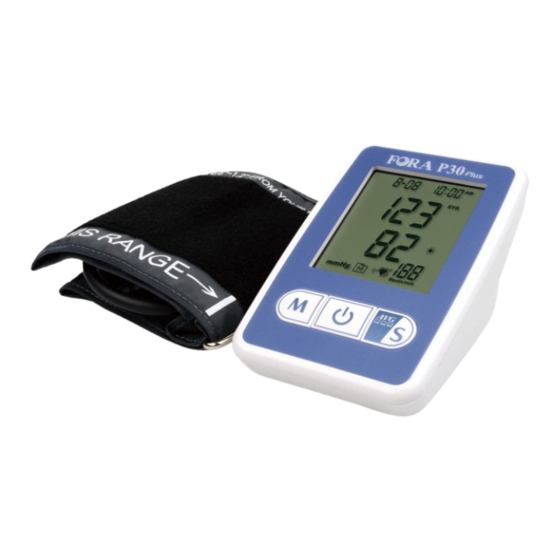
Meter Overview 1. Display Screen 5. Bluetooth Indicator (P30 Plus BLE only) 2. M Button 6. Battery Compartment To enter the meter memory / To start the wireless data 7. AC Adapter Port transmission (P30 Plus Connect to a power BLE only ) supply. -
Page 7: Display Screen
Display Screen 1. Date 7. Pulse Rate 2. Systolic Pressure Value 8. Day Average Results 3. Diastolic Pressure Value 9. Day / Night Time Symbol 4. Measurement Unit 10. Diastolic Pressure Symbol 5. Memory Mode Symbol 11. Battery Symbol 6. IHB Detection Symbol 12. - Page 8 1. Set the Date With the YEAR / MONTH / DAY flashing in sequence, press M to select the number. Press AVG / S to confirm. 2. Set the Time & Time Format With the HOUR / MINUTE flashing in sequence, press M to select the number.
-
Page 9: Testing Your Blood Pressure
NOTE: These parameters can ONLY be changed in the setting mode. If the meter is idle for 3 minutes during the setting mode, it will switch off automatically. Congratulations! You have completed all settings! Testing Your Blood Pressure This meter provides you different ways to measure your blood pressure. -
Page 10: Fitting The Cuff Properly
Fitting the Cuff Properly 1. Connect the air plug of the tubing to the air jack of the meter. 2. Assemble the cuff as shown. The smooth surface should be inside the cuff loop and the metal D-ring should not touch the patient’s skin. -
Page 11: Proper Measurement Position
Proper measurement position 1. Sit down for at least 10 minutes before measuring. 2. Place your elbow on a flat surface. Relax your hand with the palm facing up. 3. Make sure the cuff is about the same height as the location of your heart. Press On/Off button. -
Page 12: Averaging Measurement Mode
NOTE: If you press On/Off button during measurement, the meter will be turned off. If the pulse rate symbol is shown as “ ” instead of “ ”, this indicates that the meter has detected an irregular heartbeat (IHB). Please consult your doctor if you have question about IHB. -
Page 13: Auscultatory Mode
Auscultatory Mode Only well trained persons may use this mode to measure blood pressure manually. This manual method involves applying a stethoscope to the arm and listening to the pulse while the air is slowly let out from the cuff (the Korotkoff method). Please ask your health- care professional to train you how to use auscultatory mode. -
Page 14: Recalling Past Readings
6. The meter will return to the screen of 0 mmHg after the measurement is completed. To turn off the meter, press and hold On/Off button. Or it will switch off automatically after being idle for 3 minutes. Recalling Past Readings Your meter stores the 200 most recent test results with date and time in its memory. - Page 15 appear on the display. 2. Press M to review the Day-time ( ) average result. 3. Press M to review the Night-time ( ) average result. 4. Press On/Off button to turn the meter off. For P30 Plus BLE: Reviewing Day Average Results (1-3) 1.
-
Page 16: Data Transmission (For P30 Plus Ble Only)
6:00 P.M. and 11:59 P.M. Data Transmission (for P30 Plus BLE only) FORA P30 Plus Series has 2 versions: P30 Plus (no data transmission function) and P30 Plus BLE (Bluetooth Connectivity). Please check your meter box for your meter version. -
Page 17: Maintenance
The meter is compatible with the following devices, iOS (6 or above) and Android system (4.3 or above). Make sure device is in proper receiving range of the meter before transmitting data. A compatibility issue between your mobile device and the meter might occur due to the way Bluetooth functionality is implemented by the various mobile device manufacturers. -
Page 18: Using Ac Adapter (Optional)
3. Close the battery cover. NOTE: Replacing the batteries does not affect the test results stored in the memory. As with all small batteries, these batteries should be kept away from children. If swallowed, promptly seek medical assistance. ... -
Page 19: Caring For Your Meter
Caring for Your Meter To avoid the meter and pressure cuff attracting dirt, dust or other contaminants, please wash hands thoroughly with soap and water before use. Cleaning (after use or transfer the device to another patient’s use) To clean the meter exterior, wipe it with a cloth moistened with tap water or a mild cleaning agent, then dry the device with a soft dry cloth. -
Page 20: Troubleshooting
Problems with the Please contact local meter. customer service for help. Replace the batteries or Battery is too low. input AC adapter. Troubleshooting 1. If nothing is displayed after pressing On/Off button: POSSIBLE CAUSE WHAT TO DO Batteries exhausted. Replace the batteries. Batteries incorrectly installed or Check that the batteries are absent. - Page 21 elevated blood pressure. People with diabetes can reduce their heart risk by managing their blood pressure along with diabetes treatment Monitoring your routine blood pressure trend helps you to know your body condition. Human blood pressure naturally increases after reaching middle age. This symptom is a result of continuous ageing of the blood vessels.
-
Page 22: Federal Communications Commission (Fcc) Statement
Federal Communications Commission (FCC) Statement This device complies with Part 15 of the FCC Rules. Operation is subject to the following two conditions: 1. This device may not cause harmful interference and 2. This device must accept any interference received, including interference that may cause undesired operation of the device. - Page 23 FCC RF Radiation Exposure Statement: 1. This transmitter must not be co-located or operating in conjunction with any other antenna or transmitter. 2. For portable operation, this device has been tested and meets FCC RF exposure guidelines. When used with an accessory that contains metal may not ensure compliance with FCC RF exposure guidelines.
- Page 24 Manufacturer’s declaration-electromagnetic immunity The device is intended for use in the electromagnetic environment (for home and professional healthcare) specified below. The customer or the user of the device should assure that it is used in such an environment. Electromagnetic environment- guidance Immunity test IEC 60601 test level...
- Page 25 Manufacturer’s declaration-electromagnetic immunity Test specifications for ENCLOSURE PORT IMMUNITY to RF wireless communications equipment The device is intended for use in the electromagnetic environment (for home and professional healthcare) specified below. The customer or the user of the device should assure that it is used in such an environment. Compliance IMMUNI LEVEL...
-
Page 26: Specifications
Specifications System Performance Power Source: Four 1.5V AA alkaline batteries or (optional) DC 6V power adapter (Input: AC 100 to 240V; Output: DC 6V, 1A, 6W) Size of Meter w/o Cuff: 150 (L) x 100 (W) x 80 (H) mm Weight: 300g approx. - Page 27 TABLA DE CONTENIDO Importantes Medidas de Seguridad Antes de Empezar Uso Previsto Principios de la Prueba Contenido del Sistema Generalidades del Medidor Pantalla de Visualización Configurando el Medidor Comprobación de la tensión arterial Colocando Correctamente la Banda de Presión Posición correcta de medición Tomando una Medición Individual Medición Promedio Método Ausculatorio...
-
Page 28: Importantes Medidas De Seguridad
Antes de Empezar Uso Previsto El Sistema de Control de la Presión Arterial FORA Serie P30 Plus (Modelo: P30 Plus / P30 Plus BLE) es un dispositivo destinado a medir de forma no invasiva la presión arterial sistólica y diastólica y la frecuencia del pulso de un individuo adulto. -
Page 29: Principios De La Prueba
Esto podría producir errores en la lectura. Contenido del Sistema El sistema FORA P30 Plus Series incluye: Medidor Guía de usuario / Tarjeta de Manual del propietario garantía... -
Page 30: Generalidades Del Medidor
Generalidades del Medidor 1. Pantalla de Visualización 5. Indicador de Bluetooth (para P30 Plus BLE) 2. Botón M 6. Compartimiento de la Para ingresar a la memoria batería del medidor. / Para activar la transmisión de datos 7. Puerto para el inalámbricos. -
Page 31: Pantalla De Visualización
Pantalla de Visualización 1. Fecha 7. Frecuencia de Pulso 2. Valor de Presión Sistólica 8. Promedio Diario 3. Valor de Presión Diastólica 9. Simbolo de dia y noche 4. Unidades para la Presión 10. Símbolo de Presión Arterial Diastólica 5. Símbolo de Función de 11. - Page 32 Entrando a la Función de Configuración Comience con el medidor apagado. Presione AVG / S hasta que el medidor se encienda. Los siguientes ajustes se pueden configurar en secuencia: 1. Configure la fecha Con el año/mes/día parpadeando en secuencia, presione M hasta que aparezca el número correcto.
-
Page 33: Comprobación De La Tensión Arterial
4. Emparejamiento con Bluetooth (solo para P30 Plus BLE) Con "PAr" en la pantalla, pulse M para seleccionar "On", y "PCL" en la pantalla con el indicador Bluetooth parpadeando. A continuación, complete el emparejamiento Bluetooth (consulte la sección "Transmisión de datos a través de Bluetooth"). -
Page 34: Colocando Correctamente La Banda De Presión
profesional de la salud que le enseñe a utilizar el modo auscultatorio. Antes de Realizar la Medición Evite la cafeína, el té, el alcohol y el tabaco por lo menos 30 minutos antes de realizar la medición. Antes de la medición, espere por lo menos 30 minutos después de haber hecho ejercicios o de haber tomado un baño. -
Page 35: Posición Correcta De Medición
codo. La línea roja del borde de la banda deberá estar aproximadamente de 0,8" a 1,2" (de 2 a 3 cm) por encima del codo. Alinee el tubo sobre las arterias principales en el interior. 4. Deje un poco de espacio libre entre el brazo y la banda;... -
Page 36: Tomando Una Medición Individual
comenzará a inflarse automáticamente. NOTA: Si el manguito está relativamente más bajo (más alto) que el corazón, el valor de presión arterial obtenido podría ser más alto (más bajo) que el valor real. Una diferencia de altura de 15 cm puede resultar en un error de alrededor de 10 mmHg. -
Page 37: Método Ausculatorio
1. Pulse el botón AVG / S para encender el medidor. El esfigmomanometro comenzara a inflarse automaticamente. 2. Cuando la primera medicion se complete, el dispositivo iniciara una cuenta regresiva antes de llevar a cabo la segunda medicion. El número de la derecha representa la cuenta regresiva restante entre cada medición. - Page 38 en el momento en que el corazón está latiendo y enviando la sangre por todo el cuerpo. Presión arterial diastólica corresponde al valor mínimo de la tensión arterial cuando el corazón está entre latidos cardíacos. 1. Coloque un estetoscopio en el brazo del paciente donde está ubicada la arteria del pulso.
-
Page 39: Recuperación De Lecturas Anteriores
Recuperación de lecturas anteriores La memoria de su medidor puede almacenar las 200 pruebas más recientes con sus respectivas fechas y horas. Para revisar la memoria comience con el medidor apagado. Visualización de Los Resultados Para P30 Plus: Revisión de los resultados de una sola medición 1. - Page 40 2. Presione el botón M de nuevo para ver los resultados promedios del tiempo del día ( ). 3. Presione el botón M de nuevo para ver los resultados promedios del tiempo de noche ( ). 4. Pulse el botón On/Off para apagar el medidor.
-
Page 41: Transmisión De Datos (Para P30 Plus Ble)
6:00PM y las 11:59PM. Transmisión de Datos (para P30 Plus BLE) La serie FORA P30 Plus tiene 2 versiones: P30 Plus (sin función de transmisión de datos) y P30 Plus BLE (con conectividad Bluetooth). Compruebe en la caja de su medidor la versión del mismo. -
Page 42: Mantenimiento
NOTA: Mientras el medidor está en modo de transmisión, no podrá realizar una prueba de glucosa sanguínea. Asegúrese de que su dispositivo iOS(6 o superior) o Sistema Android (4.3 o superior) haya activado Bluetooth antes de transmitir los datos y de que el medidor se encuentre dentro del rango de recepción. -
Page 43: Usando El Adaptador De Ca (Opcional)
1. Presione el borde del cobertor de la batería y luego levántelo para quitarlo. 2. Remueva las baterías viejas y reemplácelas con cuatro baterías alcalinas AA de 1.5V. 3. Cerrar la tapa de las baterías. NOTA: Reemplazando las baterías no afecta los resultados guardados en la memoria. -
Page 44: Cuidados De Su Medidor
Desconecte el adapatador de CA del enchufe del medidor. Cuidados de su Medidor Para evitar que su medidor se llenen de polvo o se ensucie con algún contaminante, por favor recuerde lavarse y secarse las manos antes de usarlo. Limpieza (después de usar o transferir el dispositivo al uso de otro paciente) ... -
Page 45: Localización Y Resolución De Problemas
MENSAJE QUÉ SIGNIFICA QUÉ HACER El brazo se ha El medidor hará una nueva movido y no es medición automáticamente. posible detectar el Intente no mover el brazo y pulso durante la manténgase quieto durante medición. la medición. Error de inflado / Vuelva a colocar el desinflado o de esfigmomanómetro fuerte y... -
Page 46: Valores Referenciales
3. Si los resultados son menores que el promedio del usuario: CAUSAS POSIBLES QUÉ HACER Quizás no estaba en la Colóquese en la posición posición correcta mientras correcta antes de realizar la realizaba la medición. prueba. La presión arterial varía Tenga esto en cuenta para la naturalmente de vez en próxima medición. -
Page 47: Comunicado Oficial De La Comisión Federal De Comunicaciones
Normal < 120 < 80 Elevado 120 – 129 < 80 Etapa 1 130 – 139 80 – 89 Etapa 2 ≥ 140 ≥ 90 Crisis hipertensiva > 180 > 120 *1: Instituto Nacional de Enfermedades y Condiciones del Corazón, los Pulmones y la Sangre. *2: Séptimo Reporte del Comité... - Page 48 15.21 Tenga presente que todo cambio o modificación que no se encuentre expresamente aprobado por la parte responsable puede causar la anulación de la autorización del usuario para utilizar el equipo. Declaración referente a la exposición a la radiación de la FCC: 1.
- Page 49 Declaración del fabricante - Inmunidad electromagnética El aparato está destinado a utilizarse en el entorno electromagnético (para la asistencia sanitaria doméstica y profesional) de acuerdo con lo especificado a continuación. El cliente o el usuario del aparato debe asegurarse de que se utilice en dicho entorno. Guía de entorno electromagnético Prueba de Nivel de prueba IEC 60601...
- Page 50 Declaración del fabricante - Inmunidad electromagnética Especificaciones de prueba de INMUNIDAD DEL PUERTO DEL GABINETE a equipos de comunicaciones inalámbricas por RF El aparato está destinado a utilizarse en el entorno electromagnético (para la asistencia sanitaria doméstica y profesional) de acuerdo con lo especificado a continuación.
-
Page 51: Especificaciones
Especificaciones Rendimiento del Sistema Fuente de Alimentación: Cuatro baterías alcalinas AA de 1,5V o un adaptador de corriente CC de 6V (opcional) (Entrada: CA de 100 a 240 V; Salida: CC 6V, 1A, 6W) Dimensiones del dispositivo (sin esfigmomanómetro): 150 (L) x 100 (W) x 80 (H) mm El peso: 300g approx. - Page 52 Read instructions before use. Lea las instrucciones antes de utilizarse. Distributed by ForaCare, Inc. / Distribuido por ForaCare, Inc. 893 Patriot Drive Suite Drive, Moorpark, CA 93021 USA Products made in Taiwan / Productos hechos en Taiwán Toll Free / Número de Teléfono Gratuito : 1-888-307-8188 (6:30 am-5:30 pm PST, Monday to Friday / 6:30 am-5:30 pm PST, Lunes a Viernes) For assistance outside of these hours, please contact your healthcare professional.
Need help?
Do you have a question about the P30 Plus Series and is the answer not in the manual?
Questions and answers
What do the beeps mean