Fora D40 Pro Manual
Blood pressure plus blood glucose monitoring system
Hide thumbs
Also See for D40 Pro:
- Owner's manual (116 pages) ,
- Operations & procedures manual (36 pages)
Table of Contents
Advertisement
Quick Links
English
D40 Pro
Dear
System Owner:
Thank you for purchasing the FORA D40 Pro Blood Pressure plus
Blood Glucose Monitoring System. This manual provides impor-
tant information which helps you to operate this system smoothly.
Before using this product, please read this manual thoroughly to
ensure safe and accurate use.
If you have other questions regarding this product, please contact
the place of purchase or the local customer service for assistance.
Version 2.0 2011/07
311-3261500-001
1
Advertisement
Table of Contents
Troubleshooting

Related Manuals for Fora D40 Pro


Summary of Contents for Fora D40 Pro
- Page 1 D40 Pro Dear System Owner: Thank you for purchasing the FORA D40 Pro Blood Pressure plus Blood Glucose Monitoring System. This manual provides impor- tant information which helps you to operate this system smoothly. Before using this product, please read this manual thoroughly to ensure safe and accurate use.
-
Page 2: Table Of Contents
TABLE OF CONTENTS SAFETY INFORMATION General Warnings BEFORE YOU BEGIN Intended Use Test Principle Contents of System Monitor Overview Screen Display Test Strip SETTING THE MONITOR TESTING BLOOD PRESSURE Before Measurement Selecting the Correct Cuff Fitting the Cuff Correctly Proper Measurement Position Taking a Single Measurement Measurement Average Mode AUSCULTATORY MODE... - Page 3 TESTING WITH BLOOD SAMPLE Preparing the Lancing Device for Blood Testing Preparing the Puncture Site Alternative Site Testing Performing a Blood Glucose Test MONITOR MEMORY DOWNLOADING RESULTS ONTO A COMPUTER MAINTENANCE Low Battery Signal Replacing the Battery Using AC Adapter Caring for the Monitor Caring for the Test Strips Important Control Solution Information...
-
Page 4: Safety Information
SAFETY INFORMATION The information in this manual is a comprehensive guide to the operation of the monitor. For safety reasons, please read this manual thoroughly before using the monitor. General Warnings • Only the healthcare professionals who have trained for this system should operate. - Page 5 • Unplug the AC adapter from the electric outlet when installing, removing, or cleaning the device. • After cleaning this unit, dry it well before plugging the AC adapter in the electric outlet. • If this device fails to perform as indicated, stop the measurement immediately and turn off the unit, unplug the AC adapter from the electric outlet, contact customer service for assistance.
-
Page 6: Before You Begin
BEFORE YOU BEGIN Intended Use This system is a 2 in 1 system designed to measure blood glucose out- side the human body (in vitro diagnostic use) and to measure blood pressure non-invasively. It shall not be used for the diagnosis of diabetes and hypertension, or for the testing of neonates. -
Page 7: Test Principle
Test Principle This system measures the amount of sugar (glucose) in whole blood. The glucose testing is based on the measurement of electrical current generated by the reaction of glucose with the reagent of the strip. The monitor measures the current, calculates the blood glucose level, and displays the result. -
Page 8: Contents Of System
Contents of System The FORA D40 Pro system kit includes: Monitor Lancing Device with One Clear Cap Owner ’ s Manual Batteries Protective Wallet Test Strips Quick Start User Guide Control Solution Warranty Card Pressure Cuff (M and L size: upper... -
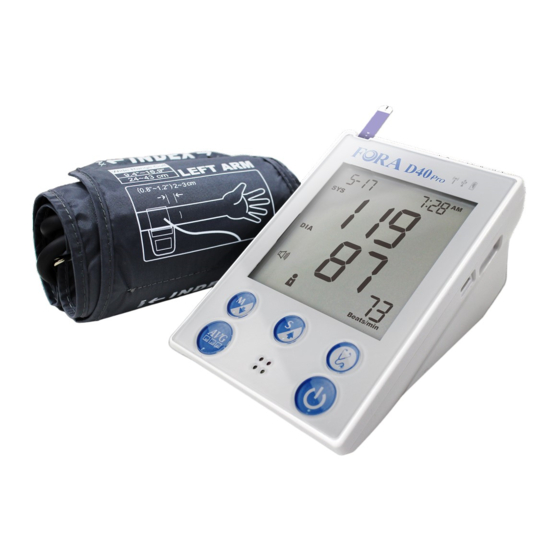
Page 9: Monitor Overview
Monitor Overview Front Back Side Pressure Cuff... - Page 10 POWER INDICATOR TEST SLOT Insert test strip here to turn the Appear when battery is low. monitor on for testing. BATTERY COMPART- DISPLAY SCREEN MENT AUSCULTATION BUTTON DC ADAPTER PORT Assist you with auscultatory Connect to a power supply. mode. USB LINK PORT S BUTTON Download test results with a...
-
Page 11: Screen Display
Screen Display 16 17 Date Unit for Blood Glucose Systolic Pressure Symbol Unit for Blood Pressure Blood Glucose Memory Mode Symbol Measurement Mode Battery Symbol Systolic Pressure Value Day Average Result Diastolic Pressure Symbol Pulse Rate Blood Drop Symbol Auscultatory Mode Symbol Test Strip Symbol Diastolic Pressure Value Heart Symbol -... -
Page 12: Test Strip
Push it in firmly until it will go no further. ATTENTION: The front side of test strip with FORA Logo should face up when inserting test strip. Test results might be wrong if the contact bar is not fully inserted into the test slot. -
Page 13: Setting The Monitor
SETTING THE MONITOR Before using the monitor for the first time or if changing the monitor battery, please check and update these settings. Make sure you com- plete the steps below and have your desired settings saved. ► Entering the setting mode Start with the monitor off (no test strip inserted). - Page 14 With the month flashing, press until the correct day appears. Press Step 2 Setting the time With the hour flashing, press until the correct hour appears. Press With the minute flashing, press until the correct minute appears. Press Step 3 Setting the time format Press to select the desired time...
- Page 15 Step 4 Deleting the memory While “ dEL ” and a blinking “ ” symbol appear on the display, if you do not wish to delete the saved results, press to skip this step. If you wish to delete ALL the results, press twice.
-
Page 16: Testing Blood Pressure
TESTING BLOOD PRESSURE This monitor provides you three different ways to measure the blood pressure. Select from the options below: • Single measurement Perform a single blood pressure measurement. • Average measurement Automatically perform three (3) consecutive blood pressure mea- surements and display the final average result. -
Page 17: Before Measurement
Before Measurement • Make sure that your patient avoids caffeine, tea, alcohol, tobacco, exercising or bathing at least 30 minutes before measurement. • Ask your patient to relax (sit or lie down) for at least 10 minutes before measurement. • Do not measure when your patient feeling anxious or tense. •... -
Page 18: Fitting The Cuff Correctly
► Fitting the Cuff Correctly Step 1 Connect the air plug of the tubing to the air jack of the monitor. Pile Side Material Step 2 ake out the cuff as shown on the > Place this side against the skin. >... -
Page 19: Proper Measurement Position
Step 5 Press the hook material firmly against the pile material. The top and bottom edges of the cuff should be tightened evenly around the arm. ► Proper Measurement Position Step 1 Patient ’ s elbow should be placed on a flat surface; hand should be relaxed with the palm facing up. -
Page 20: Taking A Single Measurement
Taking a Single Measurement Always apply the pressure cuff before turning on the monitor. Step 1 Press . All the LCD symbols will appear. Then the cuff will begin to inflate automatically. Step 2 The heart symbol “ ” will flash when a pulse is detected during the inflation. -
Page 21: Measurement Average Mode
Measurement Average Mode Always apply the pressure cuff before turning on the monitor. Step 1 Press . The monitor will turn on and enter the averaging mode. Then the cuff will begin to inflate automatically. Step 2 After the first measurement completed, the monitor will start counting down before the second measurement begins. - Page 22 The testing order would be: Test 1 Test 2 Test 3 20 seconds 20 seconds Step 3 After taken three measurements, the results are averaged to produce the blood pressure measurement. Press to turn off the monitor.
-
Page 23: Auscultatory Mode
Auscultatory Mode Only trained health care professionals are able to operate manually. The manual operation method involves applying a stethoscope and listening to the pulse during deflation while the air is slowly let out. Step 1 Place a stethoscope on the patient ’ s arm where there is a pulse. Wrap the cuff around the patient ’... - Page 24 Step 4 The systolic pressure is the maximum pressure in an artery at the moment when the heart is beating and pumping blood through the body. The systolic pressure is measured when the operator first hears the pulse. Take the reading according to the value on the display. This reading indicates the patient ’...
-
Page 25: Testing Blood Glucose
TESTING BLOOD GLUCOSE ► Important Information • Severe dehydration and excessive water loss may cause readings which are lower than actual values. • If the patient ’ s blood glucose results are lower or higher than usual, and he/she does not have symptoms of illness, first repeat the test. If he/she has symptoms or continue to get results higher or lower than usual, please check the patient ’... -
Page 26: The Four Measuring Modes
The Four Measuring Modes The monitor provides you with four modes for measuring, General, AC, PC and QC. Modes Use when any time of day without regard to time since last meal (not displayed) no food intake for at least 8 hours 2 hours after a meal testing with the control solution You can switch between each mode by:... -
Page 27: Control Solution Testing
• Control solution tests are performed regularly, or in specific time intervals, or with the number of patient test results. • Only use the control solutions for FORA D40 Pro Test Strips. • Use control solutions by the expiry date printed on the bottle and the box. - Page 28 Step 2 Press to mark this test as a control solu- tion test With “ QC ” displays, the monitor will not store the test result in memory. If press again, the “ QC ” will disappear and this test is no longer a control solution test.
- Page 29 Step 4 Read and Compare the Result After counting down to 0, the test result of control solution will appear on the display. Compare this result with the range printed on the test strip vial and it should fall within this range. If not, please read instruc- tions again and repeat the control solution test.
-
Page 30: Testing With Blood Sample
TESTING WITH BLOOD SAMPLE NOTE To reduce the chance of infection: • Never share a lancet or the lancing device. • Always use a new, sterile lancet. Lancets are for single use only. • Avoid getting hand lotion, oils, dirt, or debris in or on the lancets and the lancing device. -
Page 31: Preparing The Puncture Site
Preparing the Puncture Site Stimulating blood perfusion by rubbing the puncture site prior to blood extraction has a significant influence on the glucose value obtained. Blood from a site that has not been rubbed exhibits a measurably different glucose concentration than blood from the finger. When the puncture site is rubbed before blood extraction, the difference is significantly reduced. - Page 32 ► Fingertip testing Press the lancing device ’ s tip firmly against the lower side of your finger- tip. Press the release button to prick your finger, then a click indicates that the puncture is complete. ► Blood from sites other than the fingertip Replace the lancing device cap with the clear cap for AST.
-
Page 33: Alternative Site Testing
Alternative Site Testing IMPORTANT: There are limitations with AST (Alternative Site Testing). What is AST? Alternative site testing (AST) means that people can use parts of the body other than the fingertips to check the blood glu- cose levels. This system allows you to test on the palm, the forearm, the upper arm, the calf or the thigh with the equivalent results to fingertip testing. -
Page 34: Performing A Blood Glucose Test
We strongly recommend that perform AST ONLY at the following times: • In a pre-meal or fasting state (more than 2 hours since the last meal). • Two hours or more after taking insulin. • Two hours or more after exercise. Do NOT use AST if: •... - Page 35 Step 1 Insert the test strip to turn on the monitor Wait for the monitor to display the test strip and blood drop symbol. Step 2 Obtaining a blood sample Use the pre-set lancing device to puncture desired site. After penetration, discard the first drop of blood with a clean tissue or cotton.
- Page 36 NOTE • Do not press the puncture site against the test strip or try to smear the blood. • If no blood sample is applied to the test strip within 3 minutes, the monitor will automatically turn off. You must remove and reinsert the test strip to start a new test.
- Page 37 Step 5 Eject the used test strip and remove the lancet To eject the test strip, point the strip at a disposal container for sharp objects. The monitor will switch itself off automatically after the test strip is ejected. Always use caution when removing the lancet. Remove the lancet by pulling the cap off first.
-
Page 38: Monitor Memory
MONITOR MEMORY This monitor stores the 864 most recent results along with respective dates and times in the monitor memory. To recall the memory, start with the monitor off. Reviewing Test Results Step 1 Press and release “ ” will appear on the display. Step 2 Press Review all test results stored in the monitor. - Page 39 NOTE • Any time you wish to exit the memory, press or leave it without any action for 3 minutes. The monitor will turn off automatically. • If using the monitor for the first time, “ --- “ displays when you recall the test results or review the average result.
-
Page 40: Downloading Results Onto A Computer
Step 1 Install Software Download Health Care System Software and instruction manual provided on Fora Care Suisse AG website: www.foracare.ch to a com- puter. Follow the instructions to install the software on the computer. Step 2 Connect the USB cable to a data port on PC With the monitor turned off, connect the cable to the data port lo- cated at the side of the monitor. - Page 41 Step 3 Transmit Data Follow the instructions provided in the software to transmit data. Data transmitted will include results with date and time. Remove the cable and the monitor will automatically turn off.
-
Page 42: Maintenance
MAINTENANCE Battery The monitor comes with four 1.5V AA size alkaline batteries. ► Low Battery Signal The monitor will display the two messages below to alert you when the monitor power is getting low. Step 1 The “ ” symbol appears along with display messages: The monitor is functional and the result remains accurate, but it is time to change the batteries. -
Page 43: Replacing The Battery
► Replacing the Battery To replace the batteries, make sure that the monitor is turned off. 1. Press the edge of the battery cover and lift it up to remove. 2. Remove the old batteries and replace with four 1.5V AA size alka- line batteries. -
Page 44: Using Ac Adapter
Using AC Adapter ► Connect AC adapter to the monitor. Step 1 Connect AC adapter plug to DC adapter jack of the monitor. Step 2 Plug AC adapter power plug into an electri- cal outlet. The monitor is ready for use. ►... -
Page 45: Caring For The Monitor
Caring for Your Monitor To avoid the meter and test strips attracting dirt, dust or other contaminants, please wash and dry your hands thoroughly before use. ► Cleaning • To clean the monitor exterior, wipe it with a cloth moistened with tap water or a mild cleaning agent, then dry the device with a soft dry cloth. -
Page 46: Caring For The Test Strips
Caring for the Test Strips • Storage condition: 10 ° C to 40 ° C (50 ° F to 104 ° F), below 85% rela- tive humidity. Do not freeze. • Store the test strips in their original vial only. Do not transfer to other container. -
Page 47: Important Control Solution Information
Important Control Solution Information • Use only FORA control solutions with the monitor. • Do not use the control solution beyond the expiry date or 3 months after first opening. Write the opening date on the control solution vial and discard the remaining solution after 3 months. -
Page 48: System Troubleshooting
SYSTEM TROUBLESHOOTING If you follow the recommended action but the problem persists, or er- ror messages other than the ones below appear, please call your local customer service. Do not attempt to repair by yourself and never try to disassemble the monitor under any circumstances. Result Readings MESSAGE WHAT IT MEANS... - Page 49 MESSAGE WHAT IT MEANS Appears when the result is in the reference range from 70 to 119 mg/dL (3.9 to 6.6 mmol/L). Appears when the result is equal to or greater than 120 mg/dL (6.6 mmol/L). It indicates the result is higher than reference range.
-
Page 50: Error Messages
Error Messages MESSAGE CAUSE WHAT TO DO Please contact local cus- Inflation or pressure error. tomer service for help. Pressure error. Refit cuff tightly and Cuff pressure is too high. correctly. Repeat the measurement. If error still remains, please contact local customer service for help. - Page 51 MESSAGE CAUSE WHAT TO DO Repeat the test with a new Strip has been used. strip. Review the instructions Problem in operation. and repeat the test with a new strip. System operational range is 10°C to 40°C (50°F to Environmental temperature 104°F).
-
Page 52: Troubleshooting
Troubleshooting 1. Blood Pressure Measurement ► If no display after pressing POSSIBLE CAUSE WHAT TO DO Batteries incorrectly installed or Check that the batteries are correctly absent. installed. ► If the heart rate is higher/lower than user’s average: POSSIBLE CAUSE WHAT TO DO Movement during measurement. - Page 53 2. Blood Glucose Measurement ► If the monitor does not display a message after inserting a test strip: POSSIBLE CAUSE WHAT TO DO Test strip inserted upside down or Insert the test strip with contact bars incompletely. end first and facing up. Please contact customer service.
- Page 54 ► If the control solution testing result is out of range: POSSIBLE CAUSE WHAT TO DO Read instructions thoroughly and Error in performing the test. repeat the test again. Control solution vial was poorly Shake the control solution vigorously shaken. and repeat the test again.
-
Page 55: Detailed Information
DETAILED INFORMATION Reference Values Blood Pressure Human blood pressure naturally increases after reaching middle age. This symptom is a result of continuous ageing of the blood ves- sels. Further causes include diabetes, obesity, lack of exercise and cholesterol (LDL) adhering to the blood vessels. Rising blood pressure accelerates hardening of the arteries, and the body becomes more susceptible to apoplexy and coronary infarction. - Page 56 Source: The European Society of Hypertension and European Society of Cardiol- ogy Task Force Members. 2007 ESH-ESC Practice Guidelines for the Manage- ment of Arterial Hypertension. J Hypertens 2007; 25: 1751-1762. Blood Glucose Blood glucose monitoring plays an important role in diabetes control. A long-term study showed that maintaining blood glucose levels close to normal can reduce the risk of diabetes complications by up to 60%* The results provided by this system can help healthcare profession-...
-
Page 57: Comparing Monitor And Laboratory Results
Comparing Monitor and Laboratory Results The monitor provides you with whole blood equivalent results. The result you obtain from the monitor may differ somewhat from the laboratory result due to normal variation. Monitor results can be af- fected by factors and conditions that do not affect laboratory results in the same way. - Page 58 You may have a variation from the monitor and laboratory results because of your patient blood glucose levels can change significantly over short periods of time, especially if they have recently eaten , exercised, taken medication, or experienced stress* . In addition, if the patient has eaten recently, the blood glucose level from a finger prick can be up to 70 mg/dL (3.9 mmol/L) higher than blood drawn from a vein (venous sample) used for a lab test*...
-
Page 59: Symbol Information
SYMBOL INFORMATION Symbol Referent For in vitro diagnostic use Do not reuse Read instructions before use Keep away from sunlight Keep dry Temperature limitation Use by/ Expiry date Use within three months after first opening Batch code Manufacturer Serial number Caution, consult accompanying documents Sterilized using irradiation STERILE R... -
Page 60: Specifications
SPECIFICATIONS System performance Power source: Four 1.5V AA alkaline batteries 147 (L) x 105 mm (W) x 80 mm (H), 500g with Size of monitor w/o cuff: batteries Memory: Maximum 864 memory records Automatic power off if system idle for 3 Power saving: minutes System operating... - Page 61 Blood pressure measurement performance Pressure range: 0 - 300 mmHg Heart rate range: 40 -199 beat per minute Measurement unit: mmHg Systolic Measurement Range: 55 mmHg -260 mmHg Diastolic Measurement Range: 25 mmHg -195 mmHg Pulse Rate Measurement Range: 40 -199 beats / minute Maximum inflation pressure: 280 mmHg Accuracy of Pressure:...
- Page 62 MEMO...
- Page 63 MEMO...
Need help?
Do you have a question about the D40 Pro and is the answer not in the manual?
Questions and answers