Table of Contents
Advertisement
Advertisement
Chapters
Table of Contents
Troubleshooting

Related Manuals for Campanola 776


Summary of Contents for Campanola 776
- Page 1 INSTRUCTION MANUAL CAN12...
- Page 2 Thank you for your purchase of this Campanola watch. Before using the watch, read this instruction manual carefully to ensure correct use. After reading the manual, store it in a safe place for future reference. Visit the Citizen website (http://www.citizenwatch-global.com/) to view visual guides for operation of your watch.
- Page 3 Safety precautions (IMPORTANT) This manual contains the following instructions that should be strictly followed at all times to prevent injury to yourself and other persons as well as damage to property. Safety advisories are categorized and depicted in this manual as follows: •...
- Page 4 <Protective stickers> Be sure to remove any protective stickers that may be on your watch (case back, band, clasp, etc.). Otherwise, perspiration or moisture may enter the gaps between the protective stickers and the parts, which may result in a skin rash and/or corrosion of the metal parts.
-
Page 5: How To Use A Specially Designed Crown
How to use a specially designed crown Some models are equipped with a specially designed crown and/or push button to prevent accidental operation. Screw down crown and screw down push button Unlock the crown prior to operate your watch. Unlock Lock Rotate the crown Push the crown in to... - Page 6 You will be registered based on the [Customer Registration Card] and at the same time, we will mail the Campanola Customer Card to you. Be sure to keep the Customer Registration Card (a tentative warranty) with care until the Campanola Customer Card reachs you.
-
Page 7: Table Of Contents
Please check the model number (Caliber No. ) of your watch and refer to the instructions for your watch. Contents How to use a specially designed crown ....72 1. Main Features ..........78 Grand Complication 2. Names of Components ......... 79 3. - Page 8 2. Names of Components ....... 119 3. Setting the Time .......... 120 4. Correcting the Time Difference of the Local Time ......... 122 Cal. 776* 5. Low Battery Warning Function ....123 6. Specifications ..........124 Handling Your Watch Precautions ............125 Warranty and After-Sales Service ....
- Page 10 rand Grand Complication ompliCation 1. Main Features ........677 * 2. Names of Components ......Cal. No. 3. Before Use ..........4. Setting the Reference Position....5. Setting the Time ........6. Setting the Calendar ......7. Using the Chronograph ......8.
-
Page 11: Main Features
1. Main Features This watch is a multi-hand analog quartz watch equipped with minutes repeater function * using an electronic tone, perpetual calendar function, which corrects the date for each month including leap years, and a chronograph function that is able to measure time for up to 12 hours. -
Page 12: Names Of Components
2. Names of Components Chronograph second hand Moon age Minute hand Hour hand Button (B) Moon age correction button Crown Day hand 24 hour hand Button (C) Button (A) Date hand Second hand Year hand Month hand * The illustrations in this instruction manual may differ from the actual appearance of your watch. - Page 13 Functions of Each Hand Display Time/calendar Chronograph Hand * Hour hand Continuously indicates hours Minute hand Continuously indicates minutes Second hand Continuously indicates seconds 24 hour hand Continuously indicates the 24 hour clock Chronograph — Chronograph seconds second hand Date hand Continuously indicates the date Day hand Continuously indicates the day...
- Page 14 Functions of Each Button Crown Normal position 1st position 2nd position position Time/calendar Chronograph Setting the calendar Setting the time display Zero position Yearly/Monthly Setting of chime: — Button (A) check/Split/ correction: Clockwise Reset Clockwise direction direction Setting of chime: Yearly/Monthly Counter- Button (B)
-
Page 15: Before Use
3. Before Use Before using this watch, please check the reference positions of each hand using the following * procedure to ensure that each function operates properly. Reference position:The initial position of each hand to ensure that this watch functions properly. Confirmation of Reference Position 1) Put the crown in the normal position. -
Page 17: Setting The Reference Position
4. Setting the Reference Position The hands of the watch will not indicate the correct positions unless the reference position is set * properly. If the reference position has changed, reset it by following the procedure described below. * The reference position must also be reset after the battery has been replaced. Perform the All-Reset procedure 1) Pull out the crown to the 2nd position. - Page 18 Setting the Reference Position 1) Press button (A) and set the year and month hands to 00:00. 2) Press button (B) and set the chronograph second hand to 00.00 seconds. 3) Press button (C) and set the date hand to the ▼...
-
Page 19: Setting The Time
5. Setting the Time Minute Setting the Time and Day of the Basic Clock hand 24 hour * hand Hour hand Once the time has been set for the basic clock, always make sure to set the time of the minutes repeater according to the time of the basic clock. - Page 20 Setting the Time of the Minutes Repeater 1) Pull out the crown to the 2nd position so that the second hand of the basic clock stops at 0 seconds. 2) Push button (A) or (B) and set the year and month hands to the time of the basic clock.
- Page 21 Using the Minutes Repeater • The minutes repeater is a convenient function that lets you know the time (hours and minutes). Pressing button (B) in the time and calendar display * informs you of the current time with an electronic tone. •...
-
Page 22: Setting The Calendar
6. Setting the Calendar Moon age correction button Setting Date, Month and Year (Leap Year) 1) Pull out the crown to the 1st position. 2) Press button (A) or (B) to set the month and year (leap year for number of years passed since the last leap year). - Page 23 3) Press button (C) to set the date. • The date advances by 1 day each time button (C) is pressed. Pressing button (A), (B) or (C) confinuosly causes the hands to advance rapidly. 4) Return in the crown to the normal position. *...
- Page 24 Setting the Moon Age The moon age can be corrected regardless of the position of the crown. Press the moon age correction button to set the age of the moon. • Look in a newspaper to find out the moon age for the day, and then set the moon mark while referring to the moon age reference chart shown below.
-
Page 25: Using The Chronograph
7. Using the Chronograph The chronograph second hand is normally placed at 12 o’clock position. Once the measurement * starts, it can measure up to 12 hours in units of 1/4 second. After 12 hours have elapsed, the chronograph returns to the chronograph reset display and stops. The chronograph can also be used to measure split time (intermediate elapsed time). - Page 26 Simple Measurement 1) Press button (B) to start measuring time. 2) Press button (B) again to end measurement and display elapsed time. 3) Pressing button (A) resets the chronograph and returns each chronograph hand to zero. Integrated Measurement 1) Press button (B) to start measuring time. 2) Press button (B) again to end measurement and display elapsed time.
- Page 27 Measurement of Split Time (Intermediate Elapsed Time) 1) Press button (B) to start measuring time. 2) Pressing button (A) stops each chronograph hand to display the split time. * • Measurement of time continues even though the hands are not moving. 3) Pressing button (A) again cancels the display of split time after which measurement continues with the time that elapsed during display of split time added to the measured time (the chronograph hands begin to move again).
- Page 28 End measurement Reset Measurement (display elapsed time) End split time Split time display Split time measurement (display of final elapsed time)
- Page 29 Simultaneous Measurement of 1st Place and 2nd Place Times 1) Press button (B) to start measuring time. 2) Press button (A) when the 1st place competitor crosses the finish line. The time of the * 1st place competitor is displayed. •...
-
Page 30: Troubleshooting
8. Troubleshooting The date hand is moving backward (in 1 second intervals) • This indicates that the Reference Position Failure Alarm has been activated as a result of not setting the reference position. Perform the All-Reset and Reference Position Setting procedures by referring to “4. Setting the Reference Position”. The hands do not indicate the correct positions in each mode •... - Page 31 After Replacing the Battery • Always make sure to perform the All-Reset and Reference Position Setting procedures by referring to "4. Setting the Reference Position" after replacing the battery. If these * procedures are not performed, the watch may not operate properly.
-
Page 32: Specifications
9. Specifications • Caliber No: 677* • Type: Multi-hand analog quartz watch • Accuracy: Within ±20 seconds per month on average (when worn at normal temperatures (+5 ~ +35°C)) • Operating Temperature Range: -10°C to +60°C • Display Functions: • Time: Hours, minutes, seconds, 24 hour clock •... - Page 33 • Battery: Battery no. 280-44 (SR927W) • Battery Life: Approx. 2 years (assuming that the minute repeater sounds for 17 seconds/ day and chronograph measurement is used for 1 hour per/day) * * Specifications are subject to change without notice.
- Page 34 erpetual Perpetual Calendar alendar 1. Features ..........670 * 2. Component Names ......Cal. No. 3. Viewing the Watch Indications .... 4. Before Using the Watch - Reference position verification - ..5. Setting the Time ........6. Setting the Calendar ......7.
- Page 35 1. Features This product is an analog quartz watch that uses to hands to show the hour, minutes, and seconds, indicate the hours on a 24-hour basis, and furnish calendar information (year, month, date, and day of the week). The calender is a perpetual calender, which automatically adjusts the end of each month, including the month of a leap year.
-
Page 36: Component Names
2. Component Names Year indicator Minute hand Year hand Button (B) (future button) 24-hour hand Hour hand Crown Day of the week Second hand Button (C) (reset button) Button (A) (past button) Date hand Month hand Month indicator * The illustrations in this instruction manual may differ from the actual appearance of your watch. * Ensure that the crown is always placed in the normal position during normal use of the watch. - Page 37 Operating procedure overview Crown First click Second click Normal position position position Operation Calls a past Adjust the month * Pressing button calendar and day of the - - - (backward). month. Pressing button Calls a future Adjusts the year. - - - calendar (forward).
-
Page 38: Viewing The Watch Indications
3. Viewing the Watch Indications Viewing the time Viewing the calendar Year Minute hand Hour hand Day of the week Date 24-hour hand Second hand Month... - Page 39 2084 Year indication 2056 The year hand indicates the years that are arranged in a 2028 2000 straight line as shown below. 1972 In the widely used Gregorian calendar, a leap year is 1944 roughly defined as a year that is divisible by four. 1916 However, years divisible by four are not regarded as a leap year and counted as a common year if its quotient...
-
Page 40: Before Using The Watch
4. Before Using the Watch - Reference position verification - Before the use of the watch, you should perform the following procedure to verify that the reference position is properly set for each hand of the watch. If the reference positions are not correctly set, the calendar feature does not properly work. Year 2000 Verifying the reference position December... -
Page 41: Setting The Time
5. Setting the Time 1) When the second hand indicates 0 second, pull Hour hand Minute hand the crown out to the second click position. 2) Rotate the crown as needed to set the time. Time setting Carefully note the 24-hour hand to distinguish position between an A.M. -
Page 42: Setting The Calendar
6. Setting the Calendar 1) Pull the crown out to the first click position. Calendar Year 2) Press button (B) to set the year. setting position The year hand advances by one year at each press of button (B). Holding down this button rapidly advances the year. -
Page 43: Calling The Calendar
* The day of the week is automatically set in accordance with the month and date settings. * Do not change the calendar indication during the time between about 9 p.m. and 1 a.m. If you change the calendar indication during such a period of time, the calendar indication may fail to change on the next day. - Page 44 Calling the calendar 1) With the crown placed in the normal position, you can shift the calendar indication toward the past or future by pressing button (A) or (B). The calendar indication changes by one day at each press of button (A) or (B). (Holding down the button rapidly changes the calendar indication.) 2) The watch automatically returns to the present calendar display mode at the press of button (C) or after an elapse of 30 seconds.
-
Page 45: Troubleshooting
8. Troubleshooting The year hand moves rapidly in reverse direction The reference positioning procedure is not properly completed. That is why the “reference positioning failure alarm feature” is activated. Properly adjust the reference positions of all hands as directed in Section 9, Adjusting the *... - Page 46 The watch operates erratically The watch may occasionally perform an abnormal operation (e.g., the hands may rotate in an unusual manner) if it is adversely affected by static electricity or severely shocked. In this instance, properly adjust the reference positions of all hands as directed in Section 9, Adjusting the Reference Positions.
-
Page 47: Adjusting The Reference Positions
9. Adjusting the Reference Positions If the reference positions are not properly adjusted for all hands, the watch improperly operates. When the reference positions are found improper, perform the following procedure to adjust the reference position of each hand. (This procedure must also be completed after battery replacement.) *... - Page 48 3) Press button (B) to set the year hand to the year 2000. 4) Press button (A) to set the month and date hands to December 31. 5) Press button (C) to place the day-of-the-week hand in the Sunday (SUN) position. * Continued pressing of button (A) and button (B) will forward the hands rapidly.
- Page 49 10. Specifications • Caliber No: 670* • Type: Analog quartz watch • Accuracy: Within ±20 seconds per month (When worn at normal temperature of +5°C ~ +35°C) • Operating temperature range: -10°C ~ +60°C * • Display functions: • Time: hour, minute, second, 24-hour hand •...
- Page 50 Dual time 776 * Cal.No. 1. Features ..........2. Names of Components ....... 3. Setting the Time ........4. Correcting the Time Difference of the Local Time ......... 5. Low Battery Warning Function .... 6. Specifications ........
- Page 51 1. Features This watch is an analog quartz watch featuring a dual time function that simultaneously displays time using an ordinary three-hand display (home time) as well as local time. The Local Time enables adjustment in 1-hour increments through a simple button operation without stopping the watch, allowing easy adjustment to the time of another city.
-
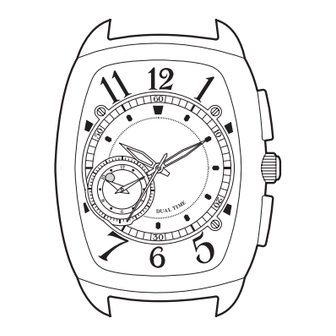
Page 52: Names Of Components
2. Names of Components Minute hand Hour hand Local time minute hand Button (B) Crown AM/PM mark Local time hour hand Button (A) Second hand * The illustrations in this instruction manual may differ from the actual appearance of your watch. - Page 53 3. Setting the Time The Home Time and the Local Time are synchronized. When setting the time, be sure to always set the minute hand of the Local Time at the same position as the minute hand of the Home Time. 1) Pull the crown out when the second hand arrives at the 0-second position.
- Page 54 Second hand Minute hand Hour hand Local Time minute hand Time correction position Crown AM/PM mark Normal position Local Time hour hand...
- Page 55 4. Correcting the Time Difference of the Local Time Perform operation with the crown in the normal position. Pressing the button (A) or the button (B) corrects the time difference in 1-hour increments for each time the button is pressed. Local Time (Pressing the button continuously minute hand...
-
Page 56: Low Battery Warning Function
5. Low Battery Warning Function When the battery is near exhaustion, the second hand switches to two-second interval movements (the second hand moves in two-second interval movements every two seconds). Even at this time, the watch runs accurately however please have the battery changed as soon as possible should this happen. -
Page 57: Specifications
6. Specifications • Model: 776* • Type: Analog Quartz Watch • Accuracy: Within ±15 seconds per month (when worn at normal temperatures of +5°C to +35°C • Operating Temperature Range: Watch operating temperature range: –10°C to +60°C • Display functions: Hours, minutes, seconds, Local Time (hours, minutes, AM/PM mark) *... - Page 58 Precautions WARNING Handling of the Battery • Keep the battery out of the reach of small children. • In the event a battery is swallowed, immediately consult a physician. • Do not dispose of the rechargeable cell with ordinary garbage. Please follow the instructions of your municipality regarding collection of batteries to prevent the risk of fire or environmental contamination.
-
Page 59: Water Resistance
WARNING Water Resistance • Refer to the watch dial and the case back for the indication of the water resistance of your watch. The following chart provides examples of use for reference to ensure that your watch is used properly. (The unit "1bar"... - Page 60 • Upgraded water resistance for daily use (to 5 atmospheres) means that the watch may be worn while swimming, but is not to worn while skin diving. • Upgraded water resistance for daily use (to 10/20 atmospheres) means that the watch may be worn while skin diving, but not while scuba or saturated diving using helium gas.
- Page 61 CAUTION To Avoid Injury • Be particularly careful when wearing your watch while holding a small child, to avoid injury. • Be particularly careful when engaged in strenuous exercise or work, to avoid injury to yourself and others. • Do NOT wear your watch while in a sauna or other location where your watch may become excessively hot, since there is the risk of burns.
- Page 62 • If seawater enters the watch, place the watch in a box or plastic bag and immediately take it in for repair. Otherwise, pressure inside the watch will increase, and parts (crystal, crown, push button, etc.) may come off. CAUTION When Wearing Your Watch <Band>...
- Page 63 • Please request adjustment or repair of the band in the following cases: - You notice an abnormality with the band due to corrosion. - The pin of the band is protruding. • We recommend seeking the assistance of an experienced watch technician for sizing of your watch.
-
Page 64: Static Electricity
<Strong Shock> • Avoid dropping the watch or subjecting it to other strong impact. It may cause malfunctions and/or performance deterioration as well as damage to the case and bracelet. <Static Electricity> • The integrated circuits (IC) used in quartz watches are sensitive to static electricity. Please note that the watch may operate erratically or not at all if exposed to intense static electricity. - Page 65 CAUTION Always Keep Your Watch Clean • Rotate the crown while it is pressed in fully and press the buttons periodically so they do not become stuck due to accumulations of foreign matter. • The case and band of the watch come into direct contact with the skin in the same manner as undergarments.
-
Page 66: Caring For Your Watch
Caring for Your Watch • Wipe any dirt or moisture such as perspiration from the case and crystal with a soft cloth. • For a metallic, plastic or rubber (urethane) watchband, wash any dirt off with water. Remove the small amounts of dirt trapped between the crevices of the metallic band with a soft brush. -
Page 67: Customer Support Center
Warranty and After-Sales Service • Free guarantee In the case a malfunction has occurred during the course of normal use while the watch is still under warranty, the watch will be repaired free of charge in accordance with the conditions of the warranty included with this manual. - Page 68 • Periodic inspection (Charge basis) • Water resistance As the water resistance will be reduced over time, you should have your watch inspected and its water resistance verified every 2-3 years (charge basis) to extend its life and ensure safety. To maintain its water resistance, it is recommended to request us to replace the packings and other parts of your watch.
Need help?
Do you have a question about the 776 and is the answer not in the manual?
Questions and answers