Table of Contents
Advertisement
Advertisement
Table of Contents

Related Manuals for Riccar Brilliance BRLP


Summary of Contents for Riccar Brilliance BRLP
- Page 1 Description of the vacuum BRLP, BRLD, BRLS & RETRIEVER O w n e r ’ s M a n u a l...
-
Page 3: Table Of Contents
Lifetime belt warranty ..................Annual checkup reminder ................. Problem Solving Guide Full bag or clog indicator light ................Jammed brushroll .................... Thermal motor protection ................. Trouble shooting ....................How to contact your Authorized Retailer ............Visit Riccar online ..................... Warranty ......................... -
Page 4: Important Safety Instructions
IMPORTANT SAFETY INSTRUCTIONS When using an electrical appliance, basic precautions should always be followed, including the following: READ ALL INSTRUCTIONS BEFORE USING THIS APPLIANCE WARNING: The manufacturer cannot accept responsibility for damage caused when the appliance is not used according to the instructions, or for uses other than those for which it was intended. -
Page 5: Polarization Instructions
Polarization Instructions POWER CORD, 2-WIRE POLARIZED CORD Household models BRLP, BRLD, BRLS and RETRIEvER To reduce the risk of electric shock, this product is equipped with a polarized alternating current line plug (a plug having one blade wider than the other). This plug will fit into the power outlet only one way. -
Page 6: Description Of The Vacuum
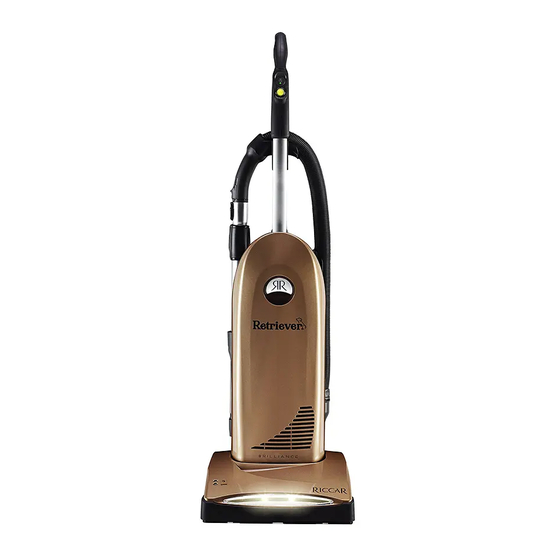
Description of the Vacuum... - Page 7 Description of the Vacuum Ergonomic handle Main on / off power switch Carpet / bare floor switch Power cord Fast Task tools (BRLP, BRLD and RETRIEvER models) ™ Carrying handle (located behind bag compartment lid) Bag compartment latch (to replace vacuum bag and secondary filter) Vacuum nozzle Xenon headlight Furniture guard...
-
Page 8: Before Using Your Brilliance For The First Time
Before Using Your Brilliance for the First Time Attaching the handle to the vacuum • Remove the handle screw located on the back of the vacuum. Insert the handle downward into the body of the vacuum. Insert screw and tighten. •... -
Page 9: Operation
Operation Vacuuming carpet Brushroll auto shut-off feature Note: When the Brilliance is turned on and • For carpet cleaning, press the “on / off” switch on and press the “carpet” switch in the upright position, the brushroll will not on. Both lights should be lit. spin as to eliminate the possibility of damage to floor surfaces. -
Page 10: Carpet Height Adjustment
Operation Carpet height adjustment There are various carpet height settings available designed for numerous flooring surfaces. • Locate the height adjustment dial just above the right rear wheel, and rotate the dial to the desired height. Models BRLP and RETRIEVER Shag/Frieze or similar length carpet X Hi Plush carpet... -
Page 11: Vacuuming Under Furniture
Operation Vacuuming under furniture Your Riccar Brilliance will lay flat on the floor for effective cleaning under beds and tables. • Press the foot pedal release once for normal vacuum cleaning. • Press the foot pedal release a second time to enable the vacuum to lay flat on the floor. -
Page 12: Attachment Cleaning
Attachment Cleaning Wand cleaning (models BRLP, BRLD and RETRIEVER) With the on-board cleaning tools and vacuum wand, your Riccar Brilliance becomes a comprehensive cleaning system. Included with the BRLP, BRLD and Retriever models is an upholstery tool, dusting brush, crevice tool, extension wand and a 5-to-1 stretch hose. -
Page 13: Cleaning Tools
Your vacuum is equipped with a dusting brush, upholstery brush and crevice tool. Other tools are available at your Authorized Riccar Retailer. • Remove the cleaning wand from the vacuum and turn the tool activation dial to the “on” position. (See page 10) •... - Page 14 Attachment Cleaning Handheld Turbo Brush: (RETRIEVER model) • Ideal for removing pet hair from upholstery, stairs and vehicles. Handheld Turbo Brush Cleaning tools can also be attached to the curved handle for above-floor cleaning. • Disconnect the wand from the curved handle by pressing the wand release button.
-
Page 15: Adjusting The Suction Power
Attachment Cleaning Adjusting the suction power for tool cleaning Full suction power might be too strong for some cleaning situations. For example, reduced suction power would be appropriate for cleaning sheer curtains. • On the curved handle, locate the suction relief valve and slide it backward. -
Page 16: Maintenance And Care
Maintenance and Care When to change the vacuum bag The full bag indicator light is designed to show when the bag is full or when there is a clog in the vacuum. Brushroll The system measures airflow and alerts the Full Bag user when airflow is significantly reduced—... -
Page 17: Replacing The Vacuum Bag
Maintenance and Care Replacing the vacuum bag • Open the bag compartment lid. • Remove vacuum bag by pressing the bag tab. • To insert a new bag, place the base of the bag collar on the bag supports. Then secure the top of the bag collar with the bag tab. -
Page 18: When To Change The Filters
Maintenance and Care When to change filters At minimum, it’s recommended to replace the filters after using twelve vacuum bags. If someone in your household is highly sensitive to airborne allergens, it is recommended to change the filter set after every six vacuum bags. Replacing the post filter Note: Your vacuum is equipped with either a HEPA filter or an electrostatic filter. - Page 19 Maintenance and Care Replacing the secondary filter (models BRLP, BRLD and BRLS) • Open the bag compartment lid and locate the secondary filter on the left side of the bag compartment. • Pull the front tab away from the vacuum to remove the filter holder.
-
Page 20: Lifetime Belt Warranty
Your vacuum belt is covered with a lifetime warranty. Should the vacuum belt break, simply bring your vacuum or the broken belt to your Authorized Riccar Retailer for a free replacement. Annual checkup reminder To keep your vacuum in peak operating condition, it is recommended you bring your vacuum to your Authorized Riccar Retailer for an annual checkup. -
Page 21: Problem Solving Guide
“brushroll warning” light is still lit, it’s likely the clogged condition is located in the vacuum motor fan. If so, please take your Brilliance to an Authorized Riccar Retailer for service. -
Page 22: Thermal Motor Protection
4. Press reset button source (clogged Reset button on the back of the vacuum. If problem persists, hose or full bag) consult owner’s manual or contact retailer. Press button and resume vacuuming. If problem continues, contact your Authorized Riccar Retailer. -
Page 23: Trouble Shooting
• Review filter installation correctly (page 20) • vacuum bag not installed • Review bag installation correctly (page 19) Any other service should be done by an Authorized Service Representative. Service 1-888-6-RICCAR To locate your nearest retailer, visit our website at www.riccar.com... -
Page 24: Warranty
Warranty What is Covered: This warranty covers any defects in material and workmanship in your new Riccar Brilliance vacuum. How Long Coverage Lasts: Warranty coverage for your Riccar vacuum lasts five years for household use. What is Not Covered: • Damage to the vacuum which occurs from neglect, abuse, alterations, accident, misuse or improper maintenance. - Page 25 Owner’s Warranty Information keep this for your records… Date of purchase Serial number Model number Purchased from: Store name Address City, State, Zip Telephone...
- Page 26 ©2013 Tacony Corporation B503-3100C...
Need help?
Do you have a question about the Brilliance BRLP and is the answer not in the manual?
Questions and answers