Advertisement
Quick Links
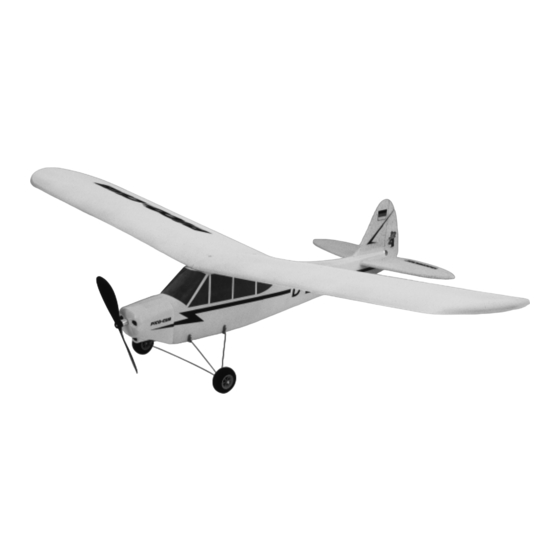
PiCO CUB
PiCO CUB
Electric model aircraft
The beginner's model with flair
Super flying qualities
Ideal for the beginner - flies great all by itself
Quick to assemble
Complete it in one afternoon
No finishing required
The model components are moulded in coloured plastic foam, and
come out of the mould as finished items
Can even be flown with only two channels
Fixed elevator
Flies in a very small space - even on a football pitch!
MULTIPLEX
Modelltechnik GmbH
22
Version 2 07/2001
Neuer Weg 15
D-75223 Niefern
# 21 4111
GB
www.multiplex-rc.de
Advertisement

Related Manuals for Multiplex PiCO CUB


Summary of Contents for Multiplex PiCO CUB
- Page 1 # 21 4111 PiCO CUB PiCO CUB Electric model aircraft The beginner’s model with flair Super flying qualities Ideal for the beginner - flies great all by itself Quick to assemble Complete it in one afternoon No finishing required The model components are moulded in coloured plastic foam, and...
-
Page 2: Building Instructions
PiCO CUB - Building instructions [1. Examine your kit carefully! MULTIPLEX models are subject to constant quality checks throughout the production process, and we sincerely hope that you are happy with the contents of your kit. However, we would ask you to check all the parts before you start construction, with reference to the parts list, as we cannot exchange components which you have already worked on. - Page 3 Motor cowl Höhenruder Propeller L.H. wing panel Fuselage PiCO CUB Undercarriage set Wing section The wing features a cambered airfoil section over which the air If you are sure that both these settings (CG and longitudinal flows when the model is flying. In a given period of time the air...
- Page 4 Assembling the model: In order to position these holes accurately it is necessary to install the servos in the fuselage. Screw the two servos to the mounting Preparation: rails 47 and check that this assembly fits in the fuselage. Shorten Check all the styrofoam parts carefully, and clean up any rough the rails if necessary.
- Page 5 Installing the motor (# 21 4111 only): spaced 100 mm apart. The undercarriage legs are later glued The standard power system for the model is the direct-drive Per- together and taped down directly over these lines. max 400 6V motor 71. The first step is to separate the motor plate Sand the ends of the undercarriage legs, fit the washers 86 on 49 from the die-cut sheet;...
- Page 6 Auftriebskraft α...
- Page 7 60/61 60/61...
- Page 8 12mm...
- Page 9 84 86...
- Page 10 However, while you watch the servos carefully: the non-controlled one if you intend flying simple aerobatics with your PiCO Cub, or if should remain stationary up to a distance of about 80 m, and the...
- Page 11 Replacement parts can be ordered through your local model shop. Parts list - radio control system and accessories The Complete Set (A+B+C = All-In Pack) - PICO CUB A+B+C 35 MHz # 1 3023...
- Page 12 PiCO-line transmitter tray# 8 5039 - Carbon-look plastic with support bars, neckstrap and fittings PiCO CUB “Tuning”: If you equip the model with the 400L geared motor you can obtain longer flight times from the same size of battery.
- Page 13 Parts list - PICO-CUB Part Description Material Dimensions Building instructions Name placard / decal set Printed adhesive film Ready made Fuselage Fuselage Moulded styrofoam Ready made, yellow Fuselage turtle deck Moulded styrofoam Ready made, yellow Motor cowl Vac. moulded plastic Ready made Wings L.H.
- Page 14 20 (2x) 21 (2x) 22(2x) + 23 (2x) 24 (1x) 25 (1x) 26 (1x) 30 (4x) 31 (2x) 27 (1x) 28 (8x) 29 (2x) 32 (2x) 33 (2x) 34 (2x) 36 (2x) 37 (2x) 38 (2x) 40 (1x) 40 (1x) 35 (1x) 47 (2x) 48 (1x)
Need help?
Do you have a question about the PiCO CUB and is the answer not in the manual?
Questions and answers