
Related Manuals for Foster FL-F60 MTL


Summary of Contents for Foster FL-F60 MTL
- Page 1 Guida rapida di utilizzo Guía Rápida de Uso Guia Ràpido de Utilização Quick Start Guide Mode d’emploi rapide FL-F60 MTL...
-
Page 2: Control Panel
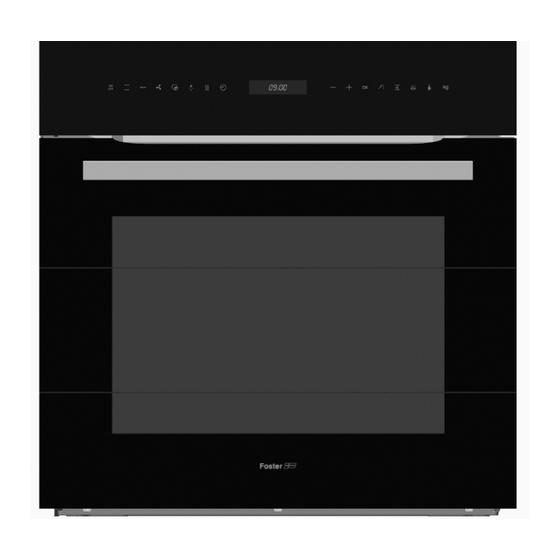
FL-F60 MTL 1 Front control panel 2 Oven Seal 3 Double folding grill elements 4 Handle for extracting shelves 5 Grid shelf 6 Telescoping guide rails 7 Cake shelf 8 Deep shelf 9 Door switch 10 Hinge 11 Triple glazed door... - Page 3 Oven cooking settings With the cooking settings described below, you Conventional with Fan will have several options for oven cooking. You Suitable for roasts and cakes. The fan spreads can use the table of cooking times provided the heat evenly throughout the inside of the with this manual for optimum results.
- Page 4 Oven Use Caution The electronic clock features Touch-Control technology. To operate, simply touch the glass control symbols with your fingertip. The touch control sensitivity continuously adapts to changing conditions. Ensure that the glass fronted control surface is clean and free of any obstacles when turning on the oven.
- Page 5 Electronic Clock Settings 1 Cooking Time: This setting allows you to 2 When you have chosen the cooking time programme cooking time length, after setting , touch the OK symbol. which the oven will turn off automatically. 3 You will see the symbol and the indi- 2 Cooking Stop Time: This setting allows cation 0:00 on the screen.
- Page 6 2 Touching the + and – symbols, select the 2 When you have chosen the cooking time End Cooking Time setting , and then setting , touch the OK symbol. touch the OK symbol. 3 You will see the symbol and the indi- 3 You will see the symbol and the current...
- Page 7 3 You will see the symbol and the indi- cation 0:00 on the screen. 4 Set the time after which the alarm should 12 When it is time to start cooking, the oven sound by touching the + or – symbols. will turn on and will operate for the pro- grammed cooking time.
- Page 8 3 The screen will then display the two 4 Touch the symbols + and – to select the options for this setting, (screen off) preferred option. Touch the OK symbol. (screen on). 5 You will hear a double beep confirming the selected option.
-
Page 9: Recommendations For Defrosting Food
Quick access to cooking settings If you want to change the cooking setting or When you turn the oven on (touching the set temperature, or use the electronic timer ON/OFF symbol), it immediately offers you the settings, follow the instructions shown above possibility of quick access to the following in the section “Selecting oven cooking cooking settings, which will be lit up in white:... - Page 10 See the following chart for defrosting times and temperature levels. LO LEVEL HI LEVEL FOOD Weight Time Weight Time Bread 35 min Cake 25 min Fish 30 min Fish 1 Kg 40 min Chicken 1 Kg 75 min Chicken 1,5 Kg 90 min Rib steak 40 min...
- Page 11 Oven cooking settings Your oven offers the possibility of cooking according to the following recipes. To do this, just choose the appropriate recipe (please see the section “Selecting recipes”), enter the weight of the food to be coked and put it in the oven. There is no need to worry about anything else, as the oven will cook it for you, with perfect results.
- Page 12 Selection of recipes • Turn the oven on by touching the ON/OFF At the start or during cooking: symbol. a) If you want to change the cooking setting: • Touch the symbol which will stay lit up • Touch symbol in red.
- Page 13 d) If you want to use the electronic timer for During cooking the symbol will blink, indicating that the oven is transmitting heat to cooking: the food. • Touch the symbol which will stay lit up in red. The settings of the electronic timer IMPORTANT will be shown on the screen.
- Page 14 Cooking with the meat probe The meat probe measures the temperature inside a roast. When this temperature reaches a previously set level, the oven will turn off automatically. Cooking with the meat probe ensures optimum results for any type of meat or size of roast.
- Page 15 If you want to change the meat probe touching the + and – symbols. Finally touch temperature during cooking, touch the symbol the OK symbol. You will hear a double beep . You can then change the temperature by confirming the change. Cooking chart: suggested temperatures for cooking with the meat probe.
- Page 16 • When the internal temperature of the roast • The roast is cooked to your taste and ready reaches the temperature you have selected, to serve. the oven will turn off, an alarm signal will If you want to change the selected cooking sound for a few seconds and the symbol time, follow the instructions above again.
-
Page 17: Changing The Oven Light Bulb
Changing the oven light bulb • Change the bulb. ATTENTION Make sure the oven is unplugged before • Reassemble the glass cover and ensure changing the bulb. that everything fits in the correct position. • Detach the chrome supports by loosening the screw (A).
Need help?
Do you have a question about the FL-F60 MTL and is the answer not in the manual?
Questions and answers