Table of Contents
Advertisement
Advertisement
Table of Contents

Subscribe to Our Youtube Channel
Related Manuals for Foster 7170 052? 7172 042


Summary of Contents for Foster 7170 052? 7172 042
- Page 1 USER'S MANUAL FOR BUILT-IN OVEN Compact, cod. 7170 052 - 7172 042 Foster via M.S. Ottone, 18/20 42041 Brescello (RE) - Italy tel. +39.0522.687425 - tel. Servizio Assistenza +39.0522.684450 fax +39.0522.686019 - fax Servizio Ricambi +39.0522.962166 e-mail: service@fosterspa.com www.fosterspa.com...
-
Page 2: Table Of Contents
CONTENTS INSTRUCTIONS FOR THE USER 1. WARNINGS FOR SAFE USE ..............21 2. DESCRIPTION OF THE OVEN ............23 3. MODELS AND FEATURES ..............24 4. DESCRIPTION OF CONTROLS ............25 4.1 FUNCTION KNOB ....................25 4.2 THERMOSTAT KNOB .....................25 4.3 DIGITAL PROGRAMMER ..................26 5. USING THE OVEN ................29 5.1 FAN-ASSISTED COOKING ..................29 5.2 COOKING ON THE RACK ..................30 5.3 GRILLING ........................30... -
Page 3: Warnings For Safe Use
Installation must be carried out by qualifi ed personnel in accordance with the regulations in force. Should the appliance not function, disconnect it from the power supply and call the nearest Foster Technical Assistance Centre. Do not attempt to repair the appliance! - Page 4 FOR CORRECT USE OF THE OVEN: • The appliance is intended for use by adults; do not allow children near it. • Do not put infl ammable objects into the oven that could start a fi re. • It is an appliance that generates heat, therefore limit contact with the outside and avoid all contact with the internal parts.
-
Page 5: Description Of The Oven
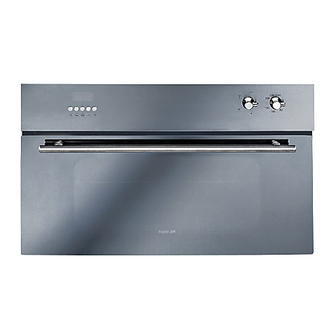
2. DESCRIPTION OF THE OVEN 1. CONTROL PANEL 2. DOOR 3. OVEN LIGHT BULB 4. OVEN FAN 5. INFRARED GRILL 6. SHELF AND TRAY RUNNERS 7. RACK 8. TRAY / DRIPPING-PAN The oven is heated by hot air which is circulated evenly by a motorised fan and hea- ted by electrical resistor positioned around the fan. -
Page 6: Models And Features
3. RED POWER ON LIGHT 4. ORANGE THERMOSTAT LIGHT 5. DIGITAL PROGRAMMER In order to fi t in with the style of your kitchen, Foster has created 2 models of COMPACT ovens, with different aesthetic, functional and performance characteristics. Energy effi ciency classes for ovens go from A to G, where the letter A indicates the lowest consumption, as illustrated on the energy label at the side. -
Page 7: Description Of Controls
4. DESCRIPTION OF CONTROLS 4.1 FUNCTION KNOB Selecting various cooking functions couldn’t be easier; just turn the knob clockwise and stop on the desired position. List of functions: EVERYTHING OFF OVEN LIGHT AND FAN LIGHT, FAN AND CIRCULAR HEATING ELEMENT LIGHT, INFRARED GRILL AND FAN LIGHT AND INFRARED GRILL The oven light and the red indicator light always remain on during operation... -
Page 8: Digital Programmer
4.3 DIGITAL PROGRAMMER TIMER BUTTON (MINUTE MINDER) COOKING DURATION BUTTON END OF COOKING BUTTON NUMBER INCREASE BUTTON NUMBER DECREASE BUTTON TIME SETTING Select the clock function clock by pressing the buttons at the same time; the dot at the centre of the display begins to fl ash. Adjust the clock using the buttons;... - Page 9 Turn the two knobs to the off position and press the buttons at the same time in order to stop the buzzer and to cancel the program in use. SEMI-AUTOMATIC OPERATION (WITH COOKING END TIME) Press the button, then release it; the time remains displayed and the letter fl...
- Page 10 TIMER (MINUTE MINDER) 0.00 Press the button and then release it; the digits appear; set the minutes using the button. After 5 seconds, the time reappears with the symbol At the end of the minutes set, the buzzer signals that the time is up, the symbol starts fl...
-
Page 11: Using The Oven
5. USING THE OVEN FIRST TIME USE Clean the oven carefully with water and activate the oven at the maximum temperature for approximately 30 minutes, in order to get rid of any manufac- turing grease residues that could give off unpleasant smells during cooking. During cooking, do not place any pans or trays on the bottom of the oven as this could damage the enamel. -
Page 12: Cooking On The Rack
5.2 COOKING ON THE RACK Turn the function knob to the position, set the desired temperature and pre-heat the oven until it reaches the selected temperature. Then insert the rack 1 with the food to be cooked resting on top of it, lightly oiled. -
Page 13: Cooking Tables
5.5 COOKING TABLES FAN-ASSISTED COOKING GRILL Cooking Cooking Temp. Temp. FOODS time FOODS time (° C) (° C) (minutes) (minutes) FIRST COURSES Ribs 35 - 45 Stuffed cannelloni Cutlets 30 - 40 Lasagne Sausages 30 - 40 Macaroni au gratin Chops 35 - 45 Baked macaroni or... -
Page 14: Oven Maintenance
6. OVEN MAINTENANCE Before any maintenance operation, disconnect the appliance from the electri- cal power supply by removing the plug from the socket. Never disconnect the plug by pulling on the power supply lead. 6.1 GENERAL CLEANING The external parts made of glass and stainless steel and rubber seals can be clea- ned using a sponge dampened with lukewarm water, and neutral soap. -
Page 15: Cleaning The Glass Panels
To replace the door after cleaning: 5. hold the door at the two outside edges and keep it in a slanting position; 6. using your index fi ngers, keep the lo- wer levers B held up and insert them, together with the levers C into their slots;... -
Page 16: Door Seal
6.4 DOOR SEAL Periodically check the condition of the seal. If it appears damaged, contact the Foster Technical Assistance Centre. You are advised not to use the oven until it has been repaired. 6.5 CHANGING THE LIGHT BULB To replace the oven lighting light bulb: 1. -
Page 17: Fitting
A. FITTING The appliance is suitable for fi tting into furniture of any material (wood, laminated plastic, metal and masonry) as long as it is heat resistant. To embed it into the furniture, the dimensions specifi ed in the diagram must be respected. Whether it is positioned under a worktop or on a pedestal, airing channels must be provided as shown in the fi... -
Page 18: Electrical Connection
B. ELECTRICAL CONNECTION Before carrying out the electrical connection make sure, referring to the data on the identifi cation plate, that: • the supply voltage corresponds to the voltage specifi ed for the appliance; • the household system and the power outlet can support the power of the ap- pliance.
Need help?
Do you have a question about the 7170 052? 7172 042 and is the answer not in the manual?
Questions and answers