Table of Contents
Advertisement
Quick Links
Download this manual
See also:
System Manual
T24S System Manual
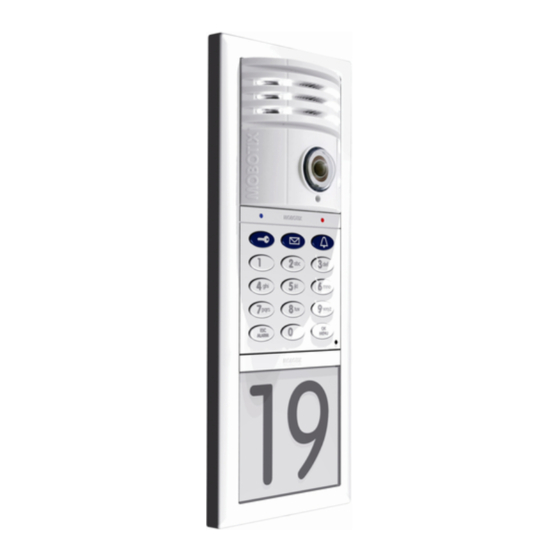
Hemispheric IP Video Door Station
Hemispheric 3MEGA camera for use in combination with Siedle Vario modules.
Complete coverage of the entire scene at the house door. From wall to wall, from
top to bottom – no blind spots and no gaps in security.
Complete Panorama view from wall to wall and from fl oor to ceiling
HiRes Video Innovations
The German company MOBOTIX AG is known as the leading pioneer in network camera tech-
nology and its decentralized concept has made high-resolution video systems cost effi cient.
MOBOTIX AG • 67722 Langmeil • Tel.: +49-6302-9816-103 • Fax:+49-6302-9816-190• sales@mobotix.com
180°
The HiRes Video Company
Advertisement
Table of Contents

Related Manuals for Mobotix T24S


Summary of Contents for Mobotix T24S
- Page 1 Complete Panorama view from wall to wall and from fl oor to ceiling HiRes Video Innovations The German company MOBOTIX AG is known as the leading pioneer in network camera tech- nology and its decentralized concept has made high-resolution video systems cost effi cient.
- Page 2 Grandstream IP Address: MicroSD Card Last Changed: Admin User Name: Default User Name: admin Password: meinsm Admin Password: Note MOBOTIX off ers inexpensive seminars that include a workshop and practical exer- Basic Advanced Sales/Project cises: 3 days, 2 days and 1 day.
-
Page 3: Table Of Contents
2.4.13 Siedle Anti-Theft Protection Finishing The Installation 2.5.1 Connecting And Retaining Modules 2.5.2 Removing Modules Replacing The MicroSD Card 2.6.1 Removing The MicroSD Card 2.6.2 Inserting The MicroSD Card © MOBOTIX AG • Security-Vision-Systems • Made in Germany www.mobotix.com • sales@mobotix.com... - Page 4 Network And Power Connection For The Camera Module 2.7.1 Notes On Cable Lengths And Power Supply 2.7.2 Power Supply With Power-over-Ethernet Products 2.7.3 Power Supply With The MOBOTIX NPA-PoE Set And Switch 2.7.4 Power Supply When Connected Directly To A Computer/Video Phone 2.7.5 Starting The T24S...
- Page 5 The enclosed Camera Software Manual contains detailed information about For more information: www.mobotix.com MOBOTIX camera software. Download the latest version of this manual, MxEasy and MxControlCenter manuals as PDF files from www.mobotix.com (Support > Manuals). All Rights Reserved. MOBOTIX, MxControlCenter, MxEasy, ExtIO and CamIO are internationally protected trademarks of MOBOTIX AG.
-
Page 6: The Hemispheric Ip Video Door Station
T24S System Manual: The Hemispheric IP Video Door Station MOBOTIX T24 – THE HEMISPHERIC IP VIDEO DOOR STATION Why Choose A Digital IP Video Door Station? Door stations with integrated video cameras have been on the market for years. In most cases, they are based on analog TV technology that is over 60 years old and, because of the system involved, can only provide relatively modest image and sound quality. - Page 7 HiRes 180° Panorama - from wall to wall HiRes 360° Full Image – view the whole scene © MOBOTIX AG • Security-Vision-Systems • Made in Germany www.mobotix.com • sales@mobotix.com...
- Page 8 As the global leader for high-resolution network cameras and the developer of Hemispheric Video Technology for security cameras, MOBOTIX brings the highest level of expertise and commitment to innovation in the IP video fi eld. The new MOBOTIX IP video door stations reinforce this position with intelligent, detailed solutions and unique advantages: •...
- Page 9 What Advantages Does MOBOTIX Off er Over Other Video Door Stations? Through HiRes image quality, distributed technology and a wide range of features, MOBOTIX can off er not only an outstanding door camera, but also a professional security cam- era in a single device. MOBOTIX...
-
Page 10: All-Round View With No Blind Spots
T24S System Manual: All-Round View With No Blind Spots Hemispheric HiRes Camera Thanks to the fisheye lens with its 180° image angle, the camera records the entire entrance area without having to be mechanically panned or tilted – without any blind spots, from wall Standard 90°... - Page 11 Also, this quick look down is incredibly practical when checking, for example, whether the daily paper is already in front of the door. In addition, it is also possible to look upwards under the ceiling also. © MOBOTIX AG • Security-Vision-Systems • Made in Germany www.mobotix.com • sales@mobotix.com...
-
Page 12: T24Mx Product Preview
T24S System Manual: T24MX Product Preview Product Preview: The T24MX IP Video Door Station (Market Launch: July 2010) In addition to the hemispheric HiRes camera, the latest MOBOTIX development also includes a multifunctional keypad module with transponder technology for keyless access and control of message functions. - Page 13 Security Door Opener With Battery Back Up Power Supply. The door station may be coupled with a MOBOTIX security door opener with internal access code storage, making it impossible to open the door by forcibly removing the system and bypassing the connecting cable. A built-in rechargeable battery...
-
Page 14: T24Mx System Overview
Keypad (stand-alone module) • Access functionality • For securing side doors, storage areas, etc. • Connection and control of door opener • 24 V power supply © MOBOTIX AG • Security-Vision-Systems • Made in Germany www.mobotix.com • sales@mobotix.com... - Page 15 VoIP video phone (reception remote station) Global access • Intercom, open door, turn light on/off • Operate camera (including recording) • Monitor door status (open/closed/locked) • Event search © MOBOTIX AG • Security-Vision-Systems • Made in Germany www.mobotix.com • sales@mobotix.com...
-
Page 16: Overview Of Modules And Components
Notes Only the Siedle Vario modules shown on the following pages can be used for system installation. The Siedle modules are connected to the Ethernet via the MOBOTIX camera module through the T24S terminal board only. © MOBOTIX AG • Security-Vision-Systems • Made in Germany... - Page 17 T24 Camera Module © MOBOTIX AG • Security-Vision-Systems • Made in Germany www.mobotix.com • sales@mobotix.com...
-
Page 18: Siedle Modules And Grandstream
1.2.1 Siedle Modules The MOBOTIX T24S IP video door station includes the T24S camera module with a special IO terminal board, which can be used to integrate the existing Siedle modules. Siedle products (modules, frames, network devices, etc.) cannot be ordered from MOBOTIX. - Page 19 Blind module to cover empty fields or placeholder for later expansion. 99 x 99 mm/3.9 x 3.9 in (W x H) Note MOBOTIX recommends using the T24S web configurator (see Section 1.3) to plan the individual door stations in the desired color. © MOBOTIX AG • Security-Vision-Systems • Made in Germany...
- Page 20 Frame dimensions in mm Frame dimensions (in mm) can be arranged verti- cally (right) for one to four modules or arranged in a grid horizontally and vertically (left). © MOBOTIX AG • Security-Vision-Systems • Made in Germany www.mobotix.com • sales@mobotix.com...
-
Page 21: Grandstream Gxv3140 Ip Multimedia Phone
The Grandstream GXV3140 is available as a potential remote video station for the T24S door station. The powerful IP video phone features high quality images delivered on a large color LCD display. The phone has a comprehensive set of important features such as transfer, hold and conference calling for use in a professional environment, in addition to numerous multimedia functions. -
Page 22: T24S Web Configurator
T24S Web Configurator On the MOBOTIX website (www.mobotix.com), we are pleased to be able to offer the practical T24S web configurator to plan your personal T24S door station with a MOBOTIX hemi- spheric camera, Siedle Vario modules and a Grandstream IP video phone. - Page 23 © MOBOTIX AG • Security-Vision-Systems • Made in Germany www.mobotix.com • sales@mobotix.com...
-
Page 24: Connecting The Door Station And Modules
1.6 m/ 63 in The system offers options for both on-wall and flush-mounted installation. Different mounting sets are available for the two different options. The T24S camera module can be used universally for both mounting options. In addition to the (most popular) vertical mounting option,... -
Page 25: Preparing Network And Power Connections
• (E) Cables to the external door opener, door switch and door lock switch Recommendation For Cabling For cable line A (network), MOBOTIX recommends using a category 5 (CAT5) Ethernet installation cable or higher. For cable lines B, C and D, we recommend laying an 8- or CAT 7 cable is designed 10-wire ySTy (telephone) cable with 0.8 mm (0.26 in) core diameter, even for smaller... -
Page 26: Terminal Board And Terminal Connectors
T24S System Manual: Connecting The Door Station And Modules Terminal Board And Terminal Connectors MOBOTIX Terminal Board The central connection unit for the door contains a: • bridge from Ethernet installation cable to camera patch cable • connection to Siedle transformer (contact b and c) •... - Page 27 Ethernet cable first (see following section). The figures show the correct final position of the connector terminals and terminal board for both vertical and horizontal installation of the door station. © MOBOTIX AG • Security-Vision-Systems • Made in Germany www.mobotix.com • sales@mobotix.com...
-
Page 28: Connections In The Door Station
T24S System Manual: Connecting The Door Station And Modules Connections In The Door Station 2.4.1 Networking The eight wires with stripped ends in the Ethernet cable are to be connected to the cor- responding contacts on the terminal board (here: standardized color coding according to TIA-568B) according to the following table. -
Page 29: Terminal Board Configuration
Connections In The Door Station 2.4.2 Terminal Board Confi guration The table shows the layout of the 16-wire terminal connector on the MOBOTIX terminal board, which is used to connect the individual modules with the camera and the network. The boards have 8 inputs (7.1 to Bpc) and 3 outputs (eLi to Do), which are all galvanically separated. -
Page 30: Circuit Overview Diagram - Modules And Power Supply
T24S System Manual: Connecting The Door Station And Modules 2.4.3 Circuit Overview Diagram – Modules And Power Supply This diagram shows the cabling for all described modules. For external 12 V AC power supply, b and c are first connected in parallel from the Siedle transformer to the module terminal connectors, and finally b to b on the terminal board. -
Page 31: Siedle Bell Button Module (1 To 4)
Connection for both modules is identical: connect module terminal bv to b; connect mod- ule terminals cv and S1 to c; connect module terminal S2 to terminal board Auth/S2. Board Module Auth/S2 © MOBOTIX AG • Security-Vision-Systems • Made in Germany www.mobotix.com • sales@mobotix.com... -
Page 32: Siedle Motion Detector Module
T24S System Manual: Connecting The Door Station And Modules 2.4.6 Siedle Motion Detector Module The module here is used as a motion sensor, and no longer as an illumination sensor, Motion detector while the system uses the illumination sensor feature built into the camera (see Section 7.6.1 in the Software Camera Manual, "Illumination"). -
Page 33: Siedle Led Spotlight
(isolated output); connect relay input A1 to b; connect terminal board eLi/c to c (control voltage); connect relay input eLi/c A2 to terminal board eLi. Board Relay Transformer/ Relay Signal © MOBOTIX AG • Security-Vision-Systems • Made in Germany www.mobotix.com • sales@mobotix.com... -
Page 34: Floor Call
T24S System Manual: Connecting The Door Station And Modules 2.4.10 Floor Call The integrated floor call function presents a convenient option to assign each of the bell Board Module buttons at the building door to an additional bell button (floor call button) directly at the apartment door. -
Page 35: Door Switch And Door Lock Switch
(DSC 602-0) in the electrical cabinet. Anti-theft protection can only be activated or deactivated using this controller. Installation instructions are included in the Siedle Anti-Theft Protection package. © MOBOTIX AG • Security-Vision-Systems • Made in Germany www.mobotix.com • sales@mobotix.com... -
Page 36: Finishing The Installation
T24S System Manual: Connecting The Door Station And Modules Finishing The Installation Before placing the camera module in the frame, we recommend first connecting the camera directly to the switch/router to carry out the automatic initial configuration (see chapter 3, Operating the Door Station). -
Page 37: Removing Modules
Siedle installation frame. Insert the key into the small opening between the modules and release the modules from the installation frame by pushing the key in. © MOBOTIX AG • Security-Vision-Systems • Made in Germany www.mobotix.com • sales@mobotix.com... -
Page 38: Replacing The Microsd Card
T24S System Manual: Connecting The Door Station And Modules Replacing The MicroSD Card The camera module is factory-fi tted with a ready-to-use 4 GB MicroSD card. However, the system also supports other MicroSD cards with up to 32 GB storage capacity. To remove, insert or replace a MicroSD card, separate fi rst the camera module from the door station. -
Page 39: Inserting The Microsd Card
Note When inserting the card, ensure that no small cables are jammed and that the back plate is replaced in the correct position (MxBus connector at the top). © MOBOTIX AG • Security-Vision-Systems • Made in Germany www.mobotix.com • sales@mobotix.com... -
Page 40: Network And Power Connection For The Camera Module
If you are using IEEE 802.3af Power over Ethernet network components to supply power to MOBOTIX cameras, make sure, if possible, that these components do not have a fan. Since the power consumption of MOBOTIX cameras is very low compared to other products, the reliability of the entire system is increased, thus extending the life of these components. -
Page 41: Power Supply With Power-Over-Ethernet Products
LAN/www PoE switch/router T24S 2.7.3 Power Supply With The MOBOTIX NPA-PoE Set And Switch 1. Connect the network patch cable that is connected to the door station terminal board to the Camera connector of the PoE adapter. 2. Connect the LAN/Power connector of the PoE adapter to the Ethernet connector of the switch/router or the Ethernet socket. -
Page 42: Power Supply When Connected Directly To A Computer/Video Phone
T24S System Manual: Connecting The Door Station And Modules 2.7.4 Power Supply When Connected Directly To A Computer/Video Phone 1. Connect the network patch cable that is connected to the door station terminal board to the Camera connector of the PoE adapter. -
Page 43: Starting The T24S
Network And Power Connection For The Camera Module 2.7.5 Starting The T24S The T24S starts after the power supply is connected. • Booting: A camera self-test is executed and the entire system is started. In case of For more information, an error, the camera will start using the backup system. -
Page 44: Operating The Door Station
Fundamental factors are whether: • you want to use one or several T24S units, • you want to integrate the T24S into an existing network or not, • the existing network has a DHCP server or not. -
Page 45: One T24S In A Separate Network
• Each Grandstream telephone displays its newly assigned IP address (e.g. 192.168.0.20) and SIP quick-dial number (e.g. MX_SIP *101) on the display. • *101 is the new SIP quick-dial number for the fi rst IP telephone, while the T24S has the *201 SIP quick-dial number. - Page 46 • Grandstream telephone and network settings are adjusted. Here, the T24S acts as • T24S and Grandstream telephones are confi gured to use DHCP, and are automati- the DHCP server and cally assigned an IP address and SIP quick-dial number.
-
Page 47: Configuring Mxeasy (Optional)
Note Only registered users are permitted to download MOBOTIX software from the website. If you are not yet a registered user with MOBOTIX, why not register now? Registered users enjoy the following benefi ts: • Access to the entire range of the freely available MOBOTIX software •... - Page 48 When you start MxEasy for the first time on a computer, the MxEasy Assistant automati- cally begins to search for MOBOTIX cameras, and displays all cameras found in a list. The camera list will be updated automatically as soon as new MOBOTIX cameras are connected to, or removed from the network.
- Page 49 Network confi guration for MxEasy Assistant will only be carried out if one of the selected cameras displays the status "Invalid network". This status always occurs if more than one T24S must be integrated in a network without a DHCP server, for example. If the control PC obtains its IP address automati- cally from a DHCP server (e.g.
- Page 50 IP address set in the previous step. You must select this option when at least one T24S is to be integrated into an existing network without a DHCP server, mean- ing that no automatic initial default configuration can be carried out (see Sections 3.3.2 and 3.5.2).
- Page 51 If no user name and password have been entered, MxEasy uses the factory defaults (user admin, password meinsm). This also automatically enables public access to the Guest screen via a browser window. © MOBOTIX AG • Security-Vision-Systems • Made in Germany www.mobotix.com • sales@mobotix.com...
- Page 52 MxEasy. The Backup Configuration button offers you the option to undo changes you have made, and rollback your configuration to previous settings. © MOBOTIX AG • Security-Vision-Systems • Made in Germany www.mobotix.com • sales@mobotix.com...
- Page 53 "Normal" (= 4:3 full image, corrected in the camera) and "Panorama" (= corrected 180° high-resolution image from wall to wall, stan- dard with T24S). © MOBOTIX AG • Security-Vision-Systems • Made in Germany www.mobotix.com • sales@mobotix.com...
- Page 54 MxEasy. If in doubt, you can find the IP address of a PC in its system network configuration. Note By selecting "Edit remote station" you can enter a new name to replace the IP number (e.g. Office PC). © MOBOTIX AG • Security-Vision-Systems • Made in Germany www.mobotix.com • sales@mobotix.com...
-
Page 55: Using Mxeasy
The individual MxEasy program icons are used to activate a range of functions on the T24S Door Stations or MOBOTIX cameras connected on the network. The following lists some of the important icons on the left side: Telephone Handset Icon (Off -hook/On-hook) •... - Page 56 The mini viewer can be scaled by dragging the frame of the window with the mouse until it has the desired size. The last view that is used (full program window or Mini-Viewer) is applied each time the program is started. © MOBOTIX AG • Security-Vision-Systems • Made in Germany www.mobotix.com • sales@mobotix.com...
- Page 57 (Live image with Live search). software release. Full Image Using PTZ, each area Live standard view of the recorded full image can be zoomed and enlarged Live PTZ © MOBOTIX AG • Security-Vision-Systems • Made in Germany www.mobotix.com • sales@mobotix.com...
-
Page 58: Module Configuration (Optional)
T24S System Manual: Operating The Door Station 3.2.4 Module Configuration (Optional) The T24S camera module can be combined with a range of Siedle Vario modules, as described in Chapter 1. These modules can be used to trigger various actions, for example, unlocking the door or switching an external light. - Page 59 (VoIP to telephone, TCP to PC) or for which a change in the status is triggered (a T24S connected external light is on/off , a T24S connected door is open/closed locked). The SIP quick-dial number of the con- cerned Grandstream telephone is also shown in the table.
-
Page 60: One T24S In An Existing Network (Lan)
3.3.1 DHCP Server Present On The Network If there is an existing DHCP server in the network, this is used by the T24S. The opera- tion of the T24S and its remote stations is carried out using the initial automatic default confi guration, similiar to a T24S in a separate network. -
Page 61: No Dhcp Server On The Lan (Static Ip Addresses)
Step 1: Connect The T24S And Remote Stations To The LAN And To The Power Supply Connect the T24S, the IP videophone and a PC, if it has not already been done, with the router/switch in the network. Ensure that the T24S has a PoE power supply. If the switch or router does not feature PoE, use the MOBOTIX NPA-PoE Set to supply the T24S with power. - Page 62 The new static IP address of the Grandstream telephone (10.0.0.10) will appear on the Display and is ready for use. Note You can connect a USB keyboard directly to the Grandstream to simplify operation. © MOBOTIX AG • Security-Vision-Systems • Made in Germany www.mobotix.com • sales@mobotix.com...
- Page 63 T24S. In this case, proceed directly to Step 4. When the MOBOTIX T24S and the Grandstream telephone are brought into service via a PC, the network parameters of the PC must be set in the IP address range 10.x.x.x, from 10.0.0.1 to 10.0.0.254 with the subnet mask 255.0.0.0.
- Page 64 T24S System Manual: Operating The Door Station Step 4: Install MxEasy On The Host PC And Assign A Static IP Address To The T24S Install MxEasy on the host PC as described in Section 3.2.2 and use the MxEasy Assistant to integrate the T24S into the network.
- Page 65 Section 3.2.2 under Door Bell Setup. Step 7: Configuration Modules (Optional) If, in addition to the T24S camera module and up to 4 Siedle door bells, you plan to use additional Siedle modules and an electrical door opener, perform the following actions in accordance with the factory...
-
Page 66: Multiple T24S Units In A Separate Network
GS 2 (*102) PC (optional) If you would like to connect more than one T24S unit to a number of remote stations (IP videophone, PC with MxEasy) in a separate network without connecting to an existing DSL router or similar device, set up and use of the IP video door station. This can be carried out without a PC so long as the videophones will only be used as remote stations and the T24S factory settings can be used with the Siedle modules. -
Page 67: Automatic Initial Configuration With Master T24S
SIP quick-dial number *201. In order to establish a connection to another T24S (*202, *203, *204 etc.), you must enter the SIP quick-dial number of the client T24S using the telephone keypad and press the send key (green phone) before picking up the receiver. -
Page 68: Multiple T24S Units In An Existing Network (Lan)
FRITZ!Box, for example, generally also serve as a DHCP server. 3.5.1 DHCP Server Present On The Network If a DHCP server exists in the network, the T24S units will utilize this network for opera- tion. An individual T24S unit and its modules are confi gured using the automatic initial default confi guration within its own network, similar to the confi guration of multiple T24S units in their own network. -
Page 69: No Dhcp Server On The Lan (Static Ip Addresses)
Connect the T24S, the IP videophone and a PC, if not already done, with the router/switch in the network. Ensure that the T24S units have a PoE power supply. If the switch or router does not feature PoE, use MOBOTIX NPA-PoE Sets to supply the T24S units with power. - Page 70 T24S System Manual: Operating The Door Station Step 5: Select The Master T24S After you have assigned a static IP address to each T24S (see Section 3.2.2), you must designate one T24S as the master T24S - meaning one T24S serves as the main entrance.
- Page 71 Step 7: Set Up Door Bell Behavior Using MxEasy – For Each Individual T24S To now add all other T24S door cameras to the system, select the menu item Camera > Add Cameras in the MxEasy menu bar at the top of the screen, select all remaining door cameras, and run through the remaining Assistant dialogs, including configuration of the bell behavior, as described under Section 3.2.2.
-
Page 72: Starting And Operating Ip Videophones
If you have integrated multiple T24S modules in the network, you can reach the master T24S (*201) by picking up the receiver. If you want to call a different T24S or IP telephone, you must first establish the connection. To do this, you must know the SIP quick-dial... -
Page 73: Grandstream Display With The T24S User Menu
In addition to displaying the current live camera image, the Grandstream VoIP videophone also off ers certain T24S-specifi c functions for easy operation of the MOBOTIX Video Door Station using the Grandstream keypad. Please note that due to software updates, some of the functions or the scope of the functions in the following examples may be subject to change. - Page 74 2 or 8; pushing key 5 again returns you to tilt mode (keys 2 and 8); Key 5: Switches to 4:3 mode and 1x zoom and changes the control options © MOBOTIX AG • Security-Vision-Systems • Made in Germany www.mobotix.com • sales@mobotix.com...
- Page 75 (e.g. bell, door opened, somebody in front of door). The arrow keys allow you to switch between pages of search result lists and select an event to play. © MOBOTIX AG • Security-Vision-Systems • Made in Germany www.mobotix.com • sales@mobotix.com...
- Page 76 Use the "1" key (English) or the "2" key (German) to change the language in the user menu. The language is changed by the next SIP call and this change is car- ried out automatically for all Grandstream remote stations © MOBOTIX AG • Security-Vision-Systems • Made in Germany www.mobotix.com • sales@mobotix.com...
- Page 77 Press and hold the "8" key until the number of door bells appears in the image. Then use the "1" key to select up to 5 of the door bells that will trigger a call to this telephone (VoIP call). Available in future software versions © MOBOTIX AG • Security-Vision-Systems • Made in Germany www.mobotix.com • sales@mobotix.com...
- Page 78 Menu hidden automatically: > each key displays the menu again Menu hidden automati- cally by pressing "#": > only the "#" key dis- plays the menu again © MOBOTIX AG • Security-Vision-Systems • Made in Germany www.mobotix.com • sales@mobotix.com...
- Page 79 Main Menu: # Show And Hide Menu The "#" key shows/hides the user menu. The actions of the corresponding keys are trig- gered even when the menu is hidden. © MOBOTIX AG • Security-Vision-Systems • Made in Germany www.mobotix.com • sales@mobotix.com...
-
Page 80: Special T24S Camera Functions
Automatic Event Recording As the leading manufacturer of high-resolution IP security cameras, MOBOTIX has also integrated all of the necessary security features into the T24S door camera. While standard cameras require the recording function to be switched on and off manually, MOBOTIX cameras work with intelligent sensor technology and store data effi... - Page 81 Video And Sound Recording Of Events Activating Recording With MxEasy And Video Phone The recording mode of your T24S can be activated via a Grandstream video phone or MxEasy. Please see the relevant legal guidelines for video surveillance. You can activate the recording on the Grandstream by selecting the Automatic Recording On option (see also section 3.6.2) in the Configuration menu using the "3"...
-
Page 82: Ptz And Full Image Storage Independent Of Live Image
(on the Grandstream telephone For this reason, the MOBOTIX T24S also off ers an optional full image recording feature. or a PC with MxEasy) This will not store the currently viewed image that refl ects the pan/tilt position and the zoom setting chosen by the user, but the full sensor image –... - Page 83 Full Image Recording Off: The event that triggered a video motion (VideoMotion VM) window may not be in the recorded sequences while the window was not displayed at the time. © MOBOTIX AG • Security-Vision-Systems • Made in Germany www.mobotix.com • sales@mobotix.com...
-
Page 84: Camera-Internal Memory Up To 32 Gb
Note MOBOTIX recordings are not just reliable, but also secure. The special MOBOTIX FlashFile system (MxFFS) prevents unauthorized persons from reading or transferring the internally stored data, even if the card is stolen. -
Page 85: Formatting A New Microsd Card Using A Web Browser
The following steps are necessary to format a storage device (Admin Menu > Storage on External File Server / Flash Device): 1. Make sure that the MicroSD card is in the card slot of the MOBOTIX camera. 2. Click on the Format button under SD Flash Card. -
Page 86: Additional Camera Settings
Open a web browser on the control PC (for example, Internet Explorer or Firefox). • Enter the current IP address of the desired T24S in the browser address bar. • The MOBOTIX T24S camera page opens and provides (password-protected) access to the hardware and software settings. - Page 87 SSL-protected transmission of the video sequences and the data (using SSL encryp- tion and X.509 certificates). Free Software Updates (www.mobotix.com) MOBOTIX provides software updates free of charge at regular intervals that improve and Free software updates at www.mobotix.com expand the camera’s functionalities. Chapter 6, Software Update, in the Software Manual provides more information on the process.
-
Page 88: Final Notes
T24S System Manual: Special T24S Camera Functions Final Notes 4.3.1 Weatherproofness The MOBOTIX T24S Secure model has been certified weatherproof according to IP65 - meaning absolutely dustproof and resistant to water jets, and can be installed outdoors without accessories. 4.3.2 Password For The Administration Menu Accessing the Administration menu of the camera (web browser: Admin menu) is only possible after entering a user name and password. -
Page 89: Starting The Camera With Factory Defaults
In contrast to resetting the camera using Admin Menu > Reset configuration to factory defaults , the user information will not be reset if the camera is booted using the factory configuration. © MOBOTIX AG • Security-Vision-Systems • Made in Germany www.mobotix.com • sales@mobotix.com... -
Page 90: Resetting The Camera To Factory Settings (By Web Browser)
4.3.5 Resetting The Camera To Factory Settings (By Web Browser) The configuration can All settings of the MOBOTIX camera can be reset permanently to the factory default settings. also be reset partially This makes sense if you have, for example, obtained a camera without any information or you would like to reset all settings after testing the camera. -
Page 91: Online Help And Camera Status
Electrical surges can be induced by other electrical appliances, improper wiring or also externally (for example, lightning strikes to phone or power lines). MOBOTIX cameras are protected against the effects of small electrical surges by numerous measures. These measures, however, cannot prevent the camera from being damaged when stronger electrical surges occur. - Page 92 (e.g. mydomain.com) with IP addresses, whereby the IP addresses may change at any time. This service provides a convenient method to access your MOBOTIX cameras from home or work if the camera Internet connection is not through a router that assigns a fixed IP address, but instead over a DSL connection with a dynamically assigned IP address from the provider.
- Page 93 LED: Abbreviation for Light Emitting Diode. An electronic semiconductor component built into MOBOTIX cameras and add-on modules that emits light when a current flows through the com- ponent in the correct direction. Megapixel: Images that have more than 1 million pixels.
- Page 94 16 cameras/door stations. MxPEG: Method developed by MOBOTIX to compress and store image and video data with low network load and high image quality. The MxPEG ActiveX control element allows video and audio data from MOBOTIX cameras to be displayed in other applications (including Internet Explorer).
- Page 95 VoIP: Voice over IP. Telephony using computer networks. WLAN: Wireless local area network connection. © MOBOTIX AG • Security-Vision-Systems • Made in Germany www.mobotix.com • sales@mobotix.com...
- Page 96 T24S-Camera Manual: Notes © MOBOTIX AG • Security-Vision-Systems • Made in Germany www.mobotix.com • sales@mobotix.com...
- Page 97 © MOBOTIX AG • Security-Vision-Systems • Made in Germany www.mobotix.com • sales@mobotix.com...
- Page 98 T24S System Manual: Declaration Of Conformity DECLARATION OF CONFORMITy © MOBOTIX AG • Security-Vision-Systems • Made in Germany © MOBOTIX AG • Security-Vision-Systems • Made in Germany www.mobotix.com • sales@mobotix.com www.mobotix.com • sales@mobotix.com...
- Page 99 MOBOTIX – The HiRes Video Company To demonstrate our confidence in the quality of our products, MOBOTIX cameras were used to capture all the images that appear in this manual. Manufacturer Executive Board MOBOTIX AG Dr. Ralf Hinkel Kaiserstrasse D-67722 Langmeil...
- Page 100 Complete Panorama view from wall to wall and from fl oor to ceiling HiRes Video Innovations The German company MOBOTIX AG is known as the leading pioneer in network camera tech- nology and its decentralized concept has made high-resolution video systems cost effi cient.
Need help?
Do you have a question about the T24S and is the answer not in the manual?
Questions and answers