Table of Contents
Advertisement
Advertisement
Table of Contents

Related Manuals for Mobotix T26


Summary of Contents for Mobotix T26
- Page 1 System Manual Part 1 System Overview and Installation DoorStation T26...
- Page 2 T26 System Manual Part 1 T26-CamCore (camera module) • Allround view with no blind spots • Internal memory • Speaker • Microphone Cindy Jones Thomas Jones Dr. Jones, MD Access module (KeypadRFID or BellRFID) • Keyless access (RFID and PIN) •...
-
Page 3: Table Of Contents
Table of Contents SySTeM MAnuAl PART 1 – SySTeM OVeRVIeW AnD InSTAllATIOn This T26 System Manual Part 1, «System Overview and Installation» is supplemented by the T26 System Manual Part 2, «Initial Operation and Configuration» . If you no longer have a manual at... - Page 4 Table of Contents 2.1.4 Recommendation for Cabling 2.1.5 Installation Tip: Replacing an Existing Doorbell by a T26 Remote Stations and network Connection 2.2.1 Notes on Cable Lengths and Power Supply 2.2.2 Direct Connection of One Remote Station 2.2.3 Network Connection with Multiple Remote Stations Mounting the Frame and Housing 2.3.1 Determining the Installation Position...
- Page 5 Table of Contents...
-
Page 6: Legal Notes
All users of MOBOTIX products are therefore required to familiarize themselves with all applicable regulations and to comply with these laws. MOBOTIX AG is not liable for any illegal use of its products... -
Page 7: Safety Warnings
Risk of overheating when exposed to direct sunlight: When mounting a black, dark gray or amber-colored T26 DoorStation in locations where the device is exposed to direct sunlight, the housing temperature can exceed the maximum allowed temperature limit. This can result in electronic failures and injuries especially when touching exterior metal parts. -
Page 8: Foreword
Congratulations on your decision to purchase an exceptionally versatile and innovative DoorStation “made in Germany.” The T26 system contains a hemispheric door camera with a 6 megapixel color sensor (T26-CamCore) and captures the entire room 180 ° from wall to wall and from floor to ceiling without any blind spots. - Page 9 More security thanks to maximum overview HD Super 180 ° Panorama HD 360 ° Full Image: Entire scene in one view...
- Page 10 The T26 is based on the international video telephony standard VoIP/SIP. All of the modules offered for outdoor use are weatherproof, maintenance-free and can be used in temperatures ranging from –30 to 50 °C/–22 to 122 °F.
- Page 11 Which Advantages Does MOBOTIX Offer Over Other Video Door Stations? Thanks to its HiRes image quality, decentralized technology and a wide range of features, MOBOTIX offers not only an outstanding door camera but also a professional security camera in a single device. MOBOTIX Hemispheric Video Technology was successfully introduced to the network video market in 2008.
- Page 12 (see image). Even in this case, thanks to its 180 ° angle of view, the T26 delivers perfect images.
- Page 13 (enlarged image section) And the T26 does all of this using only its software – without the need for moving parts or motors. This camera is silent, discreet and unobtrusive.
- Page 14 (KeypadRFID) or as a bell button module with interchangeable button sets (BellRFID). A particular advantage of the T26 is the minimal amount of cabling involved – either a stan- dard Ethernet cable (for example, CAT7) or existing bell wire is sufficient to connect the door station to the network in the building and to supply it with power.
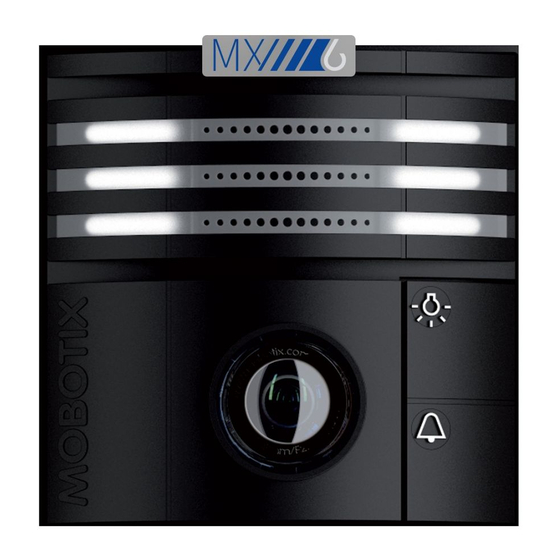
- Page 15 Hemispheric Door Camera with Allround View and no Blind Spots (T26-CamCore) With 6 megapixel image sensor and internal storage, this hemispheric door camera records the entire entrance area. No blind spots from wall to wall and from floor to ceiling. The camera can record events automatically.
- Page 16 3 signal outputs to connect external devices (doorbell, light, etc.). Modules The camera module is also T26-CamCore: Fisheye lens (for 360 ° panorama view) and inte- available with a particularly grated live image correction, high-resolution 6 megapixel color light-sensitive B/W sensor sensor, speaker, microphone and MicroSD data storage for approx.
- Page 17 On-wall housing Single on-wall housing: 126 x 138 x 31 mm (W x H x D). Metal- reinforced housing. Double on-wall housing: 126 x 227 x 31 mm (W x H x D). Metal- reinforced housing. Triple on-wall housing: 126 x 327 x 31 mm (W x H x D). Metal- reinforced housing.
- Page 18 MxDisplay+: MOBOTIX recommends the MxDisplay+ as a wall- mounted, multifuctional video intercom with WiFi and RFID technol- ogy for the T26 door station. The touchscreen glass interface allows configuring and controlling the entire MOBOTIX video system. PoE (Power over Ethernet) is used to supply the MxDisplay+ with power.
- Page 19 T26 – the Custom-Made DoorStation The T26 product line is a modular system that can be adapted to any customer needs. This highly robust and weatherproof outdoor station (IP65, –30 to 50 °C/–22 to 122 °F) is available in four attractive colors: white, silver, dark gray, black and amber.
- Page 20 T26 System Manual Part 1 Various configuration examples in all avail- able MOBOTIX colors Only white DoorStations should be exposed to direct sunlight (risk of Camera Camera Camera Camera Camera overheating on dark in single frame in single frame in single frame...
- Page 21 Cindy Jones Thomas Jones The Jones Family Dr. Jones, MD T26 with KeypadRFID T26 with BellRFID...
-
Page 22: Overview Of The System Components
T26 System Manual Part 1 OVeRVIeW OF THe SySTeM COMPOnenTS What does a typical system look like and what components are included? This section describes the setup for a complete system with a video door station including a MX-DoorMaster, KeypadRFID and Info Module Mx2wire+ with Mx2wire+ technology to connect the door sta- tion using existing two-wire cabling. - Page 23 Computer (remote station) Global access over any Internet connection • MOBOTIX software MxManagementCenter • For Windows and OS X/macOS • T26 operation • All functions including two-way video communi- cation • Connection via Ethernet/WiFi MX-DoorMaster Door contact • Open door, doorbell on/off •...
-
Page 24: System Overview
T26 System Manual Part 1: System Overview SySTeM OVeRVIeW Outdoor Station 1.1.1 Hemispheric Camera T26-CamCore The hemispheric camera with its fisheye lens (for a 360 ° panorama view) and integrated live image correction boasts a high-resolution 6-megapixel image sensor (color or black&white), speaker, microphone and integrated data storage for approx. - Page 25 Firmware of MxDisplay+ video intercom, Software (included) MxManagementCenter video management software, MOBOTIX MxBell for mobile devices(iOS 10/Android 4.4 and higher) Backlight compensation, automatic white balance, Image processing image correction (incl. panorama image correction), video sensor (motion detection)
-
Page 26: Eth Module (Ethernet Terminal Board)
T26 System Manual Part 1: System Overview 1.1.2 eTH Module (ethernet Terminal Board) The Ethernet terminal board ETH Module is used to connect the door station for the T26 versions without Mx2wire+ technology. It securely connects the camera module with the 8 connected wires of the network patch cable via RJ45 connector (for installation, see Chapter 2, «Installation»). - Page 27 Outdoor Station The Ethernet terminal board is screwed on to the housing (on-wall or in-wall) behind the camera module. Alternatively, the extended terminal board IO Module can be used to con- nect external devices, such as a doorbell...
-
Page 28: Access Module Keypadrfid
T26 System Manual Part 1: System Overview 1.1.3 Access Module KeypadRFID This module is used for keyless and scheduled access to the house or building with an access PIN or RFID transponder card. In addition, the KeypadRFID module allows leaving and retrieving messages on the video... - Page 29 Outdoor Station Technical Specifications: KeypadRFID In the case of a power Functions Keyless access using RFID card and PIN failure, the access mod- ule and the door opener Interface MxBus are supplied with power RFID (13.56 MHz, Mifare DESFire EV1), illuminated keys, from the battery of user interfaces acoustic feedback...
-
Page 30: Access Module Bellrfid
T26 System Manual Part 1: System Overview 1.1.4 Access Module BellRFID This module is used for keyless and scheduled access to the house or building with an RFID transponder card and also has bell buttons for up to five parties (depending on the selected bell button set). - Page 31 Outdoor Station Back with housing cover removed Sealing plug Gasket I/O terminal MxBus terminal Technical Specifications BellRFID Keyless access using RFID card with 1 to 5 bell buttons (depending Features In the case of a power on button set) failure, the BellRFID module and the door opener are Interface MxBus...
-
Page 32: Info Module
T26 System Manual Part 1: System Overview 1.1.5 Info Module The standard info module provides the option to attach the house or building number and/ or name to the door station. The module is equipped with permanent backlighting using energy-saving and long-lasting LED technology. - Page 33 0.25 mm²/max. 0.5 mm² sleeves without plastic sleeves Cable cross-section min. 24/max. 20 AWG/kcmil AWG according to ul/Cul min. 26/max. 20 Note on Labeling You will find some PDF templates, which you can print out yourself, on the MOBOTIX website (www.mobotix.com).
-
Page 34: Info Module Mx2Wire+ (With Mx2Wire+ Indoor Unit)
T26 System Manual Part 1: System Overview 1.1.6 Info Module Mx2wire+ (With Mx2wire+ Indoor unit) The info module with Mx2wire+ technology, combined with a second Mx2wire+ unit to be mounted inside the building, offers users not only the standard info module functions but also the option to connect and supply power to the door station via two-wire cabling instead of a network cable (see Section 1.1.6). - Page 35 Dimensions (W x H) 99 mm x 99 mm Note On Labeling You will find some PDF templates, which you can print out yourself, on the MOBOTIX website (www.mobotix.com). Standard Two-Wire Cabling (Installed in Buildings) Analog Telephone line or Bell Wire •...
- Page 36 T26 System Manual Part 1: System Overview Mx2wire+ Indoor unit An Mx2wire+ set always consists of two devices that communicate with one another. For this reason, the necessary unit to connect to the network and to supply power is included with the Info Module Mx2wire+ info module in the door station.
- Page 37 The use of a different Mx2wire+ unit that was not supplied in the original packaging is therefore technically not possible. In case of a defect, both units must always be exchanged for a new Mx2wire+ pair that has been configured by MOBOTIX.
-
Page 38: Housing And Module Frames
T26 System Manual Part 1: System Overview 1.1.7 Housing and Module Frames The robust DoorStation can be installed in both on-wall and in-wall systems, it is weather- proof (IP65) and cannot be stolen. The system consists of a housing and a frame. The frame for mounting the modules is simply screwed on to the housing used. - Page 39 Outdoor Station 131 mm/5.16 in 26 mm/1.02 in 44 mm/1.73 in 76 mm/2.99 in...
- Page 40 T26 System Manual Part 1: System Overview In-Wall and Cavity Housing (Fig. Triple Housing) The blue housing is firmly connected to the subsurface or brick work. It can also be used to ensure easy installation in cavities: Drill opening, position housing and screw tightly in place;...
- Page 41 Outdoor Station 131 mm/5.16 in Allowed wall thickness for cavity installation: min. 7 mm/0.28 in, max. 27 mm/1.06 in 7 mm/0.28 in to 27 mm/1.06 in 69 mm/2.72 in 97 mm/3.82 in...
- Page 42 T26 System Manual Part 1: System Overview Module Frame (Fig. Triple Frame) 18 mm/0.71 in 131 mm/5.16 in Installation of module * Ethernet terminal board ETH Module is not required when using Mx2wire+ technology Connection of theft protection Activation of...
- Page 43 Outdoor Station Housing Frame T26 Modules Terminal boarf* On-wall or in-wall With integrated MX-DoorMaster, Ethernet terminal housing theft protection KeypadRFID, board or Info Module Info Module/Info Module Mx2wire+ *Ethernet terminal board ETH Module is not required when using Mx2wire+ technology...
-
Page 44: Mx-Doormaster
T26 System Manual Part 1: System Overview MX-DoorMaster The T26 can be coupled with the MX-DoorMaster with internal access code memory, making it impossible to open the door by forcibly removing the system and bypassing the connect- ing cable. 80 mm/3.15 in... - Page 45 DC, self-powered – 48 V) 1 isolated relay output (AC/DC, 24 V/1 A) or Outputs 1 connector for standard door opener (6-12 V AC) 1 output for MOBOTIX theft protection (12 V DC) Protection class IP20 (DIN EN 60529) Operating temperature –5 to +40°C/+23 to +104°F (DIN EN 50155)
-
Page 46: Remote Stations
Remote Stations 1.3.1 MxDisplay+ MOBOTIX recommends the MxDisplay+ as a remote station for the T26. The MxDisplay+ is a wall-mounted multi-functional intercom with WiFi and RFID technology on-board. Al MxDisplay+ units are powered via PoE (Power over Ethernet) and you can install several MxDispla+ units that interact via wireless communication. - Page 47 Outdoor Station Fast event overview MxDisplay+ shows you at a glance, which and how many events have been recorded. Playback of messages and events Fast and easy navigation through the recordings. Access and camera configuration Centralized control of cameras and access control systems.
-
Page 48: Mobotix Mxbell
Never miss another visitor, thanks to push notifications! Use MOBOTIX MxBell on your smart- phone or tablet to receive notifications from the doorbell of a MOBOTIX IP Video Door Station and live views from MOBOTIX cameras. This app helps you open the door and enables hands- free talking, automatic camera search, a live view, camera connection via SSL and display of the connection status. -
Page 49: Mxmanagementcenter
MxManagementCenter is perfectly designed in combination with MOBOTIX cameras repre- senting the decentralized concept at its best. MxMC allows controlled recording access via the camera or later directly to the NAS. -
Page 50: Accessories
Accessories 1.4.1 nPA-Poe Set The MOBOTIX Network Power Adapter Set (NPA-PoE set) is a high-quality, robust, ultra-com- pact, and – above all – multifunctional PoE injector with three connectors (network, camera/ PoE device, computer) and a universal power supply unit with adapter plugs. The Network Power Adapter Set supplies the DoorStation and all other PoE devices with power in accor- dance with the IEEE 802.3af standard. -
Page 51: Io Module (Extended Terminal Board)
Outdoor Station 1.4.2 IO Module (extended Terminal Board) In addition to the Ethernet terminal board (ETH Module), MOBOTIX offers an IO Module (MX-OPT-IO1) with extended connection options for the door station (e.g., doorbell buttons, light, garage door opener, etc.). The board provides 8 switch inputs and 3 switch outputs. The network cable and the camera module T26-CamCore are connected in the same manner as the Ethernet terminal board. -
Page 52: Mx-Gps-Box
Mx2wire+ indoor unit Poe+ According to Ieee 802.3at for Mx2wire+ If the T26 version with Mx2wire+ technology is installed, data and power are supplied to the door station via a two-wire cable, which is connected to the network via an Mx2wire+ indoor unit. -
Page 53: Additional Video Remote Stations
Internet (such as the Fritz!Box). In this case and if only one T26 door station needs to be supplied with power, it is sufficient to purchase one PoE injector. -
Page 54: Installation
T26 System Manual Part 1: Installation InSTAllATIOn Overview: Connection and Wiring Diagrams The following diagrams are an overview of the wiring plans that will allow you to connect the DoorStation as intended. Please refer closely to the configuration that best suits your particular needs. - Page 55 Overview: Connection and Wiring Diagrams Connection of external devices (light relay, etc.) and 12 V power supply unit...
-
Page 56: Without Mx-Doormaster
In addition, an external 12 V voltage is applied to the door mechanism/electronic lock and bridged over to the access module. The two cables for the electromagnetic theft protection integrated into the T26 frame (oth- erwise connected to and powered by the MX-DoorMaster) should be conducted inside the building so that they can be connected to a 12 V supply in case modules are exchanged. - Page 57 Overview: Connection and Wiring Diagrams – Modules are connected via the looped-through, two-wire MxBus cable that transfers data and power simultaneously (cable included in packaging) The module terminal designations can be found directly on the module Connection of external devices (light relay, etc.) and 12 V power supply unit...
-
Page 58: With Info Module Mx2Wire+ And Mx-Doormaster
2.1.3 With Info Module Mx2wire+ and MX-DoorMaster To be able to use a bell wire already laid in the building to connect the T26 door station to the network and supply it with power, the T26 version with Mx2wire+ technology is required. The two-wire cable must be conducted from the door station info module to a second Mx2wire+ unit inside the building, to which data and power is supplied, for example, via a PoE+ switch. - Page 59 Overview: Connection and Wiring Diagrams The MX-DoorMaster is always connected to a free MxBus connector of the outdoor station (on the camera module, access or info module) Modules are connected via the looped-through, two-wire MxBus cable that transfers data and power simultaneously (cable included in packaging) An Ethernet patch cable...
-
Page 60: Recommendation For Cabling
Max. cable length: 200 m/218.72 yd (JY, A2Y, YR), 300 m/328.08 yd (NY), 500 m/546.81 yd (Cat 7) Two wires from the door station to the MX-DoorMaster for connecting the MOBOTIX theft protection (for unlocking when exchanging modules) The supplied patch cable is used to connect the •... - Page 61 Overview: Connection and Wiring Diagrams Door station Door YSTY 0.8 mm (door opener, Door sensor and door lock sensor – max. length: 50 m/54.68 yd Power supply 12 V DC (for elec. lock) MX-DoorMaster YSTY 0.8 mm (MxBus) – max. length: 50 m/54.68 yd YSTY 0.8 mm (theft protection) –...
-
Page 62: Installation Tip: Replacing An Existing Doorbell By A T26
Disconnect the doorbell from power (by disconnecting the bell transformer), then remove it. Connect the wire pair to the Info Module Mx2wire+ (T26 is mounted directly above the cable). This wire pair is conducted directly to the electrical cabinet, from where it is connected to the power supply and remote stations via the Mx2wire+ indoor unit. - Page 63 Overview: Connection and Wiring Diagrams Step 2: Install and Connect the MX-DoorMaster Install the MX-DoorMaster in a in-wall socket on the wall behind the door station (inside the building). Besides the in-wall socket, only two holes are required for the entire cabling. Hole A Use a long drill bit to drill a hole from the door station downwards at an angle, through the brickwork to the in-wall socket of the MX-DoorMaster on the interior wall surface.
-
Page 64: Remote Stations And Network Connection
MOBOTIX PoE adapter (MX-NPA-PoE) or other similar, high-quality PoE product conforming to IEEE 802.3af is required to supply the T26 with power (PoE switch). A PoE+ switch (IEEE 802.3at) or a 48 V power supply unit can be used to supply power to the T26 version with Mx2wire+ technology. -
Page 65: Network Connection With Multiple Remote Stations
MxManagementCenter or MxDisplay+ units) in an existing network (for example, via an Internet box), MOBOTIX again recommends using a MOBOTIX PoE adapter (MX-NPA-PoE) or a switch with multiple ports to supply power to the door station. Connect the devices as... - Page 66 T26 System Manual Part 1: Installation Connection with Mx2wire+ and Optional 48 V Power Supply note For a door station with integrated Mx2wire+ technology, an external voltage source (48 V DC) – connected via two wires directly to one of the two Info Module Mx2wire+ units (info module or indoor unit) –...
- Page 67 Remote Stations and Network Connection Connecting Multiple T26 Door Stations In general, a (PoE) switch can be used to connect several T26 door stations to the same remote stations. However, only one T26 can be connected to a MX-DoorMaster. Each transponder card can be programmed in such a way that it can be used on all the existing T26 door stations for opening the door.
-
Page 68: Mounting The Frame And Housing
MX-DoorMaster, remote stations and power supplies that are installed inside a building. Please note that only the T26 camera, access module and info module are suitable for outdoor installation (IP65, –30 to 50 °C/–22 to 122 °F). The modules will only be weather- proof if they have been installed correctly using matching MOBOTIX housings and frames. - Page 69 The height from the ground to the upper edge of the frame should be at least 1.60 m. Unlike conventional door cameras, the T26-CamCore with its 180 ° angle of view is also able to record visitors when they are NOT standing directly in front of the lens. This means that the door station can be mounted quite flexibly, which is particularly useful with wide doors.
-
Page 70: Inserting The Cables
T26 System Manual Part 1: Installation 2.3.2 Inserting the Cables On-Wall Housing The housing has cable guides made of elastic rubber to ensure the cable entry points are waterproof. Use only one cable guide for each cable. Pierce the cable guide you require using a screw- driver or other similar tool and feed the cable into the housing. - Page 71 Remote Stations and Network Connection Important: Pay Attention to the Position of the Cables When installing the door station, make sure that all the required cables (network, MxBus, theft protection and so on) are laid in such a way that they protrude from the wall directly below the housing openings provided.
-
Page 72: Attaching The Housing
T26 System Manual Part 1: Installation 2.3.3 Attaching the Housing On-Wall (Fig. Triple Housing) Drill the four holes and insert the screw anchors (drilling template is included). Ensure that the ‘Oben/Top’ label points upwards (applies to horizontal and vertical installation). Attach the on-wall housing using four Torx screws and the supplied Torx wrench. - Page 73 Remote Stations and Network Connection In-Wall (Fig. Triple Housing) Connect the housing with the subsurface so that the bars fitted Hint: Turn the in-wall socket over and use it as a to the edge are still visible. The required opening should be template to mark the hole 116 x 318 mm.
-
Page 74: Cabling In The On-Wall Housing
T26 System Manual Part 1: Installation 2.3.4 Cabling in the On-Wall Housing To prevent cables from being damaged when you mount the frame or the T26 modules, make sure that the cables are routed correctly. Please refer to the example cabling shown in the figure below. - Page 75 Remote Stations and Network Connection The T26 housing (on-wall/in-wall) provides sufficient space for cable reserves (see the blue dashed line in the figure). The red areas are ‘off-limits areas’. No cables should be placed in this area (risk of damage to cables when module is mounted).
-
Page 76: Mounting The Terminal Board And Fitting The Network Cable
Screw the board into the housing (flattened side is at the bottom). The terminal board must be placed behind the camera module. This step is not necessary for the T26 version with Mx2wire+ technology (two-wire cable replaces Ethernet cable), as an Ethernet terminal board is not required. -
Page 77: Applying The Gasket
Remote Stations and Network Connection 2.3.6 Applying the Gasket Remove the protection film and stick the supplied gasket all the way round the inner housing frame, ensuring it fits exactly and taking care not to leave any gaps. Use a pair of scissors to remove any surplus material. Please ensure that the adhesive surface is clean, dry and free of grease. -
Page 78: Attaching The Frame And Connecting The Theft Protection
2.3.7 Attaching the Frame and Connecting the Theft Protection Before the T26 modules can be clicked into the frame, you must screw the frame onto the housing (recommendation: cross slot PH 2x100) and lay the black theft protection cable to the inside of the building according to your selected connection option, for example, to the MX-DoorMaster (you may also need to extend the cable). - Page 79 Remote Stations and Network Connection Cavity and In-Wall (Fig. Triple Housing) Please note that in this case the module frame may only be screwed onto the four outermost positions on the housing (max. torque: 0.4 Nm). 4 screws, marked red, max.
-
Page 80: Mechanical Theft-Protection Lock
T26 System Manual Part 1: Installation 2.3.8 Mechanical Theft-Protection Lock In the default configuration of the door station, theft protection is not activated in the frame. This allows modules that have already been integrated to be removed again during the installation, just using the special key that has been supplied. - Page 81 Remote Stations and Network Connection Activating the Theft-Protection Lock Use a screwdriver to turn the red rotating button inside the frame 90 degrees clockwise. When theft protection is activated, the arrow points to the ‘closed lock’ symbol. locked: Modules cannot be removed from the frame.
-
Page 82: Installing The T26 Modules
2.4.1 Installing the T26-CamCore Camera Module Standard network Connection The Ethernet terminal board is used to connect the door station for the T26 version without Mx2wire+ technology. It connects the short, pre-installed camera patch cable with the eight split-out wires of the network installation cable (for installation, see Section 2.3.5, «Mounting the Terminal Board and Fitting the Network Cable»). - Page 83 Installing the T26 Modules 3. Guide the MxBus cable (to be shortened accordingly) into the housing and under the frame so that it can be easily connected to the access module later on. Insert the pre-installed camera module patch cable into the Pay attention to the RJ45 port on the terminal board.
- Page 84 T26 System Manual Part 1: Installation network Connection using Mx2wire+ Technology An Ethernet terminal board is not required for the T26 door station with Mx2wire+ technology. Instead, the camera module is connected to the Info Module Mx2wire+ via a MOBOTIX patch cable.
- Page 85 Installing the T26 Modules 4. First of all, insert the right side of the module into the frame and then press firmly on the left side, until the module audibly clicks into place. Control click: If you do not hear a click, this means that the Click module is not properly locked into place.
-
Page 86: Preparing The Bellrfid Access Module
MOBOTIX recommends to remove the keypad insert and to insert the button set before starting the installation. This way, the soft rubber surface of the T26 base module is well protected until the module is brought into service (bell buttons are then replaced by the keypad insert). - Page 87 Installing the T26 Modules Place the silicone insert on top of the name plate, push it into the frame at the top and at the bottom of the center, then push its sides into the frame. Make sure that the silicone insert properly fits flush into the frame of the bell button as shown to protect the name plate against humidity.
-
Page 88: Installing The Access Module (Keypadrfid/Bellrfid)
Installing the KeypadRFID or BellRFID access modules is identical; the pictures in this section show who to install the KeypadRFID. For more information on these access modules, please refer to the corresponding Quick Installation documents (www.mobotix.com > Support > Manuals > DoorStation > Single Components): Quick Installation: KeypadRFID •... - Page 89 The two MxBus cables of the MX-DoorMaster can be connected to the access module instead of the camera module, if the info module is connected to the MxBus connector of the T26-CamCore door camera. If no lighting function is required for the info module at all, the MxBus cables do not...
- Page 90 T26 System Manual Part 1: Installation 6. Connect all the other connection cables (if present): Standard door opener or relay (for lights etc.): – First wire to COM terminal – Second wire to OUT A terminal external power supply for door opener or power relay (for example, 12 V AC): –...
- Page 91 Installing the T26 Modules 7. Put the cover plate back on. 8. First of all, insert the right side of the module into the frame. Then press firmly on the left side, until the module audibly clicks into place. Only press firmly on the...
-
Page 92: Installing The Info Module
T26 System Manual Part 1: Installation 2.4.4 Installing the Info Module The info field in the info module of the T26 door station without Mx2wire+ technology is equipped with permanent LED backlighting supplied via MxBus. 1. Ensure that the gasket is fitted to the info module. - Page 93 Installing the T26 Modules 4. Connect the two MxBus cables that come from the access module to the info mod- ule board. – Red wire to MX + terminal – Blue wire to MX – terminal As an alternative to the...
-
Page 94: Installing The Info Module Mx2Wire
T26 System Manual Part 1: Installation 2.4.5 Installing the Info Module Mx2wire+ The info module with integrated Mx2wire+ technology is used to connect the door station to the network via a two-wire cable such as a bell wire and has an info field with permanent LED backlighting. - Page 95 Installing the T26 Modules 5. Remove the blue sealing plug on the module. Feed the RJ45 connector of the (extended) camera patch cable into the housing and insert it into the RJ45 port. Make sure that the rubber sealing ring on the patch cable is in the correct final position.
-
Page 96: Labeling The Info Module
You will find a PDF template on the MOBOTIX website to help you create your own label. Simply add your personal data to the template and print it onto a sheet of A4 paper. Then simply cut out your ‘doorbell label’... - Page 97 Installing the T26 Modules 4. Place your completed doorbell label (B) behind the transparent protective cover (A). Insert the silicone mat (C) so that its smooth side is behind the label. Follow the correct order (from left to right) Info Module Mx2wire+...
-
Page 98: Removing, Exchanging And Modifying Modules
T26 System Manual Part 1: Installation 2.4.7 Removing, exchanging and Modifying Modules If theft protection has been activated (see Section 2.3.7), you will need to switch this off before you can remove and exchange the modules. 1. Switching off theft protection on the MX-DoorMaster:... - Page 99 Installing the T26 Modules 3. Removing the modules: Insert the special MOBOTIX key provided into the split open- ing on the module frame (bottom left or bottom right, depending on how it has been mounted) and release the modules from the frame by The special key is included pushing the key in.
-
Page 100: Installing The Mx-Doormaster
It furthermore allows the door to be opened using a button and controls the theft protection in the T26 housing. Thanks to its built-in batteries, which are kept fully charged via the MxBus cables, the... - Page 101 Installing the MX-DoorMaster MX-DoorMaster System Overview Door station Door MX-DoorMaster Door sensor Door opener Door lock sensor MxBus Theft protection Theft protection (OUT1 +) Theft protection/Door opener (OUT – ) Door opener (OUT2 +) Door lock sensor/Door sensor (IN – ) Door lock sensor (IN2 +) MxBus...
-
Page 102: Connection Diagrams For Door Opener Versions
T26 System Manual Part 1: Installation 2.5.2 Connection Diagrams for Door Opener Versions Version 1: Power Supply from MX-DoorMaster Battery (Self-Powered) The MX-DoorMaster’s permanently-charged battery pack provides a supply voltage to the door opener and therefore also bridges power failures. - Page 103 Installing the MX-DoorMaster Version 3: Self-locking electronic Door lock Including uPS via Battery Pack In this connection option, the MX-DoorMaster’s battery pack powers the system in the event of a power failure and allows the door to be opened without a key. In this case however, theft protection must be controlled using an additional switch (to be ordered separately).
-
Page 104: Mounting Instructions
Cavity socket (ø 68 mm, 61 mm in depth) note MOBOTIX offers two orange cavity sockets of different depths (48 mm and 61 mm). The 61 mm-deep socket is designed for the MX-DoorMaster, and the 48 mm-deep socket is intended for the Mx2wire+ indoor unit. - Page 105 Installing the MX-DoorMaster Preparing the In-Wall Socket (Solid Wall) An in-wall socket must usually be fitted first. Make sure that the socket you use is as flush with the wall as possible to ensure proper installation. Also make sure that the socket and MX-DoorMaster are aligned correctly.
- Page 106 T26 System Manual Part 1: Installation Preparing the Cavity Socket (Cavity Wall) The MX-DoorMaster can be mounted to a cavity wall (for example, plasterboard up to a thickness of 35 mm) using either the supplied cavity socket or an existing socket. Push the...
-
Page 107: Installation Using Cavity Or In-Wall Socket
(B). The red LED indicates that the battery is low. 3. Screw on the MxBus cable (coming from the T26 door Remove approximately station): 5 mm of insulation from all the cables used –... - Page 108 T26 System Manual Part 1: Installation 6. Screw on the ‘door lock unlocked/locked’ door lock sensor (coming from the door): – First wire to IN2 + terminal – Second wire to IN – terminal The device still functions properly if the two wires used here (operating contact and changeover contact) are swapped.
- Page 109 10. Attach the frame: Place the selected frame (concave, convex or flat) onto the board frame required and press down gently until it automatically snaps into place. MOBOTIX is printed on the bottom of the frame. 11. Insert the panel: Hook the front panel onto the bottom of the frame, as shown in the figure, and then press it down.
-
Page 110: Installing The Mx2Wire+ Indoor Unit
Installing the Mx2wire+ Indoor unit 2.6.1 Overview of Mx2wire+ Technology and Connectors The Mx2wire+ technology that is optionally available with the T26 is used to connect the door station to the network via a simple two-wire cable such as the connection cable of an existing doorbell. - Page 111 A further advantage of Mx2wire+ is that it allows the range of a connection to be extended considerably using a two-wire cable up to 500 m long (a T26 connection using a network cable is limited to 100 m). For detailed technical information on the T26 version with Mx2wire+...
-
Page 112: Mounting Instructions
T26 System Manual Part 1: Installation 2.6.2 Mounting Instructions Mounting Options In addition to an on-wall installation using the supplied surface-mounted socket, you can also choose to install the Mx2wire+ indoor unit using a standard in-wall socket or a cavity socket (for wood or plasterboard, for example). -
Page 113: Installation Using Cavity Or In-Wall Socket
Installing the Mx2wire+ Indoor Unit 2.6.3 Installation using Cavity or In-Wall Socket 1. Prepare the cavity or in-wall socket: see Section 2.5.3 2. Screw the two-wire cable to terminals 1 and 2: The cable does not necessarily need to be attached to the terminal with the same number on both Info Module Mx2wire+ units. - Page 114 MOBOTIX printed convex or flat) onto the board and press down gently at the bottom until it automatically snaps into place. MOBOTIX is printed on the bottom of the frame. 6. Insert the panel: Hook the front panel onto the frame, as shown in the figure, and then press it down.
-
Page 115: Installation With Surface-Mounted Socket
Installing the Mx2wire+ Indoor Unit 2.6.4 Installation With Surface-Mounted Socket 60 mm/2.36 in 1. Prepare the surface-mounted socket: Preparation: Please refer to the figure on the right and use the surface-mounted socket as a template to mark the drill holes. Make sure Supplied rubber plug for that the alignment and position of the socket in relation sealing the two-wire cable:... - Page 116 6. Attach the frame: Place the selected frame (concave, convex or flat) onto the board and press down gently until it automatically snaps into place. MOBOTIX is printed on the bottom of the frame. 7. Insert the panel: First insert bottom of front panel into the frame as shown in the figure, then push against top.
-
Page 117: Function Of Mx2Wire+ Status Leds
Installing the Mx2wire+ Indoor Unit 2.6.5 Function of Mx2wire+ Status leDs Each Mx2wire+ unit has two status LEDs (green and orange), which provide information on the current state of the PoE power supply and on the transfer of data. The LEDs can either light up continuously (ON) or they can flash (FLASHES). -
Page 118: Connecting External Devices To The Door Station
MOBOTIX IO Module (accessory) or the access module (KeypadRFID/BellRFID). The T26 camera software is used to configure the switching of external devices and can be accessed via a standard web browser such as Internet Explorer. For additional information on this topic, see the T26 Systemhandbuch Teil 2. - Page 119 Connecting External Devices to the Door Station Terminal Connector Functions (external Devices and Third-Party System) In addition to general technical specifications for the signal inputs and outputs, the table also shows the precise layout of the 16-wire terminal connector when the external devices are modules from a third-party system.
- Page 120 T26 System Manual Part 1: Installation example: Connecting a lamp Supplied With 230 V Connect power relay (for lamp): • First wire to eLi terminal • Second wire to power supply • Third wire to lamp • Fourth wire to 230 V Connect external power supply (for relay, e.g.
- Page 121 Connecting External Devices to the Door Station example: Connecting up to Four Bell Buttons Connect bell buttons: • First wire to terminals 7.1 to 7.4 (1 to 4 bell buttons) • Second wire to power supply Connect power supply: • First wire to terminal b •...
-
Page 122: Using The Signal Outputs Of The Access Module (Keypadrfid/Bellrfid)
2.7.2 using the Signal Outputs of the Access Module (KeypadRFID/BellRFID) If the T26 door station is used with the MX-DoorMaster and a standard door opener, all the access module connectors apart from the MxBus connector remain unused (see Section 2.5.2, Version 1). - Page 123 Connecting External Devices to the Door Station example: Connecting up to Two Bell Buttons to KeypadRFID Connect first bell button: • First wire to IN1 + terminal • Second wire to IN1 - terminal Connect second bell button: • First wire to IN2 + terminal •...
-
Page 124: Finishing The Installation
The entire system starts up. The buttons on the T26-CamCore light up for four seconds. Without pressing a button, wait until the lights go out after a few minutes and then light up again. - Page 125 Indoor unit: Green LED flashes, orange LED lights up modules are skipped Check lights on Info Module LEDs on the Info Module light up Check camera lights T26-CamCore Buttons and light strips light up after boot phase Check leD signal on access module KeypadRFID/BellRFID...
-
Page 126: Configuring The Mx-Doormaster
T26 System Manual Part 1: Installation 2.8.2 Configuring the MX-DoorMaster Before using the MX-DoorMaster, it is essential to configure the signal output option to be used (see Section 2.5.2, «Connection Diagrams for Door Opener Versions»). Three Options Are Available Option 1: Power Supply From MX-DoorMaster Battery (Self-Powered) - Page 127 Finishing the Installation The signal output option is set on the MX-DoorMaster in three steps as part of the initial setup. Step 1: Press both buttons at the same time for 5 seconds (until double beep) You are now in administration mode (red LED turns off shortly every 3 seconds). Step 2: Press door opener button (right) to configure the signal output option You can switch between signal output options 1 to 3 by pressing the right button repeatedly.
- Page 128 T26 System Manual Part 1 Notes...
- Page 129 Tax Code: 44/676/0700/4 VAT ID: DE202203501 You can fi nd the latest version of this and other documents (e.g., declarations of conformity) at www.mobotix.com in the Support > Download Center > Documentation section. Technical specifi cations subject to change without notice!
- Page 130 System Manual Part 1 System Overview and Installation DoorStation T26...
Need help?
Do you have a question about the T26 and is the answer not in the manual?
Questions and answers