Table of Contents
Advertisement
Advertisement
Table of Contents

Related Manuals for Dust Free MicroPure 5” with MX4

Summary of Contents for Dust Free MicroPure 5” with MX4
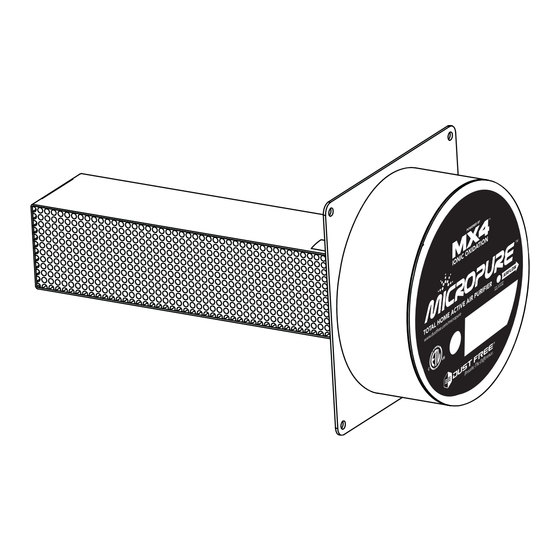
- Page 1 OWNER’S MANUAL 120V/230V ® MicroPure 5” with MX4™ #14015 #14003 ® MicroPure 9” with MX4™ #14013 #14004 MicroPure® 9” with MX4™ Lite #14016 #14001 MicroPure® 14” with MX4™ #14017 #14005 MicroPure® 14” with MX4™ Lite #14014 #14002 Read manual carefully for proper procedures and operation.
-
Page 2: Table Of Contents
CONGRATULATIONS . . . on your purchase of the MicroPure® Total Home Active Air Purifier by Dust Free®. This unit is designed to be installed into an existing HVAC system and provide virtually maintenance free air purification. Please read and follow all service procedures outlined in this manual. -
Page 3: Product Contents
REPLACEMENT PARTS MX4™ Core (Includes UV Lamp) UV Lamp Mounting Plate Power Module (Includes power supply, safety switch, and light pipe.) Power Cord (For 24V and 230V operation) 120V Power Supply... -
Page 4: Specifications
Failure to do so will void ETL safety listing and Dust Free® warranty. WARNING! UV Light in operation. Disconnect unit from power supply before servicing. Failure to follow warnings may result in severe eye damage. -
Page 5: Recommended Installation Tools
RECOMMENDED INSTALLATION TOOLS 3 1/2” Hole Saw Drill/Power Driver Phillips Screwdriver 3/8” Drill Bit (if installing into fiberglass for metal ducting with toggle bolts) (recommended) You may also need: 11/32” Open-End Wrench 1/4” Nut Driver Bit Utility Knife Tin Snips (for metal ductwork) INSTALLATION REQUIREMENTS 1. -
Page 6: Metal Ductwork Installation
METAL DUCTWORK INSTALLATION Locate suitable area of duct for installation. 2. Cut away insulation to expose metal duct Be sure to locate near proper power. (if needed). 3. Mark location for 3.5” opening using either the 4. Cut hole in duct using 3.5” hole saw. mounting plate or included template. - Page 7 METAL DUCTWORK INSTALLATION (CONTINUED) 5. Remove backing from mounting plate 6. Center openings and press mounting plate onto adhesive gasket. duct. The adhesive gasket will hold the mounting plate in place. 7. Secure the mounting plate using (8) self- 8. Insert unit into opening. Be sure the air will pass tapping screws.
-
Page 8: Fiberglass Ductwork Installation
FIBERGLASS DUCTWORK INSTALLATION 2. Mark location for 3.5” opening using either 1. Locate suitable area of duct for installation. the mounting plate or included template. Also Be sure to locate near proper power. mark the locations of 4 screw holes in corners (see template). - Page 9 FIBERGLASS DUCTWORK INSTALLATION (CONTINUED) Stud 5. Insert (4) 2” Threaded bolts into screw holes 6. Remove backing from mounting plate at corners of mounting plate. Attach (4) toggle adhesive gasket. bolt anchors to ends of threaded bolts. 7. Insert (4) toggle bolts into 3/8” holes in duct. 8.
-
Page 10: Maintenance/Uv Lamp Indicator
UV lamp at your local recycling center. You may also send your spent ™ core and UV lamp, in the same container you received your replacement, to : ® Dust Free MicroPure® Reclamation 1112 Industrial Drive Royse City, TX 75189... -
Page 11: Changing Mx4™ Core
CHANGING THE MX4™ CORE WARNING! UV Light in operation. Disconnect unit from power supply before servicing. Failure to follow warnings may result in severe eye damage. 1. Unplug unit. If the unit is hard wired, be 2. Remove the 4 mounting nuts. sure the power to the unit is off. -
Page 12: Limited Warranty
Warranty Claim. A Customer Service Representative will reply by email and will provide further instructions. Dust Free®, LP , PO Box 519, Royse City, TX 75189. Please do not mail Warranty Claim requests or your product to this address. Warranty Claim requests are only accepted by telephone and through the website.
Need help?
Do you have a question about the MicroPure 5” with MX4 and is the answer not in the manual?
Questions and answers