Table of Contents
Advertisement
Installation & Operating manual
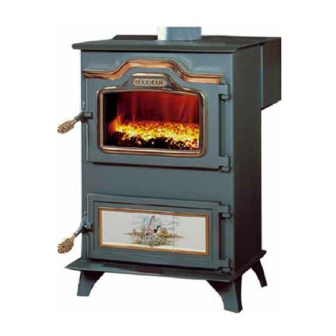
The harman magnum Stoker
dO NOT burN wET COAl.
r18
SAFETY NOTICE
PlEASE rEAd ThIS ENTIrE mANuAl bEFOrE YOu INSTAll ANd uSE YOur NEw rOOm hEATEr. FAIlurE
TO FOllOw INSTruCTIONS mAY rESulT IN PrOPErTY dAmAgE, bOdIlY INjurY, Or EvEN dEATh.
NOT SuITAblE FOr INSTAllATION IN mObIlE hOmES.
IF ThIS hArmAN STOvE IS NOT PrOPErlY INSTAllEd, A hOuSE FIrE mAY rESulT. FOr YOur SAFETY, FOllOw
INSTAllATION dIrECTIONS.
CONTACT lOCAl buIldINg Or FIrE OFFICIAlS AbOuT rESTrICTIONS ANd INSTAllATION INSPECTION
rEQuIrEmENTS IN YOur ArEA.
CONTACT YOur lOCAl AuThOrITY (SuCh AS muNICIPAl buIldINg dEPArTmENT, FIrE dEPArTmENT, FIrE
PrEvENTION burEAu, ETC.) TO dETErmINE ThE NEEd FOr A PErmIT.
CETTE guIdE d'uTIlISATION EST dISPONIblE EN FrANCAIS. ChEz vOTrE CONCESSIONNAIrE dE hArmAN.
MGMR13
SAvE ThESE INSTruCTIONS.
Advertisement
Table of Contents

Related Manuals for Harman Magnum Stoker


Summary of Contents for Harman Magnum Stoker
-
Page 1: Safety Notice
TO FOllOw INSTruCTIONS mAY rESulT IN PrOPErTY dAmAgE, bOdIlY INjurY, Or EvEN dEATh. NOT SuITAblE FOr INSTAllATION IN mObIlE hOmES. IF ThIS hArmAN STOvE IS NOT PrOPErlY INSTAllEd, A hOuSE FIrE mAY rESulT. FOr YOur SAFETY, FOllOw INSTAllATION dIrECTIONS. CONTACT lOCAl buIldINg Or FIrE OFFICIAlS AbOuT rESTrICTIONS ANd INSTAllATION INSPECTION rEQuIrEmENTS IN YOur ArEA. -
Page 2: Table Of Contents
INdEX Introduction Warnings Packing List Assembly Installation Verti-Flow Stoker Control Operation Maintenance Trouble-Shooting Wiring Diagram Feeder Parts Domestic Hot Water Coil Hot Air Duct Option Warranty DO NOT BURN WET COAL... -
Page 3: Introduction
INTrOduCTION This proven design by Harman features the Verti-Flow Stoker System. This unique system provides a very wide range of heat output. The Verti-Flow Stoker can operate from 5000 to over 85,000 btu's automatically. This unit has a 100 pound coal capacity and can provide 85,000 btu's continuous for 17 hours or stretch out to over 100 hours when less heat is required. - Page 4 rEAd ThIS Always empty the hopper when not burning for more than a week. when left standing for long periods with wet coal, the pusher block will rust and corrode, causing it to seize. If the stoker is then turned "on", damage to the pusher assembly and feed motor will result.
-
Page 5: Packing List
PACKINg lIST DO NOT BURN WET COAL... -
Page 6: Assembly
Harman Home Heating recommends that your dealer complete the assembly of this stove. It is also recommended to take a draft reading with the stoker burning. -
Page 7: Control Box
Make sure the gasket is in place on the feeder opening on the rear of the unit, as shown in fig 3. Insert the stoker into the opening in the rear of the unit. Attach using (2) 5/16 X 1 1/4 bolts. blowers Install the smaller of the two blowers on the bottom of the feeder by sliding it into the bracket as far as... - Page 8 hopper Install hopper support on top rear of stoker. Note that the bolt holes in the hopper support are slotted for adjustment. Insert the funnel end of hopper into the hopper slot on the feeder as shown. Push the top of the hopper under the hopper support, causing the slot on the bottom side of the support to hook onto the hopper.
- Page 9 Door Top Trim door Assembly Lay the glass frame face down on a flat surface. The glass panel should have channel gasket on the ends (short sides) only. Place the glass panel into the frame, making sure that it is completely down in the frame.
-
Page 10: Installation
Top view Front view IMPORTANT Use only U.L. approved floor board Clearance to Combustibles INSTAllATION Place the stove a minimum of 3" from a combustible wall from the rear of the hopper and a minimum of 24" from the sides. The stove should be placed on a noncombustible floor, or a minimum 3/8"... - Page 11 A fireclay liner, minimum 3/8" (9 mm) wall The Magnum Stoker may be installed with (.6 mm) 24 thickness must run through the brick wall to the chimney gauge chimney connector pipe. The size of the connector liner (but not beyond the inner surface of the liner).
-
Page 12: The Chimney
Minimum 2" (50mm) Closest Combustible Non-combustible cover, one Clearance to Brick Material side only. If two covers are Hole with minimum used, each must be mounted clearance of 18" (450 mm) Minimum 12" on non-combustible spacers between connector and wall. (300mm) to Brick at least 7/8"... - Page 13 Existing masonry Chimneys If you plan on using a pre-existing masonry chimney, have it thoroughly inspected and cleaned. Any faults which make the chimney unsafe and unusable must be repaired prior to use. These can include improper height, structural defects, blockages, inadequate clearance to combustibles, unsealed openings into other rooms of the house, signs of creosote or smoke leakage, a loose or absent clean-out door, or absence...
-
Page 14: Verti-Flow Stoker Control
Stoker Control This section describes the features and operations of The Harman Verti-Flow Stoker Control. The timers are adjustable from 0 minutes to 15 minutes in 1 minute steps. There are red lights on the front panel to show proper operation of the timer. -
Page 15: Operation
The thermostat connections on the back panel of the Stoker Control are .25 inch male quick connect terminals. The mating connectors (supplied) should be .25 inch female quick connector terminals. The wire should be no smaller than 22 gauge. The thermostat connections should only be connected across the thermostat switch inside the thermostat unit. - Page 16 The purpose of having the off delay timer on the distribution blower is to exhaust the excess heat in the stove that is inherent after the combustion blower and coal feeder turn off. For this reason, it is not recommended that a 0 time setting be used. This will minimize any possibility of overheating the stove. The other timer, which begins when the stoker control first takes control, is the "off"...
- Page 17 STArTINg A FIrE To start a fire, you first pour rice coal into the hopper. With the thermostat turned up and the stoker running, the coal will begin to feed onto the grate inside the stove. This process can be accelerated by adjusting the feed rate to the maximum position.
-
Page 18: Maintenance
mAINTENANCE With each hopper of coal that is burned, approximately one ashpan full of ashes must be removed. Failure to remove the ashes will result in a blocked up grate and the fire will not burn properly. Remember, the ashpan will be hot, so always wear protective gloves. - Page 19 Annually: At the end of the heating season is the best time to perform annual maintenance. The reason is, rust and corrosion can form much faster in the high humidity of summer. Remove all coal from hopper. Remove all ashes. Remove and clean flue pipe.
-
Page 20: Trouble-Shooting
TrOublE-ShOOTINg Stoker Control Trouble-Shooting FEEdINg PrOblEmS This trouble-shooting guide is designed to help wet Coal -- Wet coal does not flow the same as the customer find basic problems external to the dry coal. Therefore, the feed rate will change with stoker timer. -
Page 21: Specifications
SPECIFICATIONS 25" 31.5" 36.5" DO NOT BURN WET COAL... -
Page 22: Service Parts
Stoker Service Parts beginning manufacturing date: N/A Freestanding Coal Stove Ending manufacturing date: Sept 2009 1-70-03244-1 (black), 1-70-03244-2 (Charcoal), 1-70-03244-3 (goldenfi re), 1-70-03244-4 (metallic blue), 1-70-03244-5 (honey glo), 1-70-03244-10 (mojave red), 1-70-03244-12 (Forest green) IMPORTANT: THIS IS DATED INFORMATION. When requesting service or replacement parts for Stocked your appliance please provide model number and serial number. -
Page 23: Wiring Diagram
Stoker Service Parts beginning manufacturing date: N/A Ending manufacturing date: Sept 2009 #9 Feeder Assembly 9.18 9.19 9.16 9.14 9.20 9.17 9.15 9.13 9.12 9.10 9.11 IMPORTANT: THIS IS DATED INFORMATION. When requesting service or replacement parts for Stocked your appliance please provide model number and serial number. -
Page 24: Feeder Parts
Stoker Service Parts beginning manufacturing date: N/A Ending manufacturing date: Sept 2009 IMPORTANT: THIS IS DATED INFORMATION. When requesting service or replacement Stocked parts for your appliance please provide model number and serial number. All parts listed in this manual may be ordered from an authorized dealer. -
Page 25: Domestic Hot Water Coil
domestic hot water coil hookup Cut holes with 1 1/8" hole saw where shown . Install coil with hardware provided. Hook up as shown above. If the distance between the unit and the tank is less than 10 feet, the circulator pump and aquastat are not needed. -
Page 26: Hot Air Duct Option
hot Air duct Option 6" starting collar Important Don't forget to retighten the bolt after removing the plate. Your stoker has a built-in feature that lets you take the air that normally blows out from the front and puts it out the top into a 6" duct. To do this, remove the 6"... -
Page 27: Warranty
Hearth & Home Technologies Inc. LIMITED LIFETIME WARRANTY Hearth & Home Technologies Inc., on behalf of its hearth brands (”HHT”), extends the following warranty for HHT gas, wood, pellet, coal and electric hearth appliances that are purchased from an HHT authorized dealer. WARRANTY COVERAGE: HHT warrants to the original owner of the HHT appliance at the site of installation, and to any transferee taking ownership of the appliance at the site of installation within two years following the date of original purchase, that the HHT appliance... - Page 28 WARRANTY CONDITIONS: • This warranty only covers HHT appliances that are purchased through an HHT authorized dealer or distributor. A list of HHT authorized dealers is available on the HHT branded websites. • This warranty is only valid while the HHT appliance remains at the site of original installation. •...
- Page 29 Service & maintenance log Date Of Service Performed By Description Of Service DO NOT BURN WET COAL...
- Page 30 Service & maintenance log Date Of Service Performed By Description Of Service DO NOT BURN WET COAL...
- Page 31 NOTES...
Need help?
Do you have a question about the Magnum Stoker and is the answer not in the manual?
Questions and answers