Advertisement
Table of Contents
- 1 Table of Contents
- 2 Handling the Remote Controller
- 3 Remote Controller Specifications
- 4 Function Buttons
- 5 Indicators on LCD
- 6 How to Use the Buttons
- 7 Auto Operation
- 8 Cooling/Heating/Fan Operation
- 9 Dehumidifying Operation
- 10 Adjusting Air Flow Direction
- 11 Timer Operation
- 12 SLEEP/FRESH Function
- 13 LED/FOLLOW ME Function
- 14 TRUBO/SELF CLEAN Function
- Download this manual
Advertisement
Table of Contents

Related Manuals for INVENTOR A2MVI-09/A2MVO-09


Summary of Contents for INVENTOR A2MVI-09/A2MVO-09
- Page 1 A2MVI-09/A2MVO-09 A2MVI-12/A2MVO-12 A2MVI-18/A2MVO-18 A2MVI-24/A2MVO-24 P2MVI-09/P2MVO-09 P2MVI-12/P2MVO-12 P2MVI-18/P2MVO-12 P2MVI-24/P2MVO-24 Wall Mounted Unit...
-
Page 2: Table Of Contents
Handling the remote controller CONTENTS Location of the remote controller. Use the remote controller within a distance of 8 Handling the remote controller ............meters from the appliance, pointing it towards the receiver. Reception is confirmed by a beep. Remote controller Specifications........... Function buttons .... -
Page 3: Remote Controller Specifications
RG36B(1)/BG(C)E RG36A(1)/BG(C)EF RG36A2/BG(C)EF RG36C/BG(C)E Remote Controller Specifications RG36B3/BGE RG35A(2)/BG(C)EF,RG35A1(4)/BG(C)EF,RG35B/BG(C)E,RG35C/BG(C)E, RG36B3/BGE Model RG36A(1)/BG(C)EF,RG36A2/BG(C)EF,RG36B(1)/BG(C)E,RG36C/BG(C)E Rated Voltage 3.0V(Dry batteries R03/LR03 2) Signal Receiving Range Environment -5 C 60 C ON/OFF ON/OFF ON/OFF ON/OFF Performance Feature TEMP TEMP TEMP TEMP 1. Operating Mode: AUTO, COOL, DRY, HEAT(Cooling only model without), and FAN. SHORT SHORT MODE... -
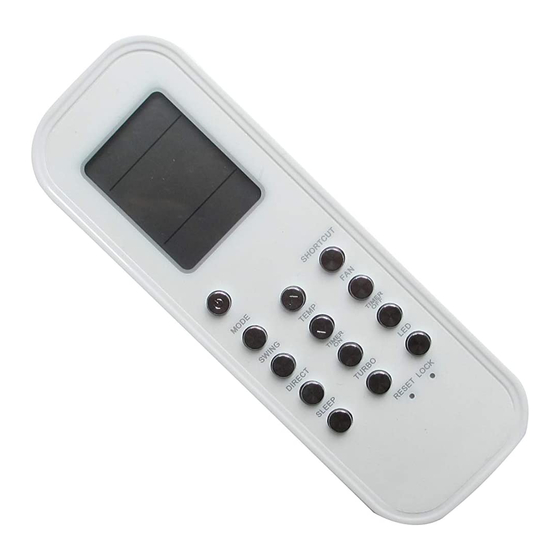
Page 4: Function Buttons
RESET Button: Function buttons ON/OFF Button( When you press the recessed RESET button, ON/OFF Operation starts when this button is pressed all current settings are cancelled and the and stops when this button is pressed again. control will return to the initial settings. MODE Button UP Button( Each time the button is pressed, the operation... -
Page 5: Indicators On Lcd
Indicators on LCD Function buttons(continued) TIMER OFF Button Transmission Indicator Press this button to initiate the auto-off time This transmission indicator lights when remote sequence. Each press will increase the controller transmits signals to the indoor unit. auto-timed setting in 30 minutes increments. Mode display When the setting time displays 10H, each Displays the current operation mode. -
Page 6: How To Use The Buttons
Dehumidifying operation How to use the buttons Ensure the unit is plugged in and power is Auto operation available. The OPERATION indicator on the display panel of the indoor unit starts flashing. Ensure the unit is plugged in and power is 1. -
Page 7: Timer Operation
Timer operation CAUTION Press the TIMER ON button can set the auto-on The effective operation time set by the remote controller for the timer function time of the unit. Press the TIMER OFF button is limited to the following settings: 0.5, 1.0, 1.5, 2.0, 2.5, 3.0, 3.5, 4.0, 4.5, 5.0, can set the auto-off time of the unit. -
Page 8: Sleep/Fresh Function
TIMER ON TIMER OFF TIMER OFF TIMER OFF (Off Start Stop operation) (Auto-off Operation) TIMER ON OFF This feature is useful when you want to start The TIMER OFF feature is useful when you want the the air conditioner before you wake up and unit to turn off automatically after you go to bed. -
Page 9: Led/Follow Me Function
LED/FOLLOW ME function Press this button less than 2nds will initiate LED function. And if keep pressing this button more than 2nds,the FOLLOW ME function is initiated. When the Follow Me function is activated, the remote display is actual temperature at its location.
Need help?
Do you have a question about the A2MVI-09/A2MVO-09 and is the answer not in the manual?
Questions and answers