Table of Contents
Advertisement
Table of Contents
• Purchaser's Reference Information.............Inside Cover
• Introduction ............................................................................... 2
• Glossary of Terms .................................................................... 2
• Safety Instructions and Warnings ..................................... 3
• 800Ub Assembly Drawing ................................................... 4
• 800Ub Assembly Instructions ............................................ 5
• 800Rb Assembly Drawing ................................................... 6
• 800Rb Assembly Instructions ............................................ 7
• 800Er Assembly Drawing .................................................... 8
• 800Er Assembly Instructions ............................................. 9
• Operation & Comfort Tips .................................................. 10
• Workout Guidelines ................................................................ 11
Weight/Height Chart ......................................................... 11
Maximum Heart Rate & Training Zone ....................... 12
Quantity & Quality ............................................................. 12
• Console Glossary of Terms & Tips ....................................14
• Console Layout........................................................................15
Dot Matrix/Profile Display ..............................................16
8 0 0 S E R I E S O W N E R ' S M A N U A L
8
00
s e r i e s
Workout Data Display.......................................................16
Time & Pulse Displays .......................................................16
Function Keys ......................................................................16
Warm Up & Cool Down .................................................... 17
Workout Summary.............................................................18
Quick Start ............................................................................18
Manual...............................................................................18
Random ............................................................................19
Interval ..............................................................................19
Hill......................................................................................20
Strength ..........................................................................20
Target Heart Rate ......................................................... 21
HR Interval...................................................................... 22
• Domestic Warranty Information ...................................... 23
• Maintenance & Specifications ...........................................24
• Space & Weight Requirements.........................................24
• Warranty Card.......................................................Back Cover
1
Advertisement
Table of Contents

Related Manuals for Diamondback 800 Series


Summary of Contents for Diamondback 800 Series
-
Page 1: Table Of Contents
• Glossary of Terms ..............2 Function Keys ..............16 • Safety Instructions and Warnings ........3 • 800 Series Workout Programs • 800Ub Assembly Drawing ........... 4 Warm Up & Cool Down ............ 17 • 800Ub Assembly Instructions ..........5 Workout Summary.............18... -
Page 2: Introduction
And having Diamondback your heart rate with a lower resistance level. equipment gives you even more of an edge. 4. The 800 Series consoles contain integrated Because when your equipment is comfortable, warmup and cooldown programs to safely simple and effective, you exercise more. -
Page 3: Safety Instructions And Warnings
Keep your hands and feet away from all moving parts. 7. Place the 800 series unit in an area that will meet minimum clearance requirements: • Front, Back & Sides: 4 feet/30cm 8. -
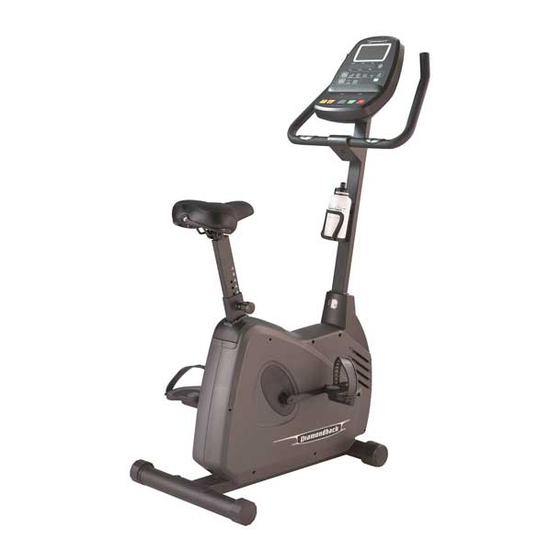
Page 4: 800Ub Assembly Drawing
800Ub Assembly Drawing Console Handle Bar Handlebar Cover Water Bottle Holder Console Mast Console Mast Cover Saddle Seat Post Console Mast Receptor Pedal Seat Pin Transformer Stabilizer Bar 8 0 0 S E R I E S O W N E R ’ S M A N U A L... -
Page 5: 800Ub Assembly Instructions
800Ub Assembly Instructions Frame Assembly 1. Unscrew two M8 x 20mm bolts from the rear stabilizer bar. 2. Place rear stabilizer bar under rear main frame body and align screw holes. 3. Insert and tighten these two M8 x 20mm screws using a 5mm Allen wrench. -
Page 6: 800Rb Assembly Drawing
800Rb Assembly Drawing Diagram 2 Console Seat Frame Console Mast Water Bottle Holder Seat Lock Retainer Seat Back Console Mast Cover Tywrap Seat Pad IMPORTANT NOTE: Cut off the Tywrap and remove the Seat Lock Retainer after installation. Seat Track Cover Seat Handlebar Pedal Handle Pulse Harncess,... -
Page 7: 800Rb Assembly Instructions
800Rb Assembly Instructions Rear Frame & Seat Assemblies 1. Unscrew two M8 x 20mm bolts from the rear stabilizer bar. 2. Remove the hand pulse harness which is stored in the seat track receiving tube. Assemble seat frame to seat track. Cut off tywrap and remove the seat lock retainer that holds the seat lock in the locked position (see diagram 2). -
Page 8: 800Er Assembly Drawing
800Er Assembly Drawing Handle Bar Console Handrail Assembly Right Handrail Assembly Left Set-screw Collar Transportation wheel Wheel Sleeve Console Mast Handrail Cover Console Mast Cover Handrail/Steparm Axle Sleeve bolt Steparm/Handrail Cover 8 0 0 S E R I E S O W N E R ’ S M A N U A L... -
Page 9: 800Er Assembly Instructions
800Er Assembly Instructions Transportation Wheel Assembly 1. Slide the Wheel Sleeve onto the bar at the base of the left rear of the unit. Attach the sleeve to the bar using the supplied Phillips head screw. 2. Press the Transportation Wheel onto the Wheel Sleeve until it snaps into place. -
Page 10: Operation & Comfort Tips
Research indicates that you will be more comfortable and get a lot more work done if you maintain a cadence of at least 60 RPM or SPM. The 800 series console will give you a continuous readout of your cadence. -
Page 11: Workout Guidelines
The Surgeon General also released a report on physical count fast enough to get an accurate number. The 800 Series activity and health. This report definitively stated that exercise products are equipped with a wireless telemetry receiving and fitness are beneficial for a person’s health and redefined... -
Page 12: Maximum Heart Rate & Training Zone
You should select activities that you diabetes or high blood pressure, a family history of heart enjoy and can fit into your daily life. Having Diamondback disease, high cholesterol or have lead a sedentary lifestyle equipment at home certainly gives you the comfortable and should protect themselves with a medical check-up and a convenient workout you want. -
Page 13: Heart Rate Monitoring Devices
Do not hold the hand pulse grips too tightly. Chest Strap (Standard) The 800 Series products are equipped a built-in receiver and a chest strap for your heart rate monitoring. To get an accurate reading using these devices, you will need to be within three feet of the console, and a minimum of four feet from others using a heart rate monitoring device. -
Page 14: Console Glossary Of Terms & Tips
CONSOLE Glossary of Terms • Idle mode = Console is reset and waiting for an entry. The • Re-start a program: The user may re-start a program after dot matrix display window will flash “DB”. If no rpm for 5 the program ends. -
Page 15: Console Layout
CONSOLE Console Layout Dot matrix window Data display window Data display select key Workout Workout programs program selecting keys Time & pulse displays Function keys 8 0 0 S E R I E S O W N E R ’ S M A N U A L... -
Page 16: Displays
DISPLAYS Dot Matrix /Profile display Time & Pulse displays In the program setup, Pulse window will light up and display the default Age, Weight & HR for adjustment. Time display will light up and display the default Time for adjustment. As soon as the program is executed, it will start displaying Time and Pulse. -
Page 17: 800 Series Workout Programs Warm Up & Cool Down
Getting Started The console automatically initiate a 3-minute Warm Up at the 800 Series products are equipped with a 3-minute Cool beginning of each program. It is designed to prepare your Down at the end of each program. It appears as soon as body for an intensive workout and to reduce the possibility a program ends. -
Page 18: Workout Summary
Workout Programs Workout Summary Adjustment • Press “Level Up/Down” key to adjust the level from L1 to L16. The level data display will update the level Getting Started and the dot matrix window will update the profile For your convenience, the console incorporate a Workout accordingly. -
Page 19: Random
Workout Programs o Entering Weight Entering Time o Entering Time 1. If Enter key is pressed after weight adjustment, the dot During the Program matrix window will flash “TM”. As soon as the “Enter” or “Start” key is pressed, the Warm Up 2. -
Page 20: Hill
Workout Programs During the Program During the Program As soon as the “Enter” or “Start” key is pressed, the Warm Up As soon as the “Enter” or “Start” key is pressed, the Warm Up will be active. See Warm Up mode section for details. will be active. -
Page 21: Hr Interactive Programs
Workout Programs During the Program A HEART RATE MONITORING DEVICE MUST BE USED FOR As soon as the “Enter” or “Start” key is pressed, the Warm Up THIS PROGRAM. FOR BETTER RESULTS, A CHEST STRAP will be active. See Warm Up mode section for details. IS RECOMMENDED FOR THIS OPERATION. -
Page 22: Hr Interval
Workout Programs Adjustment 3. You may press “Level Up/Down” key to adjust • the Rest HR up to 80% of Max HR. Press “Level Up/Down” key to adjust the target 4. After Rest HR adjustment, press “Enter” to HR setting. The Pulse window will blink the target accept and begin this program. -
Page 23: Domestic Warranty Information
Warranty. Exclusions: Warranty Registration: Warranty is void if the 800 series unit is placed in a commercial Warranty commitments are valid only with a completed or light commercial environment. (i.e. hotel, motel, apartment/... -
Page 24: Maintenance & Specifications
Repair or replace any damaged or worn parts, tighten all loose hardware. As part of Diamondback’s normal installation and set-up process, all pedals/cranks must be tightened after 8 to 10 hours of initial riding to ensure parts are properly seated. This is standard initial “break in” service which must be performed after the first 8 to 10 hours of use.
Need help?
Do you have a question about the 800 Series and is the answer not in the manual?
Questions and answers