Advertisement
ALPHA 7-DAY EASY-STAT
(Single Channel / Pre-commissioned)
1. Description
The Alpha Easy-Stat
Transmitter, with a boiler mounted Receiver as shown in Fig. 1. The device can be pre-
programmed to provide maximum and minimum room temperature control. Each day can be
programmed with the same – or different – time periods. The programme can be temporarily
or permanently overridden to increase or decrease the desired temperature setting. The
Easy-Stat's transmitter is battery powered using two AA size alkaline batteries. The batteries
should operate the device for approximately 18 months to 2 years depending on the number
of switching operations etc. When the batteries need replacing, a low battery symbol
flashes in the display. After replacement, all the programmes and temperature settings
remain stored and no resetting is required.
Note: If the batteries are not replaced and no valid signal is received from the Transmitter,
the Receiver's LED light will flash every 0.5 seconds. After 1 hr the boiler will operate in
'Emergency mode' (heating on for 4 min. and off for 9 min.) until the batteries are replaced.
If the batteries are not replaced or fitted correctly, i.e. wrong polarity, 'BAT' will flash on the
display until batteries are fitted or fitted correctly.
2. Installation of Receiver into boiler - see Fig. 2
Ensure the electrical supply to the boiler is isolated.
a. Lower the front cover and remove the two fixing screws (one each side) securing the
control panel. Close the front cover and lower the control panel.
b. Remove the two screws securing the clock cover at the rear of the control panel and remove
cover.
c. Remove and discard the clock blanking panel.
d. Connect the boiler wiring to the receiver.
Red wires to terminals 3 and 4
Brown wire to terminal 2
Blue wire to terminal 1
ENSURE WIRING IS CORRECT
e. Insert the Receiver into the opening and secure in place with the screws supplied fitted in
the control panel.
f. Replace the clock cover. Do not overtighten the fixing screws.
g. Leave the control panel open until commissioning procedures have been completed.
2
is a radio frequency 7-Day clock and room thermostat. It consists of a
2
Easy-Stat
Transmitter
2
Easy-Stat Receiver
Fig. 1
– 6.1000250
Advertisement
Table of Contents

Related Manuals for Alpha EASY-STAT2


Summary of Contents for Alpha EASY-STAT2
- Page 1 ALPHA 7-DAY EASY-STAT – 6.1000250 (Single Channel / Pre-commissioned) 1. Description The Alpha Easy-Stat is a radio frequency 7-Day clock and room thermostat. It consists of a Transmitter, with a boiler mounted Receiver as shown in Fig. 1. The device can be pre- programmed to provide maximum and minimum room temperature control.
-
Page 2: Installation Of Transmitter
Clock cover Rear of control panel Fig. 2 3. Installation of Transmitter - see Figs. 3 and 4 Note: A clearance of 80 mm is required above the transmitter to allow the front cover to be raised as shown in Fig. 4.4. Locate and fit the Transmitter as in Fig. -
Page 3: Commissioning
1. Remove wall 3. Re-assemble Transmitter mounting rear panel to rear panel from Transmitter 4. Slide the front cover up, open the battery compartment and fit the batteries Front cover Display Control panel 2. Secure rear panel to wall, Note: There must be a top clearance of at least 80 mm to allow the front cover to be raised upwards Ensure the batteries... -
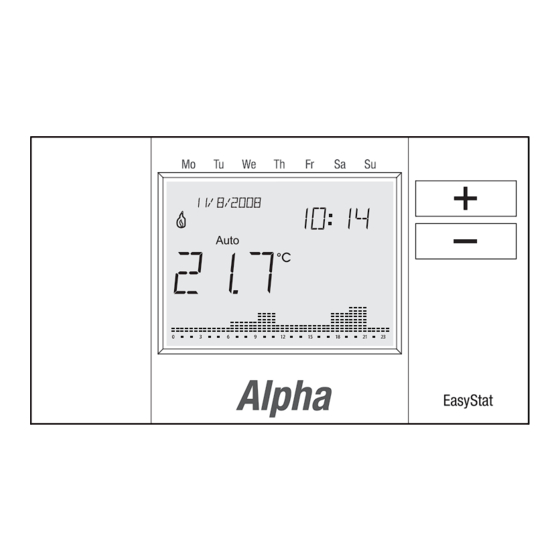
Page 4: Display
Current day of the week Low battery No radio signal when battery low Current date Radio signal Current time Status/mode indication Set temperature Current temperature Time/temperature Status (OFF) over 24 hours Fig. 5 - Display Slide front cover upwards to access contol panel Temperature Increase/Decrease EasyStat... -
Page 5: Set Heating Programme
c. Set Heating Programme Press the Set button until DATE Menu is displayed. Press the Increase (+) button until PROG Menu is displayed. Press the OK button to enter the programme menu. Using the Forward (+) or Backward (-) button, pre-set blocks Monday to Sunday, Monday to Friday, Saturday to Sunday, Individual days or your own blocks can be selected. -
Page 6: Override Function
d. Override Function This mode is available when the device is operating in the AUTO mode. Press the Increase (+) or Decrease (-) button on the front of the device to select the temperature required. This temperature setting will remain as the target temperature until the next programme change, when the device will return to AUTO. -
Page 7: Party Mode
h. Party Mode When the device is operating in the AUTO mode, press the Mode button 4 times until the party appears, then press OK. This mode runs at the set temperature during a defined period, set by the user from 1 to 23 hours. -
Page 8: Important User Information
Nepicar House, London Road, Wrotham Heath, time in the interest of product improvement. Sevenoaks, Kent TN15 7RS © Alpha Therm Limited 2008. Tel: 0870 3001964 email: info@alphatherm.co.uk website: www.alpha-innovation.co.uk Instructions compiled and designed by Publications 2000, Tel (01670) 356211...
Need help?
Do you have a question about the EASY-STAT2 and is the answer not in the manual?
Questions and answers