
Summary of Contents for View Quest Hepburn
- Page 1 Download the Android or iOS Remote Control App Operation Guide Operation Guide Guide d’utilisation Guía de funcionamiento Guida Operativa Betriebsanleitung Guia de Operação...
-
Page 2: Table Of Contents
Hepburn: compatible, stylish, hassle-free What can my Hepburn do apart from look fab? Talk to us Important Safety Information – please read Finding your way around your Hepburn – knobs, buttons, connectors and batteries. Top View Back View Battery Fitting – Bottom View... - Page 3 Controlling your Bluetooth device with your Hepburn Using Auxiliary Input Mode Remotely Controlling your Hepburn with an Android or iOS device What you can do with the View Quest App What tablet or smartphone do you need for a remote?
-
Page 4: Introducing Your Hepburn Bluetooth Speaker, Dab/Dab+ And Fm Radio
DAB/DAB+ and mobile apps to create a truly stylish way for you to enjoy your favourite sounds – wherever they come from. Taking inspiration from the latest trends in fashion and interior design, our goal for Hepburn is to create a feature rich product that not only sounds exceptional but looks fantastic too. -
Page 5: What Can My Hepburn Do Apart From Look Fab
There are two versions, DAB and DAB+. Your Hepburn works with either. FM Radio DAB isn’t everywhere, so there’s an FM radio in your Hepburn so that you can still listen to radio wherever DAB is not available. -
Page 6: Talk To Us
We would really value your feedback – how well have we succeeded in our mission to create a stylish, compatible sound experience? If you’d like to share anything about your Hepburn – things you love, things you’d like, or things that could be better, we’d love to hear from you. -
Page 7: Important Safety Information - Please Read
Hepburn Operation Guide Important Safety Information – please read Please read this guide before using your unit – it contains guidance and recommendations that can help ensure long-lasting, trouble-free, safe operation. Please keep this guide for future reference. Be careful. Avoid: •... - Page 8 Hepburn Operation Guide CAUTION: TO REDUCE THE RISK OF ELECTRIC SHOCK DO NOT REMOVE COVER (OR BACK), NO USER SERVICEABLE PARTS INSIDE, REFER SERVICING TO QUALIFIED SERVICE PERSONNEL. DANGEROUS VOLTAGE Dangerous Voltages, that may be of su cient magnitude to constitute a risk of electric shock to persons is present within this product’s enclosure.
-
Page 9: Finding Your Way Around Your Hepburn - Knobs, Buttons, Connectors And Batteries
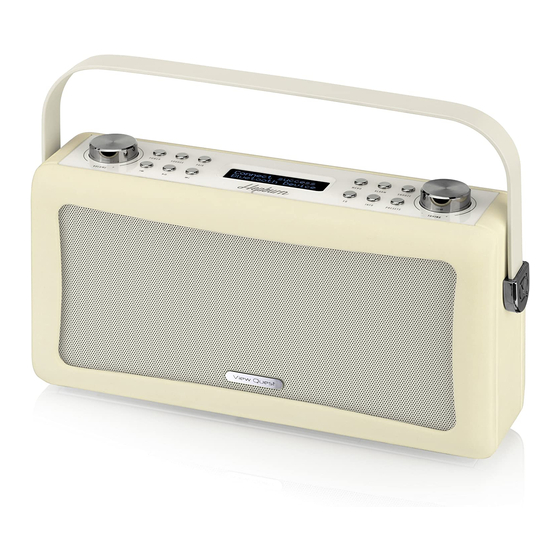
Hepburn Operation Guide Finding your way around your Hepburn Top View 1. - VOLUME + knob Turn to adjust volume level. 2. POWER button 8. LCD display Press to switch between standby and active modes. 9. SNOOZE button 3. SOURCE button Press to change the backlight level. -
Page 10: Back View
Hepburn Operation Guide Back View 1. Aerial 2. USB port for charging devices Outputs 5V volts for charging personal devices such as your phone or MP3 player. 3. AUX-IN for other devices 4. DC-IN power cable input... -
Page 11: Battery Fitting - Bottom View
Hepburn Operation Guide Battery Use Your Hepburn can be powered by 4 x Type ‘D’ batteries. Be sure to insert batteries of the correct type and ensure correct polarity (+/-). Battery Removal Slide battery cover to the left and Pull ribbon to remove battery then then lift out. -
Page 12: Getting Started
Hepburn and its aerial to achieve the best reception. Turning the Unit On and O 1. Connect the plug at the end of power adapter cable to the DC in jack on the back of your Hepburn. Insert the power adapter into the mains socket. -
Page 13: Selecting Another Dab/Dab+ Station
Hepburn Operation Guide 2. Once the scanning is complete the DAB/DAB+ stations will be displayed in alphanumeric order. The rst station in the list will be selected. Note: if no DAB/DAB+ signal is found in your area, it may be necessary to relocate your radio to a stronger signal area. -
Page 14: Setting Dynamic Range Control (Drc)
Hepburn Operation Guide 3. To exit manual tune, press the - TUNING + knob again. Setting Dynamic Range Control (DRC) You can set the compression level of stations to eliminate the di erences in dynamic range or sound level between radio stations. -
Page 15: Using Fm Mode
2. To automatically scan, turn the – TUNING + knob clockwise or anticlockwise and then press the – TUNING + knob. Your Hepburn will scan forwards or backwards until it reaches the next available station. To scan forwards, turn the –... -
Page 16: Viewing Station Information
Hepburn Operation Guide Viewing Station Information A variety of station information is transmitted by broadcasters, and your Hepburn o ers a convenient way for you to view it. To view currently playing station information, press the INFO button repeatedly to cycle through Radio Text, Program type, PS, Audio info and Time and Date. -
Page 17: Using Smart Device Mode With Bluetooth Devices
Connecting to an already paired Bluetooth device 1. Press the PAIR button. If there are any devices paired with your Hepburn, the rst one will show on the display. 2. Turn the - TUNING + knob to cycle through the list of paired devices, then press the - TUNING + knob to select the displayed device. -
Page 18: Using Auxiliary Input Mode
• Bluetooth: change tracks and adjust volume • AUX-IN: adjust the volume You can also manage equaliser presets and tell your Hepburn to standby or wake up, and all of this without leaving your chair. What tablet or smartphone do you need for a remote? For Apple devices, the App is compatible with all iPhones, iPads and iPod Touch devices running iOS 3.1.3 or later... -
Page 19: Installing The View Quest App
1. Go to the appropriate store for your device; App Store for Apple, Play Store for Android. The simplest way to nd the View Quest App is to use the search bar at the top of the screen to nd “viewquest” (with no quote marks). The App is called “View Quest”, it’s free to install and use and its icon looks like this:... - Page 20 About – displays App version information. Exit – quits the View Quest App. • Standby – puts your Hepburn in standby mode, and opens the Settings panel ready for you to enable power to your Hepburn again Exit – quits the View Quest App...
-
Page 21: Enjoying Dab/Dab+ With The View Quest App
[] mode: to select DAB/DAB+ tap Mode [icon] then tap DAB. mode: to select DAB/DAB+ just tap DAB in the Mode Window. mode the View Quest App will display the Now Playing panel. You can select it again by tapping the Now Playing button at the bottom of the display. -
Page 22: Enjoying Fm Radio With The View Quest App
[] mode: to select FM tap Mode [icon] then tap FM. mode: to select FM just tap FM in the Mode panel. In [] mode the View Quest App will display the Now Playing panel. You can select it again by tapping the Now Playing button at the bottom of the display. - Page 23 Hepburn Operation Guide The Now Playing panel in FM mode The radio tunes to the last frequency selected and plays any audio present. If no frequency has previously been selected the lowest FM frequency is presented. [note] If RadioVIS is enabled and available for the current station, images available over the internet are presented, synchronised with the FM broadcast.
-
Page 24: Enjoying Your Bluetooth Device With The View Quest App
Enjoying your Bluetooth device with the View Quest App [note] The View Quest App in Smart Device mode works in conjunction with the audio player on the tablet or smartphone you are using as a remote. The App cannot control another Bluetooth device. -
Page 25: Enjoying An Auxiliary Device With The View Quest App
[] mode: to select AUX In tap Mode [icon] then tap AUX-In. mode: to select AUX In just tap AUX-In in the Mode panel. In [] mode the View Quest App will display the Now Playing panel. You can select it again by tapping the Now Playing button at the bottom of the display. -
Page 26: General Settings
7. To cancel an already set Count Down timer, follow steps 1-3 to set the time to 00:00 minutes. Time and Date Your Hepburn can set its time and date from DAB, or you can set it manually. You can also select your date and time formats. -
Page 27: Alarms
*The order of these items are a ected by your date format setting. Alarms Your Hepburn provides highly exible dual alarms. Before setting your alarms, please set the time and date as detailed in the previous section. Then: 1. Press the ALARM button repeatedly to select ‘Alarm 1 Setup’ or ‘Alarm 2 Setup’ and press the - TUNING + knob to con rm. -
Page 28: Backlight Level
1. Press the MENU button, and then turn the - TUNING + knob to select SW Version. Press the - TUNING + knob to con rm. Display will show “SW Version” and below it your Hepburn’s software version, scrolling as necessary. -
Page 29: Speci Cation
There are separate collection systems for recycling in the EU. For more information, please contact the local authority or your retailer where you purchased the product. View Quest hereby declares that the Hepburn radio is in compliance with the essential requirements and other relevant provisions of Directive 1999/5/EC.
Need help?
Do you have a question about the Hepburn and is the answer not in the manual?
Questions and answers
Using batteries