Table of Contents

Subscribe to Our Youtube Channel
Related Manuals for TTI TX-446


Summary of Contents for TTI TX-446
- Page 1 Instruction Manual Tech Private Mobile Radio (PMR)446MHz Model: TX-446 TTI TECH CO., LTD. Eundo Bldg, 737-19, Banpo-1dong, Seocho-ku, Seoul, Korea, 137-041 http://www.ttikorea.co.kr 1 of 52...
-
Page 2: Table Of Contents
english TABLE OF CONTENTS 1. Introduction Transceiver Details Beep 2. Getting Started Battery Information Installing Battery pack Removing Battery pack Attaching Belt clip Removing Belt clip 3. Basic Operation Switching Power On/Off Adjusting Volume Selecting a Channel Transmitting a Message Receiving a Message 4. -
Page 3: Introduction
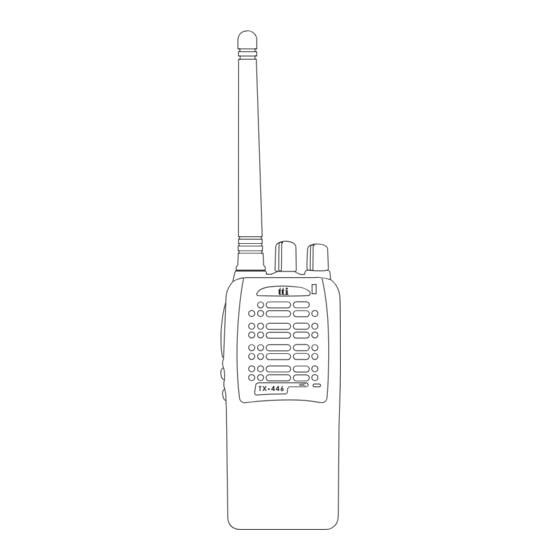
english 1. Introduction Transceiver Details 1. Channel Selection Knob 1. Channel Selection Knob This knob is used to select a channel. 2. Power/Volume Knob 2. Power/Volume Knob This knob is used to turn the radio on or off, and to increase or decrease the volume. - Page 4 english LED color Indication "RED" Continuous lighting "GREEN" Continuous lighting "GREEN" "GREEN" flashing flashing RX with CTCSS or DCS code "ORANGE" Continuous lighting matched 4. Microphone 4. Microphone Hold the radio upright and speak to the microphone clearly and slowly. 5.
-
Page 5: Beep
english Button Function SHORT/LONG HOLD Monior is Monitor activated on your selected channel To start scanning Scan from a current channel or to quit scanning Wenn scanning, Delete you can temporarily remove a Nuisance an unwanted channel Channel from the scann list To use a repeater function Repeater / or to allow communications... -
Page 6: Getting Started
• If you use a non-TTI supplied charger, the battery might be damaged. • Turn off the radio when charging the battery. -
Page 7: Installing Battery Pack
So, to get an optimum performance of the battery, you should use TTI-supplied charger only. � Installing Battery Pack 1. Put the battery pack onto the bottom of the Radio. 2. Place the battery pack... -
Page 8: Attaching Belt Clip
english Attaching Belt Clip 1. Align the mounting rail of the radio with the groove of belt clip and slide the belt clip downwards until it sounds ‘click.‘ release tab � Removing Belt Clip 1. Press down the release tab. 2. -
Page 9: Basic Operation
english 3. Basic Operation Switching Power On/Off • To turn on the radio, turn the power/volume knob clock- wise. You will be able to see a green and red light on the LED cap with a beep. After the beep, the red light goes off. -
Page 10: Transmitting A Message
english Note: Please, check if your radio is programmed with the channel selection function. For more details, you may ask your dealer. Transmitting a Message 1. Turn on the radio. 2. Select a channel. 3. Press and hold down the PTT button, and speak clearly to the microphone from a distance of around 2.5~5cm. -
Page 11: Setting Squelch Level
english Setting Squelch Level The Squelch function plays a role in controlling the amount of signals the radio receive. Setting the radio to the tight squelch level, you can avoid unwanted signal or noise, but you may not receive a weak signal. So, it will be better for you to select the Normal Squelch level. -
Page 12: Scan
english Scan This feature allows you to monitor all the channels automati- cally for valid signals. Your dealer can program more than 16 channels on the scan list. Scan operation By pressing a side button in which the scan function is programmed, you can operate the scan function. -
Page 13: Bclo (Busy Channel Lock Out)
This feature can be switched on and off by pc programming process. Priority Function This function allows the radio to assign more time to monitor the priority channel while scanning. Your dealer can program the priority function by using the TTI software. PRIORITY FUNCTION SCAN SEQUENCE ch4 ..ch1 Inactivity... -
Page 14: Specification
english 5. Specification Product Specification • General Frequency: 446.00625 - 446.09375 MHz Number of Channels: 16 Channels Power Supply: 7.5V DC Antenna Impedance: 50 Ohms PLL Step: 5kHz, 6.25kHz Operating Temperature Range: - 30°C to +60°C (EIA) -25°C to +55°C (ETS) Dimensions With Standard NiMH Battery: H (132mm) X W (56mm) X D (36mm) -
Page 15: Ce Declaration
english • Receiver Sensitivity @ 12dB SINAD (EIA) : 0.25uV typ. @ 20dB SINAD (ETS) : 0.60uV typ. Adjacent Channel Selection : - 60dB @ 12.5kHz Intermodulation : 70dB (EIA), 65dB (ETS) Spurious Rejection : 70dB (EIA) Hum and Noise : - 45 dB @ 12.5kHz Rated Audio Output : 400mW typ. - Page 17 MANUAL DE INSTRUCCIONES Radio Móvil Privada (PMR) 446MHz Modelo TX-446 TTI TECH CO., LTD. Eundo Bldg, 737-19, Banpo-1dong, Seocho-ku, Seoul, Korea, 137-041 http://www.ttikorea.co.kr 17 of 52...
- Page 18 spanish 1. Introducción 1.1.-Mandos del radioteléfono (1) Conmutador de selección de canal Utilizado para seleccionar el canal. (2) Conmutador de volumen/encendido-apagado Utilizado para encender / apagar el equipo y para aumentar / disminuir el volumen. (3) LED - Color “ROJO” continuo = Transmisión - Color “VERDE”...
- Page 19 spanish (6) Botón lateral 1 (Programable) (7) Botón lateral 2 (Programable) A estos dos botones se les puede asignar y programar varias funciones por su distribuidor. Por favor contacte con su distribuidor para saber que funciones están programadas y asignadas para dichos botones.
- Page 20 spanish 1.2.-Tonos de aviso Encendido y autochequeo correcto Encendido y fallo en autochequeo Activación del manos libres (VOX) con alta sensibilidad Activación del manos libres (VOX) con baja sensibilidad Sonido de activación de función Sonido de desactivación de función Tono Alto Tono Bajo Sonido para los botones laterales programables Algunos sonidos de los botones laterales son programables de...
- Page 21 spanish NO cargue una batería que ya esté completamente cargada. Nuestras baterías y cargadores han sido diseñados para funcionar conjuntamente. Por tanto, para obtener las mejores prestaciones, utilice solamente el cargador original. COLOCACIÓN DE LA BATERÍA 1. Posicione el pack de baterías sobre la parte inferior del equipo.
- Page 22 spanish COLOCACIÓN DEL CLIP DE SUJECIÓN 1. Alinee el rail de montaje de la radio con las guías del clip y desplácelo hacia abajo hasta que oiga un ‘click.’ EXTRACCIÓN DEL CLIP DE SUJECIÓN release tab 1. Presione hacia afuera la presilla de enganche.
- Page 23 spanish 2. Funcionamiento básico. 2.1.-Encendido/apagado del equipo Para encender la radio gire el conmutador de volumen en sentido de las agujas del reloj. EL LED se encenderá verde y después rojo y sonará un “beep” . Después del sonido la luz roja se apagará.
- Page 24 spanish 2. Funcionamiento básico. 2.1.-Encendido/apagado del equipo Para encender la radio gire el conmutador de volumen en sentido de las agujas del reloj. EL LED se encenderá verde y después rojo y sonará un “beep” . Después del sonido la luz roja se apagará.
- Page 25 spanish 3. Funcionamiento avanzado 3.1.-Selección del nivel del silenciador El silenciador permite controlar la cantidad de señales que recibe el equipo. Así, seleccionando un ajuste duro del silenciador, se puede prevenir la recepción de señales no deseadas o ruido, pero también puede impedir que se reciba una señal deseada débil, por lo que es recomendable seleccionar un ajuste de silenciador normal.
- Page 26 spanish 3.3.-Escáner Esta opción permite monitorizar automáticamente todos los canales en busca de una señal válida. Se puede programar una lista de escáner de hasta 16 canales. FUNCIONAMIENTO DEL ESCÁNER Para seleccionar el escáner el equipo debe tener programada dicha función en uno de los botones laterales. 1.
- Page 27 ..ch1 Inactividad Actividad Su distribuidor puede programarle la función de prioridad usando un software TTI. 3.7.-Sonido de llamada El equipo tiene 5 sonidos seleccionables de llamada, que le avisan de que hay una llamada entrante. Su distribuidor puede asignarle uno de los cinco sonidos de llamada.
- Page 28 spanish 4. Especificaciones * General - Rango de Frequencias : 446.00625 - 446.09375 MHz - Número de canales : 16 canales - Alimentación : 7.5V DC - Impedancia de antena : 50 Ohms - PLL Step : 5kHz, 6.25kHz - Rango de temperatura de funcionamiento : -30°...
- Page 29 spanish * Receptor @ 12dB SINAD (EIA) : 0.25uV tip. - Sensibilidad : @ 20dB SINAD (ETS) : 0.60uV tip. -60dB @ 12.5kHz - Selectividad de canal adyacente : -70dB (EIA), -65dB (ETS) - Intermodulacion : 70dB (EIA) - Rechazo de espúreas : -45 dB @ 12.5kHz - Hum y ruido de FM : 400mW tip.
- Page 30 Protección de canal CTCSS Declaración de conformidad: Por el presente documento TTI Tech Co, Ltd. declara que el tipo de radio listado anteriormente se atiene a los requisitos esenciales y a las otras disposiciones pertinentes de la Directiva 1999/5/CE Especificación pertinente: Radio: EN 300 086-1 V.1.2.1 (2001-03)
- Page 33 Bedienungsanleitung deutsch Tech Private Mobile Radio (PMR) 446 MHz Model: TTI TX-446 maas ® funk-elektronik importeur...
- Page 35 Vorwort Vielen Dank für den Kauf eines PMR 446 - Transceivers TTI TX- 446. Dieses Gerät ist für Anwender konstruiert, die eine professionelle Qualität und zuverlässige Performance benötigen. Dieser Transceiver entspricht Europäischen PMR 446 - Spezifikation und ermöglicht dem Nutzer eine lizenz- und gebührenfreie Nutzung.
- Page 37 Bedienungsanleitung TTI TX-446 1. Details Frontansicht 2. Hinweise zu den verschiedenen Quittungstönen (Pieptönen) 3. Hinweise zur ordnungsgem ä ssen Handhabung des Ni- MH Akku 4. Den Akku installieren /entfernen 5. Den Gürtelclip installieren /entfernen 6. Das Gerät ein-/ausschalten 7. Die Lautst ä rke einstellen 8.
- Page 38 deutsch 1. Details Frontansicht 1. Kanal Wahlknopf ( CH ) 1. Kanal Wahlknopf ( CH ) Zur Auswahl der Kanä le (siehe Tabelle Kanalbelegung). Kanal 1 bis 8 entspricht der Europäischen PMR 446 -Spezifikation. 2. Lautstärkeregler, Ein-/Ausschalter ( VOL/POWER ) 2.
- Page 39 deutsch 3. LED Anzeige 3. LED Anzeige Die LED Anzeige zeigt folgende Zustä nde: LED leuchtet konstant rot = TX Sendebetrieb LED leuchtet konstant grün = RX Empfangsbetrieb LED blinkt grün = Scan (automatischer Kanal Suchlauf) LED leuchtet konstant orange = RX Empfangsbetrieb mit aktiviertem CTCSS - oder DCS Code 4.
- Page 40 deutsch Programmierung eine der unten aufgezä hlten Funktio - nen zuweisen (siehe Tabelle). Diese Programmierung wird von Ihrem Fachhä ndler vorgenommen. Folgende Funktionen können in den aufgeführten Kombinationen programmiert werden: Funktionstaste 1 Die Funktionstaste kann mittels Programmierung folgendermaßen belegt werden: kurzes Drücken: nicht belegt (keine Funktion nach drücken der Taste) Monitorfunktion –...
- Page 41 Damit die maximale Akkukapazität möglichst langfristig erhal- ten bleibt sollten folgende Hinweise beachtet werden: • Benutzen Sie für den Ladevorgang möglichst Original TTI-TX-446 Ladegeräte: TCG -1000 (im Lieferumfang enthalten) TCG -1010 (Option Tischlader mit Schnellade Funktion) • Schalten Sie das Funkgerät aus wä hrend Sie den Akku aufladen.
- Page 42 deutsch • Laden Sie niemals einen Akku der eine Temperatur von 35°C oder mehr aufweist. Dies könnte den Akku langfristig beschädigen. • An einem kühlen, trockenen Ort kann ein neuer Akku bis zu zwei Jahre ohne Kapazitätsverlust aufbewahrt werden. • Vermeiden Sie das Laden eines bereits vollstä ndig aufge - ladenen Akkus, dies könnte zu einem langfristigen Kapazi- tätsverlust führen.
- Page 43 deutsch Den Akku entfernen Battery latch 1. Bevor sie den Akku vom Gerät entfernen müssen � Sie das Funkgerät ausschalten. 2. Drücken Sie die Taste auf der Oberseite des Akkus � nach unten. (Abb: 1) 3. Nehmen Sie den Akku nun vorsichtig aus dem Batterieschacht heraus.
- Page 44 deutsch 5. Den Gürtelclip installieren/entfernen release tab Den Gürtelclip entfernen 1. Drücken Sie die Gürtelclip � Taste auf der Oberseite des Gürtelclips nach unten. (Abb: 1) 2. Drücken Sie den Gürtelclip � nun nach oben aus der Führungsschiene heraus. (Abb: 2) 6.
- Page 45 deutsch ist zu hören. Nach dem Quittungston erlischt die LED wieder. • Wenn Sie nach dem Einschalten des Gerätes einen positi- ven (hohen) kurzen Quittungston hören war der technische Selbsttest des Gerätes erfolgreich. Hören Sie einen nega- tiven (tiefen) langen Quittungston ist der Selbsttest fehl- geschlagen und es liegt möglicherweise ein technisches Problem vor.
- Page 46 deutsch 9. Sendebetrieb 1. Schalten Sie das Funkgerät ein. 2. Wä hlen Sie einen Kanal. 3. Halten Sie die PTT Taste gedrückt und sprechen Sie PTT Taste gedrückt und sprechen Sie PTT Taste klar in das Mikrofon. Halten Sie dabei einen Abstand von ca.
- Page 47 deutsch Hinweis: Die Repeater /Talk- around Funktion ist erst nach entspre - chender Programmierung nutzbar. Eine der beiden seitlich angeordneten Funktionstasten kann mit dieser Funktion belegt (programmiert) werden. Wenn Sie nach Druck auf die entsprechend programmierte Funktionstaste einen posi- tiven Quittungston hören, ist die Repeaterfunktion nicht aktiv.
- Page 48 deutsch 13. VOX Funktion (sprachgesteuertes Senden) Diese Funktion ermöglicht das Senden ohne Druck auf die PTT Taste. Ist die VOX Funktion aktiviert reagiert das Funk- gerät auf Ihre Stimme und sendet sobald Sie in das inte - grierte Mikrofon sprechen. Die VOX Funktion aktivieren 1.
- Page 49 deutsch 15. Kanalausblendung (Deleting a Nuisance Channel) Wä hrend des Suchlaufs (Scan) werden alle Kanä le berück- sichtigt. Möchten Sie einen bestimmten Kanal nicht in der Suchlaufliste berücksichtigen und diesen für die Zeit des Suchlaufs sperren, wä hlen Sie diesen Kanal mit dem Kanal- wahlknopf an und drücken Sie die entsprechend program- mierte Funktionstaste bis Sie zwei Quittungstöne hören.
- Page 50 deutsch 17. Technische Spezifikationen Frequenzbereich 446.00625-446.09475 MHz Sendeleistung 0.5 W ERP Anzahl der Kanäle siehe Tabelle Kanalbelegung FM Modulation 12.5 kHz / 11KOF3E Stromversorgung 7.5V DC Antennenimpedanz 50 Ohm Kanalraster 12,5 kHz Betriebstemperatur -30�C bis +60�C (EIA) / -25�C bis +55�C (ETS) Abmessungen mit Standard Akku H (132mm) x B (56mm) x T (36mm) Gewicht mit Standard Akku...
- Page 51 Programmierung an Ihren Fachh ä ndler. Irrtümer nicht ausgeschlossen. Änderungen vorbehalten. maas elektronik 2003 Lieferumfang 1 x PMR Handfunkgerät TTI TX-446 1 x Ladestation TTI TCG-1010 1 x Ni-MH Akkupack TTI TBP-1000 1 x Gürtelclip TTI TBC-1000 1 x Bedienungsanleitung...
- Page 52 Optional erhältliches Zubehör ��������� ��������� ���������� ���������� �������� ��������������� ��������� ���������������� ���������� �������������� ����������������������� ��������������������� ��������������� ��������������� �������������� ��������������� ��������������� ���������� ���������������� ������������ ���������� ���������� ���������������������� ���������������������� ���������������� ����������������� ����������������� ���������������������� ���������������� ������������� ��������������� ��������������� ���������������� �������������� ��������������� ��������������� ��������� ���������...
Need help?
Do you have a question about the TX-446 and is the answer not in the manual?
Questions and answers