Table of Contents
Advertisement
Advertisement
Table of Contents

Related Manuals for ELECTROCOMPANIET EMC 1 Mark III


Summary of Contents for ELECTROCOMPANIET EMC 1 Mark III
- Page 1 EMC 1 Mark III Reference SACD player Owner's Manual Version 1.1 ENGLISH...
- Page 2 Welcome to the world of Electrocompaniet! We thank you for choosing an Electrocompaniet high-end product. At Electrocompaniet we are relentlessly focused on developing audio equipment that is capable of bringing the fabulous experience of the concert hall into the very heart of your home.
-
Page 3: Important Safety Instructions
Precautions • Before connecting the AC power cord to the appliance, make sure the voltage selector switch of the appli- ance corresponds to the local electrical supply. If you are unsure of your power supply, contact your local power company. The acceptable power input range is either AC~100V to 120V or AC~220V to 240V 50/60Hz. -
Page 4: Important Notice
Do not remove cover. No user serviceable parts inside. Refer servicing to qualified service personal. The warranty is void if the product is tampered with by non-authorised personnel. Use only authorized Electrocompaniet service center. The contents of the carton •... -
Page 5: Setup Procedure
Setup procedure How to remove a CD transport screws. 1. Remove the two wing bolts and the wing nut located underneath the unit. Remove Remove 2. Unscrew the Allen screws holding the gold sign marked « Limited Edition SACD player» with the smallest Allen key and remove the trasport lock bracket. -
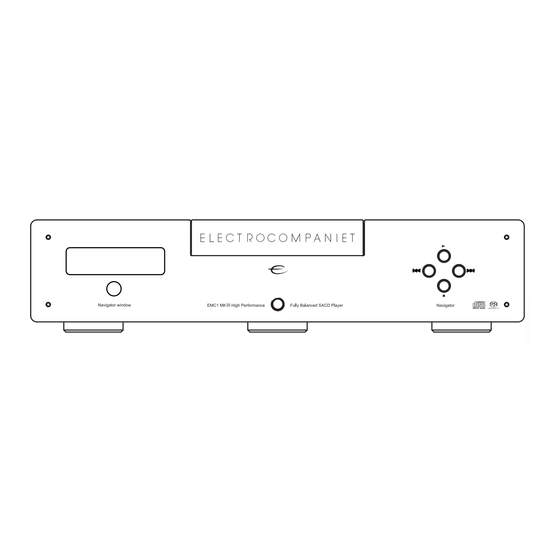
Page 6: Navigator Controls
Navigator controls 1. PLAY button 2. STOP button 3. NEXT TRACK button 4. PREVIOUS TRACK buttons 5. ON/OFF - The power button is used for turning ON and OFF the CD player. 6. INFRARED SENSOR The infrared sensor will detect commands from the included infrared remote control. Please make sure that there is a direct line of sight between the infrared sensor and the infrared remote control. -
Page 7: Remote Control
Remote control 1. Standby – Standby mode is indicated by glowing e-logo on top of the player. 2. Numeric controls – Press these buttons to select a specific track on the disc. For tracks 10 and above, the second digit of the number must be pressed within one second 3. -
Page 8: Loading A Disc
1. Press STOP for more than 2 seconds. The player stop and «Open» is shown on the display. Load the disc by gently pushing the drawer marked: ELECTROCOMPANIET towards the rear of the unit. If you don’t use the STOP button before you move the drawer, the drawer will be blocked and “WAIT”... -
Page 9: Technical Specifications
Technical specifications The following technical data were measured on randomized test objects and are typical data. All measurements are made at 120V / 240V // 50Hz / 60Hz Output level:............(unbalanced) 2.3Vrms/(balanced) 4.6Vrms Noise floor:....................... < -130dB Frequency deviation:................(20-20kHz) 0.05dB Channel separation:................... - Page 10 Balanced audio connection EMC 1 MK III Pre-/Integrated Amplifier Manufactured by: SPEAKER OUTPUT Electrocompaniet Norway TYPE : ECI 6 WLAN Made in Norway DIGITAL INPUT ANALOG INPUT PREAMP OUT RIGHT LEFT COAX 1 COAX 2 TOSLINK TRIGGER RS-232 CD-R CD-L...
- Page 11 MODEL: ECD 2 MADE IN NORWAY RIGHT LEFT TOSLINK 2 TOSLINK 1 COAX RS-232C AC INPUT ELECTROCOMPANIET Optical digital audio connection EMC 1 MK III D/A Converter ANALOG OUTPUT DIGITAL INPUT TRIGGER REMOTE CONTROL C A U T I O N...
-
Page 12: Product Registration
User Manual Updates Online An updated version of the User Manual may be available online at the Electrocompaniet web site. Occasional updates are needed to reflect new features added to the player since the User Manual was printed. -
Page 13: Ir Remote Control Codes
IR Remote control codes RC6 codes are denoted as xxx.yyy. xxx is 8 bit adress. yyy is 8 bit command code. All numbers in decimal. All RC6 codes are mode 0. Key label Code Type Code Hex STANDBY 04.0C 04.01 04.02 04.03 04.04... - Page 16 Verify line voltage before use. Do not remove cover. No user serviceable parts inside. Refer servicing to qualified service personal. The warranty is void if the product is tampered with by non-authorised personnel. Use only authorized Electrocompaniet service center. Made in Norway www.electrocompaniet.no...
Need help?
Do you have a question about the EMC 1 Mark III and is the answer not in the manual?
Questions and answers