Alpine CDA-7832R Owner's Manual
Fm/mw/lw/rds compact disc receiver
Hide thumbs
Also See for CDA-7832R:
- Owner's manual (115 pages) ,
- Manual for installation and connections (2 pages) ,
- Service manual (78 pages)
Table of Contents
Advertisement
ALPINE ELECTRONICS, INC.
Tokyo office: 1-1-8 Nishi Gotanda,
Shinagawa-ku, Tokyo 141, Japan
Tel.: (03) 3494-1101
ALPINE ELECTRONICS OF AMERICA, INC.
19145 Gramercy Place, Torrance,
California 90501, U.S.A.
Tel.: (310) 326-8000
ALPINE ELECTRONICS OF CANADA, INC.
Suite 203, 7300 Warden Ave. Markham,
Ontario L3R 9Z6, Canada
Tel.: (905) 475-7280
ALPINE ELECTRONICS OF AUSTRALIA PTY. LTD.
6-8 Fiveways Boulevarde Keysborough,
Victoria 3173, Australia
Tel.: (03) 769-0000
ALPINE ELECTRONICS GmbH
Brandenburger Strasse 2-6 D-40880 Ratingen,
Germany
Tel.: 02102-45 50
ALPINE ITALIA S.p.A.
Via C. Colombo 8, 20090 Trezzano Sul
Naviglio MI, Italy
Tel.: 02-48 40 16 24
ALPINE ELECTRONICS FRANCE S.A.R.L.
98, Rue De La Belle Etoile, Z.I. Paris Nord Il
B.P. 50016 F-95945, Roissy,
Charles De Gaulle Cedex, France
Tel.: 01-48 63 89 89
ALPINE ELECTRONICS OF U.K., LTD.
13 Tanners Drive, Blakelands,
Milton Keynes MK14 5BU, U.K.
Tel.: 01908-61 15 56
ALPINE ELECTRONICS DE ESPAÑA, S.A.
Portal De Gamarra 36, Pabellón 32
01013 Vitoria (Alava)-Apdo. 133, Spain
Tel.: 34-45-283588
Designed by ALPINE Japan
Printed in Japan
68P81384W46-O
(Y.)
R
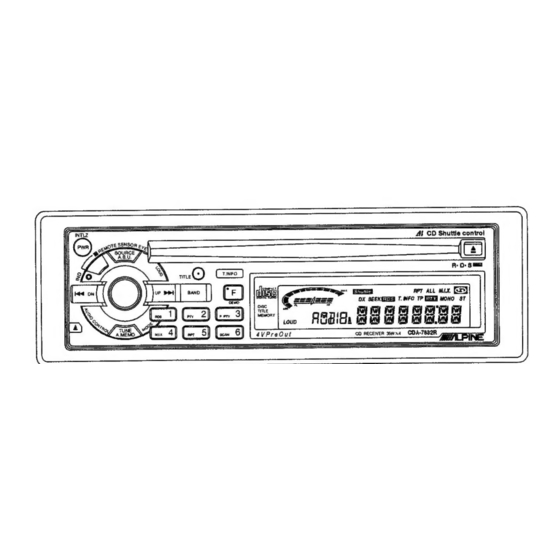
CDA-7832R
FM/MW/LW/RDS Compact Disc
Receiver
• OWNER'S MANUAL
Please read this manual to maximize your enjoy-
ment of the outstanding performance and feature
capabilities of the equipment, then retain the
manual for future reference.
INTLZ
PWR
SOURCE
A.S.U.
TITLE
T. INFO
DN
BAND
UP
F
DEMO
DISC
TITLE
RL
MIN
1
2
3
MEMORY
RDS
PTY
P.PTY
LOUD
TUNE
4
5
6
M.I.X.
RPT
SCAN
A. MEMO
35W × 4
R
R•D•S
EON
RPT ALL M.I.X.
MAX
DX SEEK
RDS
T.INFO TP
PTY
MONO ST
RF
CD RECEIVER 35W x 4
CDA-7832R
Advertisement
Table of Contents

Related Manuals for Alpine CDA-7832R


Summary of Contents for Alpine CDA-7832R
- Page 1 ALPINE ELECTRONICS OF CANADA, INC. Suite 203, 7300 Warden Ave. Markham, Ontario L3R 9Z6, Canada Tel.: (905) 475-7280 CDA-7832R ALPINE ELECTRONICS OF AUSTRALIA PTY. LTD. 6-8 Fiveways Boulevarde Keysborough, Victoria 3173, Australia Tel.: (03) 769-0000 FM/MW/LW/RDS Compact Disc ALPINE ELECTRONICS GmbH...
- Page 2 English Precaution Warning DO NOT DISASSEMBLE OR ALTER Attempts to disassemble or alter may lead to an accident, fire and/or electric shock. KEEP SMALL ARTICLES OUT OF THE REACH OF CHILDREN Store small articles (batteries, screws, etc.) in places not accessible to children.
- Page 3 English Precaution Caution DO NOT RAISE THE VOLUME EXCES- SIVELY Keep the volume at a level where you can still hear outside noises while driving. Driving while unable to hear outside sounds could cause an accident. DO NOT USE THIS EQUIPMENT OUTSIDE THE VEHICLE Do not use this equipment for pur- poses other than those listed for a...
-
Page 4: Table Of Contents
English Contents Page/Page/Página 8/ 9 ................ Precautions 14/ 15 ..........Detachable Front Panel Basic Operation 18/ 19 ............. Initial System Start-Up 18/ 19 .............. Automatic Setup 20/ 21 ..........Turning Power On and Off 20/ 21 ............. Subwoofer On and Off 22/ 23 .......... -
Page 5: Moisture Condensation
Do not attempt to insert a disc into the unit when the unit power is off. Maintenance If you have problems, do not attempt to repair the unit yourself. Return it to your Alpine dealer or the nearest Alpine Service Station for servicing. - Page 6 English Precautions Inserting Discs Your player accepts only one disc at a time for playback. Do not attempt to load more than one disc. Make sure the label side is facing up when you insert the disc. Your player will automatically eject any disc that is inserted incorrectly.
- Page 7 English Precautions Installation Location Make sure the CDA-7832R will not be installed in a location subjected to: • Direct sun and heat • High humidity and water • Excessive dust • Excessive vibrations Handling the Detachable Front Panel • Do not expose to rain or water.
-
Page 8: Detaching The Front Panel
English English Detachable Front Panel Detaching the Front Panel INTLZ Press the PWR button to turn off the power. Press the release button until the front panel pops out. Grasp the left side of the front panel and pull it out. -
Page 9: Attaching The Front Panel
English English Detachable Front Panel Attaching the Front Panel 1. First, insert the right side of the front panel into the main unit. Align the 2 small holes on the front panel with the 2 projections on the main unit. 2. -
Page 10: Initial System Start-Up
English Basic Operation Initial System Start-Up When operating the unit for the first time after installation or after the vehicle's battery has been disconnected and reconnected, set the volume level to its minimum, then remove the detachable front panel. Press the Reset switch with a ball-point pen or any other pointed object. -
Page 11: Subwoofer On And Off
English Basic Operation Turning Power On and Off Press the PWR button to turn on the unit. Note: The unit can be turned on by pressing any other button except the eject c button. INTLZ The volume level gradually increases to the previous level you were listening to before the unit was turned off. -
Page 12: Basic Operation
The display shows "LOUD" when the loudness mode is activated. Note: Depending on the device connected to LOUD the CDA-7832R, not all functions or display indications will operate as described. For details, consult your Alpine dealer. Adjusting Source Signal... -
Page 13: Adjusting Volume/Bass/Treble
English Basic Operation Adjusting Volume/Bass/Treble/ Balance/Fader Press the AUDIO CONTROL button repeatedly to choose the desired mode. Notes: • If the AUDIO CONTROL knob is not rotated in 5 seconds after selecting BASS the BASS, TREBLE, BALANCE and FADER modes, the unit automatically TREB sets in the VOLUME mode. -
Page 14: Sound Guide Function
English Basic Operation Sound Guide Function This function will give audible feedback with varying tones depending upon the button pressed. INTLZ Press and hold the PWR button for more than 3 seconds. Press the BAND button and the display shows BEEP ON "BEEP ON."... -
Page 15: Turning Mute Mode On/Off
English Basic Operation Turning Mute Mode On/Off With a cellular phone connected, audio will be interrupted whenever a call is received. This function can be turned ON or OFF from the head unit by following procedure below. INTLZ Press and hold the PWR button for at least 3 seconds. - Page 16 3. The unit continues scanning of the sources DEMO as described in 1 and 2 above. Note: Depending on the device connected to the CDA-7832R, not all functions or display indications will operate as described. For details, consult your Alpine dealer.
-
Page 17: Manual Tuning
English Radio Operation Manual Tuning Press the SOURCE button to select the radio SOURCE A.S.U. 90.10 mode. (Radio mode) T08 0'16 (CD mode) Press the BAND button repeatedly until the desired radio band is displayed. BAND Press the TUNE button repeatedly until "DX SEEK"... -
Page 18: Automatic Seek Tuning
English Radio Operation Automatic Seek Tuning Press the SOURCE button to select the radio SOURCE mode. 90.10 A.S.U. (Radio mode) T08 0'16 (CD mode) Press the BAND button repeatedly until the desired radio band is displayed. BAND Press the TUNE button to illuminate the DX and SEEK indicators in the display. -
Page 19: Radio Operation
English Radio Operation Manual Storing of Station Presets 1. Select the radio band and tune in a desired radio station you wish to store in the preset memory. 2. Make sure that the Function indicator illuminates, and press and hold any one of the preset buttons (1 through 6) for at least 2 seconds until the station frequency on the display blinks. -
Page 20: Station Presets
English Radio Operation Automatic Memory of Station Presets Press the SOURCE button to select the radio SOURCE mode. 90.10 A.S.U. (Radio mode) T08 0'16 (CD mode) Press the BAND button repeatedly until the desired radio band is displayed. BAND Press and hold the A. MEMO button for at least 2 seconds. -
Page 21: Tuning To Preset Stations
English Radio Operation Tuning to Preset Stations Press the SOURCE button to select the radio SOURCE mode. 90.10 A.S.U. (Radio mode) T08 0'16 (CD mode) Press the BAND button repeatedly until the desired band is displayed. BAND Make sure that the Function indicator illumi- nates, and press the station preset button that has your desired radio station in memory. -
Page 22: Rds Operation
English English RDS Operation The RDS (Radio Data System) is a radio information system using the 57 kHz subcarrier of regular FM broadcast. The RDS allows you to receive a variety of information such as traffic information, station names, and to automatically re-tune to a stronger transmitter that is broadcast- ing the same programme. - Page 23 English English RDS Operation Press the DN or UP button to tune in the desired RDS station. BBC R3 When the RDS station signal received has become weak: • AF seek mode, press and hold the RDS button for at least 2 seconds to have the unit AF SEEK automatically seek a stronger station in the ↓...
- Page 24 English English RDS Operation Turning AF (Alternative Frequencies) List On or Press and hold the INTLZ button for at least 3 INTLZ seconds to activate the setting mode. Press the Preset 3 button repeatedly to select the AF ON mode or the AF OFF mode. AF ON When the AF ON mode is selected, the unit P.PTY...
-
Page 25: Rds P.pty
English English RDS Operation Recalling Preset RDS Stations Press the "F" button. The function indicator will be off. DEMO Press the RDS button to activate the RDS mode. The display shows "RDS" when the RDS mode is activated. Press the "F" button to activate the normal mode. - Page 26 English English RDS Operation RDS Operation Receiving RDS Regional (Local) Stations Press and hold the INTLZ button for at least 3 INTLZ seconds to activate the setting mode. Press the Preset 4 button to turn on or off the REG ON REG (Regional) mode.
-
Page 27: Receiving Traffic Information
English English RDS Operation RDS Operation Receiving Traffic Information Press the T.INFO button to activate the Traffic T. INFO T.INFO TP Information mode. Press the DN or UP button to select your desired traffic information station. When a traffic information station is tuned in, the TP indicator lights up. - Page 28 English English RDS Operation RDS Operation Presetting Volume Level for Traffic Information Press and hold the INTLZ button for at least 3 INTLZ seconds to activate the setting mode. Press the Preset 2 button repeatedly until the desired volume level is obtained. TA-LV 4 TA-LV 3 TA-LV 2...
- Page 29 English English RDS Operation RDS Operation PTY (Programme Type) Tuning Press the "F" button. The function indicator will be off. DEMO Press and hold the PTY button to activate the PTY NEWS mode. The Programme Type of the station being currently received will be displayed for 5 seconds.
- Page 30 English English RDS Operation RDS Operation Receiving Traffic Infor- mation While Playing CD or Radio Press the T.INFO button repeatedly until the T.INFO T. INFO T.INFO indicator appears in the display. Press the DN and UP buttons to select a traffic information station if necessary.
-
Page 31: Priority Pty (Programme Type)
English English RDS Operation Priority PTY (Programme Type) This function allows presetting of a programme type such as music category, news, etc. You can listen to a programme in the preset programme type as the unit automatically gives priority to the preset programme type when it begins broadcasting, and interrupts the programme you are currently listening. - Page 32 English English RDS Operation Turning Emergency Alarm On or Off Press and hold the INTLZ button for at least INTLZ 3 seconds. Press the Preset 5 button repeatedly to select the PTY31 ON or PTY31 OFF mode. In the PTY31 ON mode, the unit will produce an PTY31OFF alarming sound when the unit receives the ↑...
-
Page 33: Normal Play
English CD Operation Inserting/Ejecting Disc Insert a disc half way into the slot with the label side facing up. The player automatically draws LOAD the disc into the disc compartment. The Disc indicator appears to show that a disc is loaded. Note: Three-inch (8cm) CD's cannot be used. -
Page 34: Music Sensor (Skip)
English CD Operation Music Sensor (Skip) Momentarily press the DN g button once to T04 2'35 return to the beginning of the current track. If you wish to access a track further back, repeatedly press until you reach the desired track. -
Page 35: Repeat Play
English CD Operation Repeat Play In the CD Shuttle Press the F (Function) button. The function mode. indicator will turn off. En mode de changeur CD. Note: Press the "F" button only when a CD En el modo de Shuttle is connected. cambiador de CD. -
Page 36: M.i.x
English CD Operation M.I.X. (Random Play) In the CD Shuttle Press the F (Function) button. The function mode. indicator will turn off. En mode de changeur CD. Note: Press the "F" button only when a CD En el modo de Shuttle is connected. -
Page 37: Scanning Programs
English CD Operation Scanning Programs In the CD Shuttle Press the F (Function) button. The function mode. indicator will turn off. En mode de changeur CD. Note: Press the "F" button only when a CD En el modo de Shuttle is connected. cambiador de CD. -
Page 38: To Display Cd Titles
(see example below). (Refer to page 84 to title the disc.) T08 11'03 NORMAL Mode _ _ _ _ _ _ _ _ ALPINE CD TITLE Mode Title not entered Title entered Note: If a CD Shuttle is connected, "Shuttle"... -
Page 39: Titling Disc
(Refer to page 82). TITLE Press and hold the TITLE button for at least 3 seconds. The first digit will blink. TITLE or/ou/o BLPINE Rotate the AUDIO CONTROL knob to select the desired letter/numeral/symbol available for naming ("A" for example). or/ou/o ALPINE... - Page 40 When that character begins or/ou/o to blink, you may choose the next letter or symbol of your title. ALPINE Repeat the steps 3 and 4 above to complete the titling. The 8 digits should be filled for the disc title.
-
Page 41: Para Titular Los Discos
Français Español Fonctionnement Operación del repro- du lecteur CD ductor de discos compactos Titrage d'un disque Para titular los discos (suite) (continuación) Appuyez sur la commande AUDIO CONTROL Presione el botón de control de audio para pour mémoriser le premier caractère. Le memorizar el primer carácter. -
Page 42: Erasing Disc Title
Press and hold the SOURCE button for at least 3 SOURCE seconds to activate the title scanning mode. The A.S.U. ALPINE title in the display will blink, for example "ALPINE." Press DN g or UP f button repeatedly until the disc title you want to erase is dis- played. -
Page 43: Rpt 5 Scan
Controlling 6-Disc CD Shuttle (Optional) An optional 6-disc CD Shuttle may be con- nected to the CDA-7832R if it is Ai-NET compatible. With a CD Shuttle connected to the Ai-NET input of the CDA-7832R, the CD Shuttle will be controllable from the head unit. - Page 44 English CD Shuttle Operation Titling Disc Press the TITLE button to select the disc titling mode. TITLE Make sure that the Function indicator illumi- nates, and press the Preset buttons to select P.PTY the desired disc to be titled. After this step, see Steps 2 to 6 of "Titling Disc" M.I.X.
-
Page 45: Cd Shuttle Operation
Press and hold the BAND button for at least 2 seconds while the title is displayed. The title in BAND memory blinks in the display. ALPINE Press the DN g or UP f button to select the desired disc title. Press the BAND button to play the selected disc. - Page 46 English CD Shuttle Operation Multi-Changer Selection Alpine's Ai-NET system will support up to 6 CD Shuttles. When operating two or more changers, the KCA-400C (Multi-Changer Switching device) must be used. If you use 1 Switching device, you can connect up to 4 CD Shuttles.
- Page 47 English CD Shuttle Operation Multi-Changer Selection (Continued) Press the PROG button on the Remote Controller until the desired changer indicator CHGR 1 appears on the display. CHGR 2 CHGR 6 BAND DISC PROG CD/3D/6D To operate the selected changer, see "CD Shuttle Operation"...
- Page 48 English Audio processor Operation Activating Equalizer (optional) If an optional Alpine Equalizer is connected via the Ai-NET system, their functions can be accessed from the Remote Controller. Remote Control/ Télécommande / Controlador remoto Press the A.PROC button repeatedly to select the desired equalizer mode.
-
Page 49: Remote Control
English Remote Control Controls 1 Power Switch Press the switch to turn the power on/off. REMOTE Button CONTROL Radio mode: SEEK (UP) Button UNIT RUE-4180 CD Shuttle mode: Press the button to advance to the beginning of the next track. Button Radio mode: Pressing the button will select, in descending order, stations... - Page 50 English Remote Control Button Radio mode: Pressing the button will select, in ascending order, stations programmed into the radio’s presets as shown below. … → → REMOTE CONTROL UNIT RUE-4180 CD Shuttle mode: DISC Select (UP) Button Press the button to select a disc in ascend- ing order as shown below.
-
Page 51: Battery Replacement
English Remote Control Battery Replacement Applicable battery: Use one CR2025 or equivalent. Opening the battery case 1 Place the remote upside down on a flat, level surface. Looking at the back of the remote, grasp the battery holder at the bottom of the unit between your forefinger and thumb. -
Page 52: Disc Care
Using such accessories Transparent Sheet/Feuille can cause the disc to be out of standard transparente/Hoja transparente specifications and may create operational problems. We recommend not using these accessories on discs played in Alpine CD players. Disc Stabilizer/Stabilisateur de disque/Estabilizador del disco... -
Page 53: In Case Of Difficulty
This guide will help you isolate the problem if the unit is at fault. Otherwise, make sure the rest of your system is properly connected or consult your authorized Alpine dealer. Initial Turn-on After Installation Symptom/Symptôme/Síntoma Cause and Solution •... -
Page 54: Radio Mode
English In Case of Difficulty English/Français/Español Radio Mode Cause and Solution Symptom/Symptôme/Síntoma • No antenna or open connection in cable. Unable to receive stations./Impossible de recevoir les stations./Es imposible recibir – Make sure the antenna is properly emisoras. connected; replace the antenna or cable if necessary. -
Page 55: Cd Mode
English In Case of Difficulty English/Français/Español CD Mode Symptom/Symptôme/Síntoma Cause and Solution • Out of operating temperature range +50˚C CD not functioning./Le changeur CD ne fonctionne pas./El cambiador de discos (+120˚F) for CD. compactos no funciona. – Allow the car's interior (or trunk) tempera- ture to cool. - Page 56 HI TEMP temperature returns to within operation range. • Malfunction in the CD Shuttle. – Consult your Alpine dealer. Press the magazine eject button and pull out the magazine. Check the indication. Insert the magazine again. If the magazine cannot be pulled out, consult your Alpine dealer.
-
Page 57: Specifications
English Specifications English/Français/Español CD SECTION Frequency Response/Réponse en fréquence/ Frecuencia de respuesta ................5 – 20,000 Hz (±1 dB) Wow & Flutter (% WRMS)/ Pleurage et scintillement (% efficace)/ Fluctuación y trémolo medibles ..............Bleow measurable limits Total Harmonic Distortion/ Distorsion harmonique totale/ Distorsión armónica total .................. - Page 58 English Specifications English/Français/Español GENERAL Power Requirement/Alimentation/ Alimentación .................. 14.4 V DC (11–16 V (allowable)) Maximum Power Output*/Sortie max. d'alimentation*/Salida máx. de alimentación* ................35 W × 4 Output Voltage/Tension de sortie/ Tensión de salida ....................500 mV/10 k ohms Maximum Pre-Output Voltage/ Tension maximale sortie pré-ampli/ Tensión de salida de preamplificación máxima ............
Need help?
Do you have a question about the CDA-7832R and is the answer not in the manual?
Questions and answers