Table of Contents
Advertisement
Quick Links
U2 Inkjet Printer
User Manual
ANSER CODING INC. (TAIWAN)
ANSER CODING INC. (CHINA)
HEADQUARTERS & R&D CENTER
GLOBAL BUSINESS CENTER & MANUFACTURING BASE
7F, NO.23 LUNG CHIANG RD. TAIPEI, TAIWAN 10492
7F, NO.52 HULI DADAO XIAMEN 361006, CHINA
TEL: +86-0592-571-8888
TEL:+886-2-2777-3488
FAX: +86-0592-571-0888
FAX:+886-2-2752-7496
www.anser-u2.com
Advertisement
Table of Contents

Subscribe to Our Youtube Channel
Related Manuals for Anser U2


Summary of Contents for Anser U2
-
Page 1: User Manual
U2 Inkjet Printer User Manual ANSER CODING INC. (TAIWAN) ANSER CODING INC. (CHINA) HEADQUARTERS & R&D CENTER GLOBAL BUSINESS CENTER & MANUFACTURING BASE 7F, NO.23 LUNG CHIANG RD. TAIPEI, TAIWAN 10492 7F, NO.52 HULI DADAO XIAMEN 361006, CHINA TEL: +86-0592-571-8888 TEL:+886-2-2777-3488... -
Page 2: Table Of Contents
Contents SAFETY INSTRUCTIONS U2 Introductions Printer ............3 IR-Remote Keypad ........4 Menu Tree ........... 5 Message Browser ........6 SD card ............7 Function Configuration ..........8 Shut down ............ 8 Language ............8 Measurement ..........8 System Clock ..........8 LCD Backlit ........... - Page 3 Conveyor Speed Test ........19 Repeat Print ..........20 Clean PrintHead...........20 Printing Display Mode .........20 Security Setup..........21 Password Option .........21 User Setup ..........21 About U2 ........... 23 Printer Information ........23 Ink Information..........23 Editing Message TEXT ............25 TIME ............25 EXPIRE............26 COUNTER ..........
- Page 4 Production Counter ........33 III | CONTENT...
-
Page 5: Safety Instructions
Notes and Warning NOTE: Important information that helps you make better use of U2. WARNING: Indicating either potential damage to hardware or loss of data and telling you how to avoid the problem. Please retain this page nearby your printer for future reference. - Page 6 to clean the nozzle surface. If the printing position is incorrect, please press to reset to the best printing position. In a dusty production environment, please clear the dust using clean low pressure compressed air daily. Please contact your local distributor if the printer malfunctions and the problems cannot be solved personally.
-
Page 7: U2 Introductions
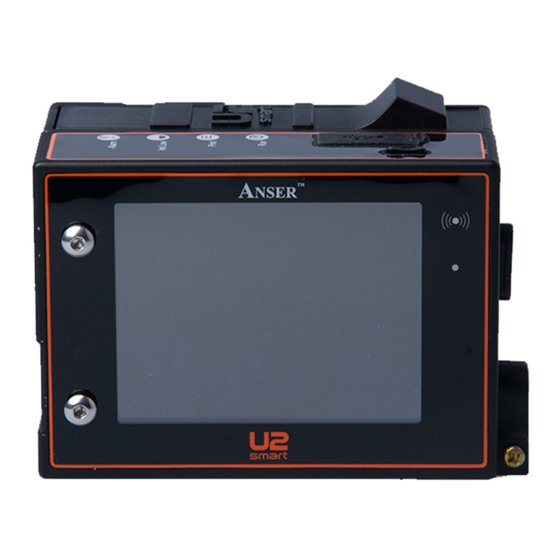
Printer SD Card Slot 2.8” LCD Screen with LED Backlight IR Receiver IR Input External Device Connector IR Remote On-off (Press the button to turn ON/OFF.) System On-off button (Press and hold 5 seconds the button for booting or shutdown the system.) Power Input Running Light Printing Light... -
Page 8: Ir-Remote Keypad
IR-Remote Keypad Print Off: Stop Printing Print On: Start Printing Input variable objects in a message: F1. Select fonts F2. Select time and date format F3. Select expiration date format Fast Move Keys: F4. Input the Counter Code ◀/▶, ◀◀/▶▶: Position the F5. -
Page 9: Menu Tree
3. Photocell 4. Encoder and Conveyor 5. Conveyor Speed Test 6. Repeat Print 7.Clean PH. 8. Printing display 6. SECURITY SETUP 1. Password option 2. User setup 7. ABOUT U2 1. Printer Information 2. Ink Information 5 | MENU TREE... -
Page 10: Message Browser
Message Browser Use arrow key to select messages (No.001~999), press to edit message. You can only edit one message (No.001) without SD card. Message Content Message with contents. Message Number Status Bar Icons on Status Bar Icons Descriptions No Cartridge Ink Empty Ink Low No SD Card... -
Page 11: Sd Card
CARD LOST: You can purchase any standard 2GB SD card as replacement. As blank SD card, please insert the cards into U2 printer for activation, and the card will be auto-activated by obtaining the same serial number from the printer. -
Page 12: Function Configuration
Configuration Under the Message Browser, press FUNCTION > CONFIGURATION. Shut down Press to shut down the U2 system. Language Press to choose a system language. Press to select languages. The system offers eight different languages. (English, Chinese, Japanese, German, Italian, French, Spanish and Korean) -
Page 13: Daylight Saving Time
Press to select ON. Input the delay time, the range is from 1~60 minutes. The LCD screen will be always on when status is OFF. Daylight Saving Time Daylight saving time (DST), and "Summer Time" in much of Europe, is the practice of moving local time forward one hour in the spring and backwards in the autumn. - Page 14 Time : 20:01:01 Pre-zero Date : 2010:10:12 Counter : 0001 Direction ->|ABC PrintHead Nozzle: LEFT Resolution:300×400DPI Pre-purge Photocell Internal Encoder: OFF Encoder and Conveyor Conveyor Speed: 82 FEET/MIN Print Delay Password Option 10 | CONFIGURATION...
-
Page 15: Alarm Option
Alarm Option Under the Message Browser, press FUNCTION > ALARM OPTION Counter-Alarm Allow the printer making alarm sound when the pre-setup counter value has been reached. Press Press to ON. When COUNTER ALARM is ON, you are able to turn the ALARM ON/OFF in every single Counter with in a message. - Page 16 Normal Work Green Ink Empty Invalid cartridge Ink error: Ink Cartridge area code or sales code error No Cartridge Alarm LED Instruction 12 | ALARM OPTION...
-
Page 17: Editing Option
Editing Option Under the Message Browser, press FUNCTION > EDITING OPTION. Message Name Allow you to name/rename any message as your desire. Press Press to select ON. Customer Year Allow you to print customized year despite the system year. Press to setup. -
Page 18: Shift
Shift Allow user records all operators and their starting time. Press to setup. Highlight to any item then enter shift name and time. Press to go to the next row and add more shifts. SHIFT starts work at 08:00 SHIFT starts work at 12:00 SHIFT starts work at 14:00... -
Page 19: Counter Reset
Counter Reset To reset the counter before printing the message. Press Press to select ON. Pre-Zero Displays a digit or nothing! If the expression has a digit in the position where the # appears in the format string, display it; otherwise, display nothing in that position. -
Page 20: System Diagnostic
Press to enter System Tests. SELF TEST: Check the U2 system controller for any abnormal status or alarm information, such as Ink low, Ink empty, No cartridge or Ink error. LCD TEST: Check if the LCD Screen is damaged. -
Page 21: Printing Setup
Resolution: user can adjust resolution from 50~600dpi, when the encoder is OFF. As U2 default resolution: 300x400, the first number represents vertical dpi, which will auto adjust to 600 when Dual Channel is ON. The second number represents horizontal resolution, and it can be adjusted manually. -
Page 22: Photocell
Press to setup. Press to choose INTERNAL or EXTERNAL. INTERNAL: Default internal photocell of U2 printer. EXTERNAL: Connect an external photocell via external device interface. Select EXTERNAL, and press to choose NORMAL or INVERT. NORMAL: PNP configuration in CMOS (Default). -
Page 23: Encoder And Conveyor
PULSE/CYCLE DIAMETER of encoder and U2 calculates the DPI automatically. Don’t recommend modify PULSE/CYCLE, and default value is 2500. ANSER offers optional 400DPI encoder with 1.98” wheel diameter. Conveyor Speed Test Press to test the conveyor speed. When the Encoder is OFF: Input the length of a box you want to print to. -
Page 24: Repeat Print
Preview Report speed simultaneously. When the Encoder is ON: Enter CONVEYOR SPEED TEST and start conveyor belt, the system can calculate the current speed automatically. Repeat Print When enable this function, the printer will repeat print automatically as long as you set the printer to corresponding parameters. -
Page 25: Printing Display Mode
Preview Report Printing Display Mode 1. Press to setup. 2. Press to select printing PREVIEW/REPORT. 21 | PRINTING SETUP... -
Page 26: Security Setup
When PASSWORD is ON, the LOG-OUT USER SETUP instantly become available. The next time you turn on the U2, you must input a user name and password to logon! User Setup Enable password allows you to manage different user account! - Page 27 Preview Report Add New User Under the USERS PASSWORD, press Select ADD, and then press Input the user name, and then move to the next row. Press to assign a level of access to the new user, and move to the next row.
-
Page 28: About U2
Under the Message Browser, press FUNCTION > ABOUT Printer Information Press to view the related information about the Printer. Press , you can read more information about U2. Ink Information Press to view the ink information. 24 | ABOUT U2... -
Page 29: Editing Message
In the Message Browser, use arrow key to select messages, press enter the Editing Mode. In the Editing Mode, you can input text and variable objects contain Time, Expire, Counter, Shift, Logo, Barcode, Strings. Message Number Current page # Cursor locating row Cursor locating space Quick Basic Operation: Use arrow keys to move the cursor to any position you desire. -
Page 30: Text
Non-Roman characters are not available to the system, please refer to our PC editing software – MessagePRO, which allows you to input all different text messages, save to SD card and then input to U2. Under Editing Mode, press to choose 1, 2, 3 or 4 lines. -
Page 31: Expire
Under Editing Mode, press and choose CREATE TIME DATE/TIME FORMAT (See Date/Time Format). Press to choose a time format you need. Press to return to the Editing Mode. EXPIRE Insert Expiration date with various formats and expired duration. Under Editing Mode, press to add an expiration Date to the message. -
Page 32: Shift
example: ①Single counter (Max: 9999, Min: 1, Current: 1, Step: 1) Step=1 3…… 9999 ②Box (Max: 9999, Min: 1, Current: 1, Step: 2) Lot (Max: 9999, Min: 1, Current: 10, Step: 5) Box: Lot: Step=2 Advance Step=5 5…… 9999 20 …… Move to and MIN, and input their value. -
Page 33: Barcode
Press to choose a logo. Press to return to the Editing Mode. BARCODE Under Editing Mode, press to add Barcode into the message. Press to select a barcode type you need. Press to choose width-level you need. Width-level indicates the spacing between bars. Input the contents. -
Page 34: String
Under Editing Mode, select the object you desired. Press DELETE to delete the object. Save Message Under Editing Mode, press The U2 will confirm with you to SAVE & EXIT ABORT & EXIT. Delete Message Under the Message Browser, highlight to the message you want to delete, and then press DELETE. -
Page 35: 31 | Setting Up Print Delay
Print Delay allows you adjusting the distance of printing right after photocell is triggered. Under Message Browser, and press Input the value. example: If you set the delay to be 1 Inch, after the photocell is triggered, the PrintHead will wait conveyor to roll 1 Inch before the next print. (Each message can be set with print delays individually) 31 | SETTING UP PRINT DELAY... -
Page 36: Printing Message
Under the Message Browser, select a message and press Normally at PRINT ON stage, most of actions are not available until you remove the cartridge press . However, if you , the system switches to PRINT automatically. 32 | PRINTING MESSAGE... -
Page 37: Tools
Preview Message Under the Message Browser, highlight to a message you want to view and press Move to PREVIEW MESSAGE and press Press to select page # in order to preview the whole message. Page # Width (pixels) Height (pixels) Press to preview the different messages. -
Page 38: Copy Message
When MESSAGE NAME is OFF, you can only find the message by its number. Under the Tools, highlight to FIND MESSAGE. Type the first few letters of the message name. Press to find the message. (Maybe you need to take some time to wait searching) Copy Message Copy the message content to a different message location.
Need help?
Do you have a question about the U2 and is the answer not in the manual?
Questions and answers