Advertisement
Quick Links
Advertisement

Related Manuals for Kicker RS56.2


Summary of Contents for Kicker RS56.2
- Page 2 If you require service on this speaker during the warranty period, you will need to provide this information and a copy of the original sales receipt to Kicker for validation of warranty repairs. ALWAYS KEEP YOUR RECEIPT! _____________________________________________ Authorized Kicker Dealer:...
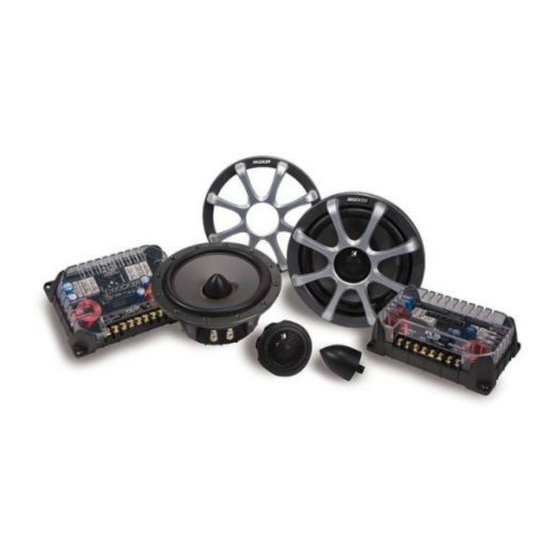
- Page 3 System Components cone maximum EXmax™ (effective excursion) potential. Flexible Mounting of the RS56.2, which includes an 6” x 8” (15.2 cm x 20.3 cm) mounting adapter, and the RS65.2 and RS56.2, which have coaxial mounts for the tweeters, enable the RS-Series System Components to accommodate most installations.
- Page 4 Tweeter Diaphragm Material Tweeter Magnet Material Outboard Crossover Speaker Wire High Pass, dB, at Frequency, Hz Low Pass, dB, at Frequency, Hz Grills Included RS56.2 2 - Way 6-90 50-21k 2 9/16 (6.5) 2 13/16 (7.1) 5 (12.7) 5 1/4 (13.3)
-
Page 5: Installation
Your Kicker RS-Series System Component drivers are specifically designed for mounting in free-air applications. The speakers do not require a sealed enclosure for optimum performance. It is important to isolate the sound coming off the front of the driver from the sound radiating from the back of the driver. - Page 6 If custom door mounting locations for the RS-Series System Components are desired, be careful to avoid interference from the window and door lock mechanisms. The first step is to find a location on the door panel that will accept the dimensions of the speaker.
-
Page 7: Tweeter Mounting
Tweeter Mounting The tweeter can be mounted one of four ways: flush, surface, angled and coaxial mounting. For flush mounting applications, please refer to the illustration in Figure 3. Mount the tweeter as high up on the door and as far forward as possible without interference from the dashboard. - Page 8 Tweeter Mounting continued The tweeter can be mounted in the center of the midrange. This creates a high quality coaxial speaker. Remove the tweeter face plate by screwing it off and install the supplied smaller face plate. Remove the magnet boot from the midrange. Then install the tweeter back plate by securing the supplied phillips-head machine screw to the plate, as outlined in Step 1, in Figure 4.
-
Page 9: Wiring Options
There are three sets of wires supplied with the Kicker RS-Series System Components. One set is designed to plug on to the terminal of the midrange. The other end of this wire goes to the midrange output on the supplied crossover. - Page 10 Wiring two RS-Series System Components to a single channel Modern high performance system components have a lower DC Resistance than what used to be available. The Kicker RS-Series System Components are rated at four ohms and work with any source unit or amplifier designed to operate at a four ohm load. If you want to use two RS-Series System Components on each channel of your source unit or amplifier wire the system components in series--at the connection between the crossover and source unit or amplifier, as shown below in Figure 6.
- Page 11 Defective merchandise should be returned to your local Authorized Stillwater Designs (Kicker) Dealer for warranty. Assistance in locating an Authorized Dealer can be obtained by writing, calling, or by visiting kicker.com. You can confirm that a dealer is authorized by asking to see a current authorized dealer window decal.
Need help?
Do you have a question about the RS56.2 and is the answer not in the manual?
Questions and answers