Table of Contents
Advertisement
Quick Links
Advertisement
Table of Contents

Subscribe to Our Youtube Channel
Related Manuals for Vista VIP Kit2 VK2-ENCODER

Summary of Contents for Vista VIP Kit2 VK2-ENCODER
- Page 1 VIP Kit2 VK2-ENCODER Installation Guide...
- Page 2 This page is intentionally left blank...
-
Page 3: Product Description
1. Product Description This manual applies to the VIP Kit2 Camera – VK2-ENCODER The VK2-ENCODER supports the network service for an existing analog camera. An analog image entered can be monitored on a real-time screen regardless of distances and locations. By using its dedicated program, many users are able to have an access to the VK2- ENCODER at once or a single user can monitor various VK2-ENCODERs at the same time. -
Page 4: Package Components
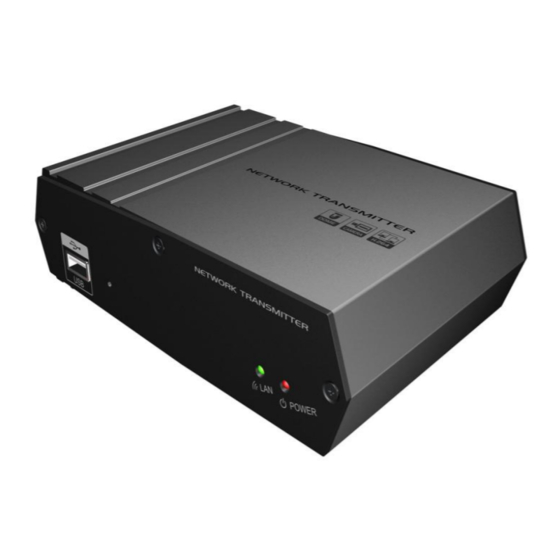
Package Components The system comes with the following components: VK2-ENCODER Installation CD Installation Guide Contents in the installation CD 1. The VK2-ENCODER User’s Manual 2. The SmartManager User’s Manual 3. The VK2-CS Client Software User’s Manual... - Page 5 Overview • Front Panel Function Description One USB port is provided to connect external USB memory stick for archiving video or system upgrade. Reset Button Press this button to restore the factory default settings Network Indicator Lights when a remote user is connected to the unit. Lights when the power is on.
-
Page 6: Installation
2. Installation Various connections can be made to the Encoder, these include: Network cable (which can also power the camera if used with a PoE switch), Composite video coax connection, separate power connection and an Alarm input and output cable, and RS485 Telemetry cable Network Connection To communicate with the VK2-ENCODER camera it is necessary to connect a standard RJ-45 cable to it. - Page 7 : Loading settings information of video after connecting the camera. : Connectable to the camera but fixed security settings (password) : Unavailable for connection to the camera (PC can not access relevant IP Address) 3. Select the camera on the list and click right button of the mouse. You can see the pop-up menu as below.
-
Page 8: Operation
3. Operation The VK2-ENCODER Camera can be used with most standard operating systems and browsers. Notes: To view streaming video in Microsoft Internet Explorer, set your browser to allow ActiveX controls. 3.1 Access from a browser 1. Start a browser (Internet Explorer). 2. -
Page 9: Access From The Internet
3.2. Access from the internet Access from the internet Once connected, the VK2-ENCODER is accessible on your local network (LAN). To access the video encoder from the Internet you must configure your broadband router to allow incoming data traffic to the video encoder. To do this, enable the NAT-traversal feature, which will attempt to automatically configure the router to allow access to the video encoder. -
Page 10: Live View Page
3.4 Live View Page The live view page comes in eight screen modes like 4CIF(704x480(576)), 2CIF(704x240(288)), CIF(352x240(288)), QCIF(176x120(144)), VGA(640x480), QVGA(320x240), and QQVGA(160 X 120). Users are allowed to select the most suitable one out of those modes. Please, adjust the mode in accordance with your PC specifications and monitoring purposes. - Page 11 • Control toolbar The live viewer toolbar is available in Microsoft Internet Explorer only. It displays the following buttons: The Stop button stops the video stream being played. Pressing the key again toggles the start and stop. The Start button connects to the camera or starts playing a video stream.
- Page 12 3.5 Setup This section describes how to configure the VK2-ENCODER, and is intended for product Administrators, who have unrestricted access to all the Setup tools; and Operators, who have access to the settings for Basic, Live View, Video & Image, Audio, Event, and System Configuration.
-
Page 13: Resetting To The Factory Default Settings
3.6 Resetting to the factory default settings To reset the VK2-ENCODER Camera to the original factory settings, go to the Setup>System >Maintenance web page (described in Maintenance, on page 61, the User’s Manual) or use the control button on the camera, as described below: Follow the instructions below to reset the Network Camera to the factory default settings using the Reset Button.
Need help?
Do you have a question about the VIP Kit2 VK2-ENCODER and is the answer not in the manual?
Questions and answers