
Related Manuals for Fortinet Talkswitch TS-850i


Summary of Contents for Fortinet Talkswitch TS-850i
- Page 1 T A L K S W I T C H S T A R T G U I D E ® TALKSWITCH TS-850i AND TS-860i TELEPHONE C T.T P 0 0 5 . 0 1 0 9 0 3 A N S W E R S W I T H I N T E L L I G E N C E ®...
- Page 2 Fortinet, Inc. and other Fortinet names herein may also be registered trademarks and/or common law trademarks of Fortinet. Other product or company names may be trademarks of their respective owners. Reproduction, adaptation or translation without prior written permission is prohibited, except as allowed under the copyright laws.
- Page 3 Introduction Congratulations on your purchase of the TS-850i/TS-860i Cordless DECT Phone! This guide describes how to install and configure your new telephone with a TalkSwitch system. For more information, see the support section at http://global.talkswitch.com. Installing the base 1. Place the base near a wired Ethernet router, either on a tabletop or mounted on a wall.
- Page 4 3. Optionally connect the telephone cable from the Line port on the base to the telephone wall socket. This will allow you to use the TS-850i/TS-860i as a regular phone as well. 4. Connect the power adapter from the power outlet to the power supply connector.
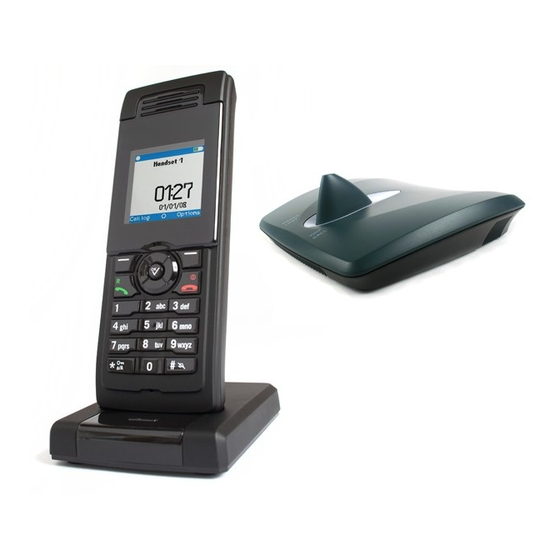
- Page 5 Installing the handset charger 1. Place the handset charger within the signal range of the base. The handset has an indoor signal range of up to 150 feet (50 meters) from the base. Concrete and metal objects might affect the signal range. 2.
- Page 6 Installing the batteries 1. Release the battery cover from the bottom. TS-860i handset 2. Insert the Li-ion cell battery in the handset, making sure it is placed as shown in the illustration, and then slide the battery cover shut. T S - 8 5 0 i A N D T S - 8 6 0 i S T A R T G U I D E...
- Page 7 Charging the batteries 1. Place the handset in the handset charger. The handset turns on, and the battery charge indicator in the display starts to flash. 2. Charge the batteries for at least 10 hours before first use. E V E R Y C A L L C O U N T S...
- Page 8 Registering handsets with the base A base can support up to three handsets with three concurrent calls. It can support up to eight handsets if they aren’t all used at once. If you have more than three handsets and are getting busy signals, add more bases to your installation in order to handle more calls.
- Page 9 Once the handset is registered, the left connection status indicator in the display will turn yellow. 4. Once the handset is registered, you can place additional handsets in the handset charger for registration. If the five-minute registration period has expired, but the handsets aren’t all registered, press the Reset button on the back of the base to start a new registration period.
- Page 10 Configuring the TS-850i/TS-860i as an IP extension You can configure the phone as an IP extension located within the office, or outside the office (i.e. an external IP extension). Before configuring a phone, ensure that no handsets registered with the associated base are being used. If a handset is on a call, the call will be terminated when the system resets the base during configuration of the phone.
- Page 11 Configuring the TS-850i/TS-860i for use within the office If the TS-850i/TS-860i is located within the office, it connects to your TalkSwitch system over the local area network (LAN). 1. Launch the TalkSwitch management software. 2. Select the Local Extensions/Fax page. 3.
- Page 12 6. Enter the user’s First name and Last name. The names are used for caller ID and the dial-by-name directory. 7. Assign an Extension number. 8. Select TalkSwitch as the Manufacturer, and then select the model. 9. Enter the MAC address of the phone: •...
- Page 13 i) Click the Select button. A MAC Selection window appears and lists TalkSwitch IP phones of the selected type. ii) Select the MAC address of the IP phone associated to the extension, and then click Select. • You can enter the Phone MAC Address manually. This is the required method if you are setting up an external IP extension.
- Page 14 10. Click Finish. 11. In the Extension tab, select the language for prompts heard by the user of the extension in the System Prompt Language list. IP Extension Details area 1. Set the Location to Internal. 2. See Local Extensions/Fax in Help within the TalkSwitch management software, for instructions on configuring direct line access, hunt group permissions, caller ID settings (VoIP only), call...
- Page 15 Configuring the TS-850i/TS-860i for use outside the office An external IP extension is located outside the office (e.g. an office phone within the home), and connects to your TalkSwitch system over the Internet. The TalkSwitch system must be equipped with a VoIP module. Warning: Calls to an emergency service number using an external IP extension will not send the correct address to the emergency operator.
- Page 16 3. Click Check Firewall. The Firewall Test window appears. 4. Click Test Ports to run the firewall test and ensure port forwarding is set up. Selecting the extension 1. Select the Local Extensions/Fax page. 2. Click the Add button. The Add User / Extension window appears.
- Page 17 5. Enter the user’s First name and Last name. The names are used for caller ID and the dial-by-name directory. 6. Assign an Extension number. 7. If necessary, select TalkSwitch as the Manufacturer, and then select the model. 8. Enter the MAC address of the phone: •...
- Page 18 i) Click the Select button. A MAC Selection window appears and lists TalkSwitch IP phones of the selected type. ii) Select the MAC address of the IP phone associated to the extension, and then click Select. • You can enter the Phone MAC Address manually. This is the required method if you are setting up an external IP extension.
- Page 19 9. Click Finish. 10. In the Extension tab, select the language for prompts heard by the user of the extension in the System Prompt Language list. IP Extension Details area 1. Set the Location to External. 2. Select the Time Zone of the phone. 3.
- Page 20 Configuring the external IP extension handset 1. In Idle mode, press the OK key on the handset to access the Main menu. The OK key is the round key between the navigation keys. 2. Choose Settings, and then press the OK key. 3.
- Page 21 Using the TS-850i/TS-860i with a traditional phone line NOTE: If you connected the telephone cable from the Line port on the base to the telephone wall socket, you can use the TS-850i/TS-860i with a traditional phone line. When connected to the traditional telephone network (PSTN) or to a TalkSwitch system as an analog extension, FLASH is engaged by pressing the R# key on the TS-850i and the...
Need help?
Do you have a question about the Talkswitch TS-850i and is the answer not in the manual?
Questions and answers