Table of Contents
Advertisement
Quick Links
Advertisement
Table of Contents

Related Manuals for Sirius XM RAdio XM Snap!


Summary of Contents for Sirius XM RAdio XM Snap!
- Page 1 User Guide...
-
Page 3: Table Of Contents
Table of Contents Introduction . . . . . . . . . . . . . . . . . . . . . . . . . . 5 The Main Display . -
Page 6: Introduction
Introduction Features Thank you for purchasing XM Snap! XM Snap has these exciting features to enhance your overall experience: • Simple controls make it a snap to use . • Hear SIRIUS|XM through your existing vehicle radio with easy installation . • Fully adjustable for convenient placement in your vehicle . -
Page 7: Safety And Care Information
Safety and Care Information IMPORTANT! Self installation instructions and tips are provided for your convenience . It is your responsibility to determine if you have the knowledge, skills, and physical ability required to properly perform an installation . SIRIUS|XM shall have no liability for damage or injury resulting from the installation or use of any SIRIUS|XM or third party products . - Page 8 Introduction Warning! • Opening the case may result in electric shock . • If the liquid crystal fluid comes in contact with your skin, wipe the skin area with a cloth and then wash the skin thoroughly with soap and running water . If the liquid crystal fluid comes into contact with your eyes, flush the eyes with clean water for at least 15 minutes and seek medical care .
-
Page 9: What's In The Box
What’s in the Box? Cable Routing Adapter Alcohol Prep Pad Magnetic Mount Aux In Cable Antenna Alcohol Snap Radio Antenna Preparation Pad... -
Page 10: Snap Functions
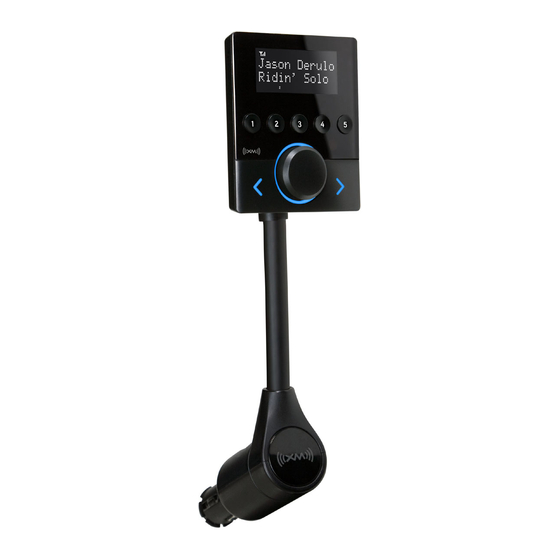
Introduction Snap Functions Top View (Radio Control Unit) Menu Button Press to access Radio ID and adjust audio level . Power Button FM Button Press to turn Radio on Press to change to FM mode for MENU FM configuring FM channels . and off . -
Page 11: Snap Features And Connections
Snap Features and Connections Flexible Stalk ANTENNA ANTENNA WIRE GUIDE Connection for Guides antenna wire to the Magnetic connection . Mount Antenna . AUDIO Base AUDIO Connection for Connection for Aux In Cable or optional optional FM Direct Cassette Adapter Adapter (sold (sold separately) . -
Page 14: Installation And Setup
Installation and Setup WARNING! DO NOT attempt to install Snap while driving . Park your vehicle in a safe location before beginning installation . Step 1: Mount the Magnetic Mount Antenna Mount the Magnetic Mount Antenna on the outside of your vehicle, on a horizontal surface that will always face the sky . - Page 15 Recommended Antenna Locations Sedans and Coupes Pickups and SUVs Convertibles* * If the antenna can not be placed above the windshield, place it on vehicle hood . TIP: When mounting the Magnetic Mount Antenna, be sure that the area is clean and dry by using the Alcohol Prep Pad .
- Page 16 Installation and Setup If you are installing the antenna at the roof edge, or hood edge, install the Cable Routing Adapter to direct the antenna cable downward . With Cable Without Cable Routing Adapter Routing Adapter Installed Installed Cable Routing Adapter orientation Place the antenna wire Slide the Cable Routing...
- Page 17 around the door opening . Lift the weather stripping from the opening and tuck the cable inside it, then replace the weather stripping . Run the cable inside of the weather stripping to the bottom of the door opening . Hide the Place Antenna antenna wire inside the cabin .
-
Page 18: Step 2: Find A Location For Snap And Mount It
Installation and Setup Step 2: Find a Location for Snap and Mount It Snap mounts in your vehicle be plugging the Base into your vehicle’s power adapter or cigarette lighter socket . If your vehicle has more than one, be sure to choose the one that doesn’t interfere with the driver’s vision or access to driving controls, won’t interfere with the deployment of airbags or other safety equipment, and makes Snap easily accessible for operation . - Page 19 Inserting Snap into the Power Adapter or Cigarette Lighter Socket Be cautious when inserting or removing Snap from the vehicle’s power CAUTION: adapter or cigarette lighter socket, so as not to damage Snap or the socket . When inserting Snap into, or removing Snap from, the vehicle’s power adapter or cigarette lighter socket, do not push or pull using the Radio Control Unit or Flexible Stalk .
- Page 20 Installation and Setup Adjusting Snap The Flexible Stalk with swivel lets you optimize placement in your vehicles so you can access the Radio controls and view the display: • Swivel the Radio Control Unit left or right, 90° in either direction . • Twist the Flexible Stalk left or right, 90°...
-
Page 21: Step 3: Initiate The Courtesy Period
Step 3: Initiate the Courtesy Period Before proceeding with connecting the audio, the Courtesy Period included with your Snap needs to be initiated: Be sure the vehicle is outside and the antenna has a clear view of the sky . MENU FM 2 Power on your Snap by pressing the Power button . - Page 22 Installation and Setup that you are not receiving the XM signal . Be sure the vehicle is outside and the antenna has a clear view of the sky . Verify that you have installed and connected the antenna as described in “Step 1: Mount the Magnetic Mount Antenna”...
-
Page 23: Step 4: Connect The Audio
Step 4: Connect the Audio To play XM audio through your vehicle’s stereo or FM radio, decide on one of the following audio connection options: • Option 1: Best: Use the provided Aux In Cable if your vehicle’s stereo system has an auxiliary input connection or jack . - Page 24 Installation and Setup Options 1 & 2: Aux In Cable Or Cassette Adapter Installation Instructions Plug one end of the Aux In Cable (or Cassette Adapter) Optional Cassette into the AUDIO connector on the Base of Snap . Adapter 2 Plug the other end into the auxiliary input jack of your vehicle’s stereo system (or insert the Cassette Adapter into the cassette deck;...
- Page 25 Option 3: PowerConnect Installation Instructions You’ll first need to find an available FM channel . An available FM channel is one that’s not being used by an FM radio station in your area . When you tune your FM radio to an available channel, you should only hear static or silence –...
- Page 26 Installation and Setup 3 Set your Snap to transmit on the same FM channel that you have selected in step 2: a. Press FM on the top of Snap . The FM icon will be displayed on the screen to indicate Snap is in the FM mode . b.
-
Page 27: Step 5: Tune To Other Channels, Explore
5 Press FM or wait 10 seconds to exit the FM mode . Proceed to “Step 5: Tune to Other Channels, Explore and Enjoy” on page 27 . 6 The audio level output of Snap can be increased or decreased as necessary to match the audio levels of other sources in your vehicle . -
Page 28: Step 6: Subscribe
Installation and Setup Step 6: Subscribe You can subscribe to the XM service anytime by following these steps: Make sure your Snap is turned on, and receiving the XM signal so that you can hear the XM audio . 2 Make a note of your Radio ID . You can find it by pressing MENU, on a label on the bottom of the gift box, on the label on the back of your Snap, and by tuning to channel 0 . -
Page 30: Using Your Snap
Using Your Snap The Main Display When listening to a channel, information about the channel and what is currently playing is displayed . The screen will alternate between displaying the artist name and song/program title; and displaying the category, channel name and channel number . Displayed when Snap is in menu mode (after pressing MENU) -
Page 31: Navigation Basics
Navigation Basics Power Button Pressing the Power button turns Snap On or Off . Rotary Knob Turning the Rotary knob clockwise or counter-clockwise scrolls through channels and tunes to a channel within a category . In FM mode, scrolls through FM channels and tunes to an FM channel . -
Page 32: Listening To Satellite Radio
Using Your Snap FM Button Pressing FM puts Snap into the FM mode for configuring FM channels when using PowerConnect (or FMDA) as the audio connection option . The FM icon lights up to indicate Snap is in the FM mode, and the display shows the current FM channel . You can tune to a different FM channel, store an FM preset, or choose an existing FM preset while Snap remains in the FM mode . -
Page 33: Favorite Channels
either the first channel in the category (if that category was never accessed before), or the channel that Snap was tuned to in that category when it was accessed the last time . 2 To view each previous or next category without changing categories, press and hold the Previous or Next Category button . - Page 34 Using Your Snap To assign a favorite channel to a number button: Tune to the desired channel . Rock The Loft 2 Press and hold a number button between 1-5 that you want to assign to the favorite channel . The corresponding number icon will be displayed on the screen confirming that the channel has been assigned .
-
Page 35: Scanning Channels In A Category
Scanning Channels in a Category You can scan a category and listen to each channel for 10 seconds before Snap automatically tunes to the next channel . To scan a category: Press the Previous or Next Category button until the desired category is displayed . 2 Press the Scan button . -
Page 36: Fm Presets
Using Your Snap FM Presets FM presets make it easy to store FM channels and then quickly access 90.1 them to choose a new FM channel . Use FM presets when you use PowerConnect or the FMDA to listen to your Snap through your vehicle’s FM radio . (Refer to “Option 3: PowerConnect Installation Instructions”... - Page 37 To replace an FM preset assigned to a number button: Press FM on the top of Snap . The FM icon is displayed on the screen to indicate the Radio is in FM mode, and the display will show the current FM channel . 2 Turn the Rotary knob to tune to the desired FM channel .
-
Page 38: Radio Id
Using Your Snap NOTE! You may find an FM channel with static or silence that does not work with Snap . It is possible that some type of inaudible interference is present that prevents reception of the Snap broadcast . Your only options are to use another FM channel or a different audio connection method . -
Page 39: Set Audio Level
Set Audio Level The audio level of Snap can be adjusted when an audio connection is made between Snap and the vehicle’s stereo system . Audio level is used to adjust Snap’s volume level to match the volume of other audio sources you may use, such as a CD player, other FM stations, or an MP3 player . Do not use the audio level as a volume control . -
Page 40: Auto Shut Off
Using Your Snap Auto Shut Off Snap will automatically shut off after 6 hours of inactivity, i .e ., when no Started Auto buttons have been pressed or the rotary knob has not been turned . This Shut Off feature prevents the vehicle battery from being discharged if you forget to turn your Snap off . -
Page 42: Troubleshooting
Troubleshooting Snap has been designed and built to be trouble-free but if you experience a problem, try this: • Check that all connections are firm and secure . • Make sure the vehicle power socket is working, and clean and free of corrosion . • Make sure you have connected Snap as described in this User Guide . - Page 43 If you see this on the screen: Try this: Courtesy Period Ended • The Courtesy Period included with your Snap has ended . Call 1-866- 408-9796 to subscribe . Also refer to “Step 6: Subscribe” on page 28 . If this happens: Try this: You do not receive all the • Ensure that you have subscribed to the service by following the steps...
- Page 44 Troubleshooting If this happens: Try this: Audio sounds too soft • Raise the volume of your stereo system or increase the audio level of your Snap until the sound quality improves . Refer to “Set Audio Level” on page 39 . No audio when using the Aux In • Check all cables between your Snap and your vehicle’s stereo system for Cable or Cassette Adapter...
-
Page 46: Product Specifications
Product Specifications System Power Requirements: 9-16 V DC, 500 mA (max) Operating Temperature: -4°F to +140°F (-20°C to +60°C) Audio Output: 1 .0 V rms (max) Snap Dimensions Radio Control Unit: 2 . 7 in (width) x 3 . 1 3 in (height) x 0 .6 in (depth) 68 .5 mm (width) x 79 .5 mm (height) x... -
Page 47: Patent Information
Patent and Environmental Information Patent Information It is prohibited to, and you agree that you will not, copy, decompile, disassemble, reverse engineer, hack, manipulate, or otherwise access and/or make available any technology incorporated in this product . Furthermore, the AMBE ™... - Page 48 FCC Statement The user is cautioned that changes or modifications not expressly approved by SIRIUS XM Radio Inc . can void the user’s authority to operate this device . This device complies with Part 15 of the FCC Rules . Operation is subject to the following two conditions: 1 .
- Page 49 Copyrights and Trademarks ©2010 SIRIUS XM Radio Inc . “SIRIUS”, “XM” and all related marks and logos are trademarks of SIRIUS XM Radio Inc . and its subsidiaries . “BBC” and “Radio One” are trademarks of the British Broadcasting Corporation and are used under license .
-
Page 50: Owners Record
Owners Record Owner’s Record The Radio model number is located below and the Radio ID is located on the label on the back of Snap . Record the Radio ID in the space provided below . Refer to these numbers whenever you call your dealer regarding this product . - Page 52 .xmradio .com SIRIUS XM Radio Inc . 1221 Avenue of the Americas New York, NY 10020 1 .800 . 9 67 .2346 © 2010 SIRIUS XM Radio Inc . XSN1UG 081710b...
Need help?
Do you have a question about the XM Snap! and is the answer not in the manual?
Questions and answers