Table of Contents
Advertisement
Quick Links
Advertisement
Table of Contents

Related Manuals for Sennheiser sk100-g3 bodypak transmitter


Summary of Contents for Sennheiser sk100-g3 bodypak transmitter
- Page 1 SK 100 Notice d’emploi...
-
Page 3: Table Of Contents
..................25 Manufacturer Declarations................27 For more detailed information on the individual sections of this instruction manual, visit the SK 100 G3 product page on our website at www.sennheiser.com. There you can also view an animated instruction manual. -
Page 4: Important Safety Instructions
• Only use attachments/accessories specified by Sennheiser. • When replacement parts are required, only use replacement parts specified by Sennheiser or those having the same characteristics as the original part. Unauthorized substitutions may result in fire, electric shock, or other hazards. -
Page 5: The Sk 100 G3 Bodypack Transmitter
The frequency bank system Please note: Frequency usage is different for each country. Your Sennheiser partner will have all the necessary details on the available legal frequencies for your area. The bodypack transmitter is available in 6 UHF frequency ranges with... -
Page 6: Areas Of Application
The SK 100 G3 bodypack transmitter Areas of application The bodypack transmitter can be combined with the EM 100 G3 stationary receiver. The EM 100 G3 stationary receiver is available in the same UHF frequency ranges and is equipped with the same frequency bank system. This has the advantage that •... -
Page 7: Delivery Includes
Delivery includes Delivery includes The packaging contains the following items: 1 SK 100 G3 bodypack transmitter 2 AA size batteries, 1.5 V 1 instruction manual 1 frequency information sheet... -
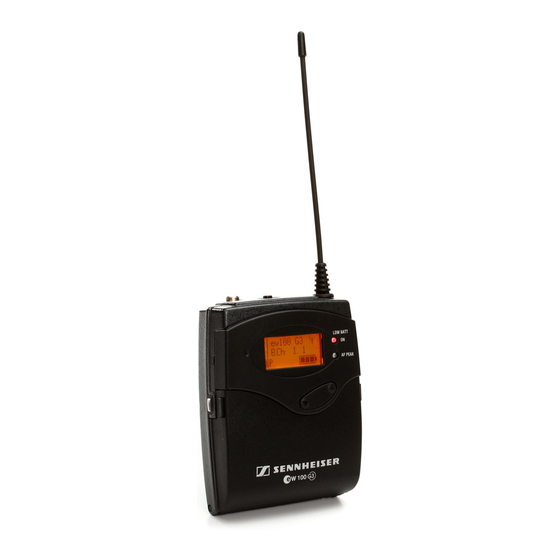
Page 8: Product Overview
Product overview Product overview Overview of the SK 100 bodypack transmitter » Microphone/instrument input (MIC/LINE), 3.5 mm jack socket, lockable MUTE switch Antenna Operation and battery status indicator, red LED (lit = ON/flashing = BAT) Audio overmodulation indicator, yellow LED (lit = PEAK) Charging contacts... -
Page 9: Overview Of The Displays
Product overview Overview of the displays After switch-on, the bodypack transmitter displays the standard display “Frequency/Name”. For further illustrations and examples of the different standard displays, refer to page 13. The display backlighting is automatically reduced after approx. 20 seconds. 543.200 ew100 G3 MUTE... -
Page 10: Putting The Bodypack Transmitter Into Operation
(e.g. guitars). DC powering of the condenser microphones is via the audio input (3.5 mm jack socket MIC/LINE Use one of the recommended Sennheiser microphones or the optional CI 1 instrument cable (see page 4). Connect the 3.5 mm jack plug from the Sennheiser microphone or instrument cable to the 3.5 mm jack socket... -
Page 11: Attaching And Positioning The Microphones
Putting the bodypack transmitter into operation Attaching and positioning the microphones ME 2 Use the microphone clip to attach the microphone to clothing (e.g. tie, lapel). Attach the ME 2 microphone as close as possible to the sound source. The ME 2 clip-on microphone has an omni-directional pick-up pattern. It is therefore not necessary to position it precisely. -
Page 12: Attaching The Bodypack Transmitter To Clothing
Putting the bodypack transmitter into operation Attaching the bodypack transmitter to clothing You can use the belt clip to attach the bodypack transmitter to clothing (e.g. belt, waistband). The belt clip is detachable so that you can also attach the transmitter with the antenna pointing downwards. -
Page 13: Using The Bodypack Transmitter
Using the bodypack transmitter Using the bodypack transmitter To establish a transmission link, proceed as follows: 1. Switch the receiver on (see the instruction manual of the receiver). 2. Switch the bodypack transmitter on (see below). The transmission link is established and the receiver’s RF level display “RF”... -
Page 14: Deactivating The Lock Mode Temporarily
Using the bodypack transmitter activate signal: Briefly press the ON/OFF button. ON/OFF “RF Mute Off” appears on the display panel. Press the button. The transmission icon is displayed again. Deactivating the lock mode temporarily You can activate or deactivate the automatic lock mode via the “Auto Lock”... -
Page 15: Selecting A Standard Display
Using the bodypack transmitter The current state of the muting function or the RF signal is displayed on the display panel of the bodypack transmitter: Audio signal is muted Transmitter’s display panel: “MUTE” is displayed Audio signal is activated (muting is canceled) Transmitter’s display panel: “MUTE”... -
Page 16: Using The Operating Menu
Using the operating menu Using the operating menu The buttons Button Function of the button Press the • Switches the bodypack transmitter on and off ON/OFF button • Cancels the entry and returns to the current ON/OFF standard display (ESC function) •... -
Page 17: Working With The Operating Menu
Using the operating menu Display Function of the menu item LCD Contrast Adjusts the contrast of the display panel (see page 20) Reset Resets the bodypack transmitter (see page 21) Software Revision Displays the current software revision (see page 21) Exit Exits the extended menu “Advanced... - Page 18 Using the operating menu Exiting a menu item To return to the next higher menu level: Change to the “Exit” menu item. Menu Exit Confirm your selection. You return to the next higher menu level. To directly return to the current standard display: Press the ON/OFF button.
-
Page 19: Adjusting Settings Via The Operating Menu
The relevant information is marked with the sync icon. For more detailed information on the operating menu, visit the SK 100 G3 product page at www.sennheiser.com. The main menu “Menu” Adjusting the input sensitivity – “Sensitivity”... - Page 20 Adjusting settings via the operating menu Selecting the frequency bank and the channel manually – “Frequency Preset” Frequency Preset Frequency Preset Menu Frequency Preset B.Ch: 5.12 B.Ch: 1.12 B.Ch: 5.12 Call up Select the frequency Select the channel; bank and confirm store the setting “Frequency Preset”...
-
Page 21: The Extended Menu "Advanced Menu
Adjusting settings via the operating menu The extended menu “Advanced Menu” Setting transmission frequencies and frequency banks – “Tune” When you have selected one of the system banks and then select the “Tune” menu, the bodypack transmitter automatically switches to channel 1 of the frequency bank “U”. - Page 22 Adjusting settings via the operating menu Setting the mode for the MUTE switch – “Mute Mode” Advanced Menu Mute Mode Mute Mode Mute Mode AF On/Off RF On/Off AF On/Off Call up Select the desired Store the setting “Mute Mode” setting “Stored”...
- Page 23 Adjusting settings via the operating menu Loading the factory-preset default settings – “Reset” Advanced Menu Reset Reset Call up “Reset” Select the desired setting; apply the setting “Stored” When resetting the bodypack transmitter, only the selected settings for the pilot tone and for the frequency bank “U” remain unchanged. Displaying the software revision –...
-
Page 24: Adjustment Tips
Adjustment tips Adjustment tips Synchronizing the bodypack transmitter with a receiver When synchronizing the bodypack transmitter with a receiver, please observe the following: Only use a bodypack transmitter and a receiver from the same frequency range (see the type plate on the transmitter and the receiver). -
Page 25: If A Problem Occurs
If a problem occurs that is not listed in the above table or if the problem cannot be solved with the proposed solutions, please contact your local Sennheiser partner for assistance. To find a Sennheiser partner in your country, search at www.sennheiser.com under “Service & Support”. -
Page 26: Specifications
Frequency stability RF output power at 50 Ω typ. 30 mW Pilot tone squelch can be switched off AF characteristics Compander system Sennheiser AF frequency response microphone: 80–18,000 Hz line: 25–18,000 Hz Signal-to-noise ratio ≥ 110 dBA (1 mV, peak deviation) ≤... -
Page 27: Connector Assignment
Specifications Approved by Canada Industry Canada RSS 210 IC 2099A-G3SK limited to 806 MHz FCC-Part 74 FCC-ID: DMO G3SK limited to 698 MHz Microphones ME 2 ME 3 ME 4 Microphone type condenser condenser condenser Sensitivity 20 mV/Pa 1.6 mV/Pa 40 mV/Pa Pick-up pattern omni-directional cardioid... - Page 28 Specifications Frequency response curve ME 2 1.000 10.000 Frequency response curve ME 3 -100 1.000 10.000 5 cm Frequency response curve ME 4 1.000 10.000 0° / 1 m 90° / 1 m 0° / 10 cm...
-
Page 29: Manufacturer Declarations
Manufacturer Declarations Manufacturer Declarations Warranty Sennheiser electronic GmbH & Co. KG gives a warranty of 24 months on this product. For the current warranty conditions, please visit our web site at www.sennheiser.com or contact your Sennheiser partner. In compliance with the following requirements •... - Page 32 Sennheiser electronic GmbH & Co. KG Printed in Germany Am Labor 1, 30900 Wedemark, Germany Publ. 01/09 www.sennheiser.com 529669/A01...
Need help?
Do you have a question about the sk100-g3 bodypak transmitter and is the answer not in the manual?
Questions and answers