Sennheiser SK 100 G3 Instruction Manual
Evolution wireless g3 bodypack transmitter
Hide thumbs
Also See for SK 100 G3:
- Instructions manual (27 pages) ,
- Instruction manual (37 pages) ,
- Comprehensive manual (28 pages)
Table of Contents
Advertisement
Advertisement
Table of Contents

Related Manuals for Sennheiser SK 100 G3


Summary of Contents for Sennheiser SK 100 G3
- Page 1 SK 100 Instruction manual...
-
Page 2: Table Of Contents
Specifications................31 Connector assignment ............. 32 Polar diagrams and frequency response curves of the microphones............33 Manufacturer Declarations............ 34 Index................... 36 An animated instruction manual can be viewed on the SK 100 G3 product page on our website at www.sennheiser.com. -
Page 3: Important Safety Instructions
• Heed all warnings and follow all instructions in this instruction manual. • Use only a cloth for cleaning the product. • Do not place the product near any heat sources such as radiators, stoves, or other devices (including amplifiers) that produce heat. -
Page 4: The Sk 100 G3 Bodypack Transmitter
Channel 2 – freely selectable frequency Frequency bank U Channel 12 – freely selectable frequency Each of the channels in the frequency banks “1” to “20” has been factory-preset to a fixed frequency (frequency preset). The factory-preset frequencies within one frequency bank are intermodulation-free. -
Page 5: Areas Of Application
The SK 100 G3 bodypack transmitter For an overview of the frequency presets, please refer to the supplied frequency information sheet. Updated versions of the frequency information sheet can be downloaded from the SK 100 G3 product page on our website at www.sennheiser.com. -
Page 6: Delivery Includes
Delivery includes Delivery includes The packaging contains the following items: 1 SK 100 G3 bodypack transmitter 2 AA size batteries, 1.5 V 1 instruction manual 1 frequency information sheet 1 RF licensing information sheet... -
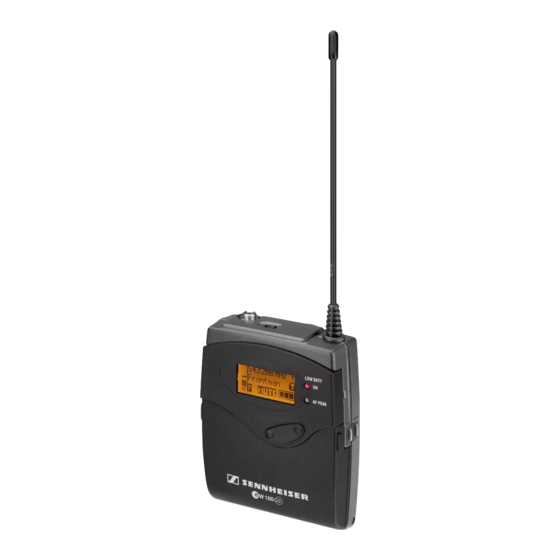
Page 7: Product Overview
Product overview Product overview Overview of the SK 100 G3 bodypack transmitter » Microphone/instrument input (MIC/LINE), 3.5 mm jack socket, lockable MUTE switch Antenna Operation and battery status indicator, red LED (lit = ON/flashing = BATTERY) Audio overmodulation indicator, yellow LED... -
Page 8: Overview Of The Displays
Product overview Overview of the displays After switch-on, the bodypack transmitter displays the standard display “Frequency/Name”. For further illustra- tions and examples of the different standard displays, refer to page 15. The display backlighting is automatically reduced after approx. 20 seconds. -
Page 9: Putting The Bodypack Transmitter Into Operation
Inserting the batteries/accupack For powering the bodypack transmitter, you can either use two 1.5 V AA size batteries or the rechargeable Sennheiser BA 2015 accupack (see “Accessories and spare parts” on page 30). Open the battery compartment by pushing the two... -
Page 10: Attaching And Positioning The Microphones
Use the microphone clip to attach the microphone to clothing (e.g. tie, lapel). Attach the ME 2 microphone as close as possible to the sound source. The ME 2 clip-on microphone has an omni-directional pick- up pattern. It is therefore not necessary to position it precisely. -
Page 11: Attaching The Bodypack Transmitter To Clothing
You can use the belt clip to attach the bodypack trans- mitter to clothing (e.g. belt, waistband). The belt clip is detachable so that you can also attach the bodypack transmitter with the antenna pointing down- wards. To do so, withdraw the belt clip from its fixing points and attach it the other way round. -
Page 12: Using The Bodypack Transmitter
Using the bodypack transmitter Using the bodypack transmitter To establish a transmission link, proceed as follows: 1. Switch the receiver on (see the instruction manual of the receiver). 2. Switch the bodypack transmitter on (see next section). The transmission link is established and the receiver’s RF level display “RF”... -
Page 13: Deactivating The Lock Mode Temporarily
You can activate or deactivate the automatic lock mode via “Auto Lock” menu item (see page 22). If the lock mode is activated, you have to temporarily deactivate it In order to be able to operate the bodypack transmitter: Press the button. -
Page 14: Muting The Audio Signal Or Deactivating The Rf Signal
When you are in the operating menu The lock mode remains deactivated until you exit the operating menu. When one of the standard displays is shown The lock mode is automatically activated after 10 seconds. The lock mode icon flashes prior to the lock mode being activated again. - Page 15 Using the bodypack transmitter The current state of the muting function or the RF signal is displayed on the display panel of the bodypack transmitter. 533.875 ew100 G3 MUTE Audio signal is muted Transmitter’s display panel: “MUTE” is displayed Audio signal is activated (muting is deactivated) Transmitter’s display panel: “MUTE”...
-
Page 16: Selecting A Standard Display
Using the bodypack transmitter Selecting a standard display Press the rocker button to select a standard display: Contents of the display Selectable standard display “Frequency/Name” 533.875 ew100 G3 MUTE “Frequency bank/Channel/ B.Ch: 20.12 Frequency” 533.875 MUTE “Name/Frequency bank/ ew100 G3 Channel”... -
Page 17: Using The Operating Menu
Using the operating menu Using the operating menu A special feature of the Sennheiser ew G3 series is the consistent, intuitive menu structure of transmitters and receivers. As a result, adjustments to the settings can be made quickly – even in stressful situations, for example on stage or during a live show or presentation. -
Page 18: Overview Of The Operating Menu
Exits the operating menu and returns to the current standard display Extended menu “Advanced Menu” Tune Sets the transmission frequencies for the frequency bank “U” (see page 23) Sets the channel and the transmission frequency for the frequency bank “U” (see page 23) Mute Mode... -
Page 19: Working With The Operating Menu
Working with the operating menu If the lock mode is activated, you have to deactivate it In order to be able to work with the operating menu (see page 12). By way of example of the “Sensitivity” menu, this section describes how to use the operating menu. - Page 20 Using the operating menu Exiting a menu item Change to the “Exit” menu item. Menu Exit Confirm your selection. You return to the next higher menu level. To directly return to the current standard display: Press the ON/OFF button. ON/OFF...
-
Page 21: Adjusting Settings Via The Operating Menu
Store the setting “Sensitivity” setting “Stored” Adjustment range: 0 to –60 dB, adjustable in steps of 3 dB The audio level display “AF” always indicates the audio level, even if the bodypack transmitter is muted, e.g. allowing you to check the adjusted sensitivity before live operation. - Page 22 Adjusting settings via the operating menu The following figures are a guide to the best settings: Transmission situation Sensitivity setting −30 to −21 dB Loud music/vocals −21 to 0 dB Presentations Instrument input −30 to −24 dB Electric guitars with single coil pickups −45 to −30 dB...
- Page 23 The name can be displayed on the standard displays “Frequency/Name” and “Name/Frequency bank/Channel”. The name can consist of up to 8 characters such as: • letters (without pronounciation marks), • numbers from 0 to 9, • special characters and spaces.
-
Page 24: The Extended Menu "Advanced Menu
“U” are not assigned a transmission frequency. When you are in the “Tune” menu item, the RF signal is deactivated. Via the “Tune” menu item, you can set a transmission frequency to be stored in the current channel you can select a different channel in the frequency bank “U”... - Page 25 The frequency selection appears. Set the desired frequency. Press the button. Your settings are stored. You are back to the operating menu. Setting the mode for the MUTE switch – “Mute Mode” Advanced Menu Mute Mode Mute Mode Mute Mode AF On/Off...
- Page 26 100 G3 receiver. Adjusting the contrast of the display panel – “LCD Contrast“ You can adjust the contrast of the display panel in 16 steps. Resetting the settings made in the operating menu – “Reset” Advanced Menu...
-
Page 27: Synchronizing The Bodypack Transmitter With A Receiver
Make sure that you set the bodypack transmitter to the same frequency bank and the same channel as the receiver (see page 21). If you still cannot establish a transmission link, refer to the chapter “If a problem occurs ...” on page 29. Synchronizing bodypack transmitters with receivers –... -
Page 28: Cleaning The Bodypack Transmitter
Liquids entering the housing of the device can cause a short-circuit and damage the electronics. Keep all liquids away from the bodypack transmitter. Use a cloth to clean the bodypack transmitter from time to time. Do not use any solvents or cleansing agents. -
Page 29: Recommendations And Tips
• Make sure that the antenna and the microphone cable do not cross. • The antenna should hang freely and be at least 1 cm away from the body. The antenna must not be in direct contact with the skin. -
Page 30: Troubleshooting
If a problem occurs that is not listed in the above table or if the problem cannot be solved with the proposed solutions, please contact your local Sennheiser partner for assistance. To find a Sennheiser partner in your country, search at... -
Page 31: Accessories And Spare Parts
Accessories and spare parts Accessories and spare parts The following accessories are available from your specialist dealer: Cat. No. Product name and description 009950 BA 2015 accupack 009828 L 2015 charger 503168 CC 3 system case 009825 BPP 1 bodypack pouch... -
Page 32: Specifications
626–668, 734–776, 780–822, 823–865 MHz (A–E, G, see page 3) Transmission frequencies 1,680 frequencies, tune- able in steps of 25 kHz 20 frequency banks, each with up to 12 factory- preset channels 1 frequency bank with up to 12 user programmable... -
Page 33: Connector Assignment
ME 3 ME 4 Microphone type condenser condenser condenser Sensitivity 20 mV/Pa 1.6 mV/Pa 40 mV/Pa Pick-up pattern omni cardioid cardioid Max. SPL 130 dB SPL 150 dB SPL 120 dB SPL Connector assignment 3.5 mm jack plug: Line Line... -
Page 34: Polar Diagrams And Frequency Response Curves Of The Microphones
Specifications Polar diagrams and frequency response curves of the microphones Polar diagram ME 3 Polar diagram ME 4 0° 0° 30° 30° 30° 30° 60° 60° 60° 60° 90° 90° 90° 90° 120 ° 120° 120° 120° 125 Hz 150°... -
Page 35: Manufacturer Declarations
This equipment has been tested and found to comply with the limits for a Class B digital device, pursuant to Part 15 of the FCC Rules. These limits are designed to provide reason- able protection against harmful interference in a residential installation. - Page 36 • Reorient or relocate the receiving antenna. • Increase the separation between the equipment and receiver. • Connect the equipment into an outlet on a circuit different from that to which the receiver is connected. • Consult the dealer or an experienced radio/TV technician for help.
-
Page 37: Index
Connecting (microphone/instrument cable) 8 Deactivating lock mode temporarily 12 Displays adjusting the contrast (LCD Contrast) 25 charge status 7 overview 7 standard displays 15 Emulating guitar cables (Cable emulation) 24 Factory default settings (resetting the settings in the operating menu) 25... - Page 38 ~ 4 Modulation (input sensitivity/adjusting the sensitivity) 20 Multi-channel system 26 Mute (muting the audio signal) 13 Mute Mode (setting the mode for the MUTE switch) 24 MUTE switch function 13 setting the mode (Mute Mode) 24 Muting (audio signal) 13...
- Page 39 Index Setting up transmission link 26 Software Revision (displaying the software revision) 25 Switching on/off bodypack transmitter 11 Synchronizing (bodypack transmitter/receiver) 26 Transmission frequency selecting (Frequency Preset) 21 setting (Tune) 23 Transmission power, optimizing 28 Troubleshooting 29 Tune (setting a transmission frequency) 23...
- Page 40 Sennheiser electronic GmbH & Co. KG Printed in Germany Am Labor 1, 30900 Wedemark, Germany Publ. 01/09 www.sennheiser.com 529669/A01...
Need help?
Do you have a question about the SK 100 G3 and is the answer not in the manual?
Questions and answers