Table of Contents
Advertisement
®
Front.Loading
Automatic
Washer
Use & Care Guide
Lavadora
autom&tica
de carga
frontal
Manual de uso y cu
Laveuse
automatique
& chargement
frontal
Guide d utlllsat_on
et d entrewen
ModelslModelos_od_les
796.4027*
* = color number, nL_mero de color, numero de couleur
==
iiiiZ:!!_ ¸
Designed
to use only HE
High Efficiency
detergent
DiseSado
para utilizar
solamente
detergente
de alta
eficacia
Con_u pour i'utilisation
d'un
d6tergent
haute efficacit6
seulement
iiiii_i
MFL625268_
Sears Brands Management
Cor_ration,
Hoffman
Estates,
IL 60179
_ars
Canada
Inc,, Toronto,
Ontario,
Canada M5B 2B8
WWW, _ars
.CO m
www,_ars,ca
Advertisement
Table of Contents

Related Manuals for Kenmore 796.4027 Series


Summary of Contents for Kenmore 796.4027 Series
- Page 1 Con_u pour i'utilisation d'un d6tergent haute efficacit6 seulement MFL625268_ Sears Brands Management _ars Washer de carga frontal & chargement 796.4027* Cor_ration, Hoffman Canada Inc,, Toronto, Ontario, Canada M5B 2B8 frontal Estates, IL 60179 WWW, _ars www,_ars,ca iiiiZ:!!_ ¸ iiiii_i...
- Page 2 Save these instructions and your sales receipt for future reference. Master Protection Agreements Congratulations Kenmore _ product is designed and manufa_ured years of de_ndable may require preventive maintenance or repair from time to time. That's when having a Master Protection Agreement can save your money and aggravation.
- Page 3 This will release any accumulated hydrogen gas, As the gas is flammable, do not smoke or use an open flame during this time. • Do not allow children to play on or in the washer. Close su_rvision of children is necessary when the washer is used near children.
- Page 4 3-prong wall outlet. Failure to follow this warning can cause serious injury, fire, electrical shock, or death. , Do not install on carpet. Install washer on a solid floor. Failure to follow this warning can cause serious leak damage.
- Page 5 . Do not allow children to play on or in the washer. Close supervision of children is necessary when the washer is us_ near children. As children grow, teach them the proper, safe use of all appliances. Failure to comply with these warnings _u]d serious _rsonal injuries.
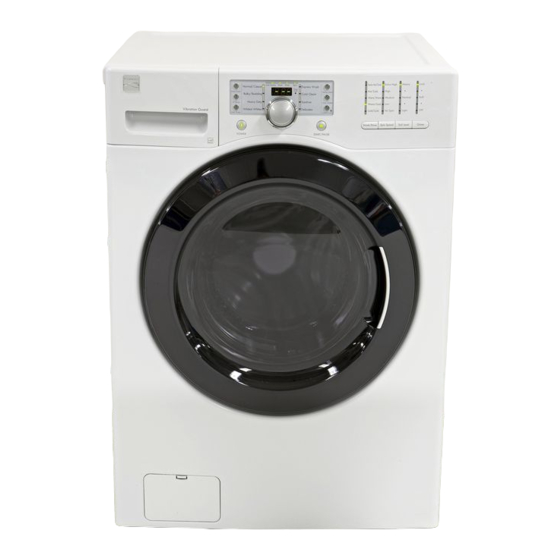
- Page 6 The easy-to-read LED display shows cycle options, settings, cycle status, and estimated time remaining during operation. NOTE: Sensors in the washer automatically detect the size of the wash load to optimize washing time, based on the selected cycle and options.
- Page 7 (2.5 cm) Allow at least 21 _/4in. (54 cm) in front of the washer to open the door. NOTE: Please note that the floor must be strong and rigid enough to support the weight of the washer, when fully loaded, without flexing or bouncing.
- Page 8 If you must lay the washer down to remove the base packaging materials, always protect the side of the washer and lay it carefully on its side. DO NOT lay the washer on its front or back. To prevent internal damage during transport, the washer is equipped with 4 shipping bolts and plastic retainers.
- Page 9 Water inlets 2. Attach the red, hot water line to the hot water inlet on the back of the washer. Attach the blue, cold water line to the cold water inlet on the back of the washer. Tighten the fittings securely,...
- Page 10 NOTE: If the drain hose is extended more than 4 inches beyond the end of the end of the elbow bracket, mold, or microorganisms could spread to the inside of the washer. Option 2: Laundry The elbow bracket should be installed near the end of the drain hose.
- Page 11 Use the leveling feet on the pedestal to ]eve]the washer.. 3. Once the washer is level from side to side and front to bad,{, use the adjusting wrench to tighten all four iock nuts securely to prevent the legs from getting out of adjustment during operation.
- Page 12 Important CONTROL PANEL FEATURES POWER (ONJOFF) BUTTON Press to turn the washer ON. Press again to turn the washer OFF. NOTE: Pressing the POWER button during a cycie will cancel that cycle and any load settings will _...
- Page 13 See pages 16 and 17 for important information on detergents and dispenser use, TURN ON THE WASHER Press the POWER button to turn on the washer. The lights around the Cycle Selector Knob will H]uminate and a chime will sound, if turned on page i 2.
- Page 14 CYCLE GUIDE The cycle guide below shows the default settings, available options and recommended cycle. Allowable modifier adjustments are shown below the default setting for each cycle. Cotton, linen, towels, Normal/ shirts, _eets, jeans, Casual mix_ loads Large items such iiiii ii ii i!ii!ii!i ii!iiii:i! Bulky/ as blankets and...
- Page 15 • Large _ems should not be more than half of the totai wash load. • The washer can be fully loaded, but the drum shouid not be tightly packed with items. The door of the washer should close easily.
- Page 16 Never exceed the manufactureCs recommendations when adding softener. Using too much fabric softener can result in buildup in clothing and the washer. Either powdered or liquid fabric softener may be used. *Always follow the manufacturer's recommendations when adding fabric softener.
- Page 17 IMPORTANT: Do not place or store laundry products, such as detergent, bleach, or liquid fabric softener, on top of your POWDERED washer or dryer. Wipe up any spills [mmediateiy.These DETE RG ENT products can damage the finish and controls. NOTE: Do not put detergent or other laundry products in the Prewash compartment.
- Page 18 START/PAUSE to pause the washer. NOTE: • If the temperature in the washer is too high, the door cannot be unlocked until the washer has cooled. , If the water level is too high, the door will not unlock. To drain the water, cycle the power off/on, then press the spin speed button without selecting a cycle.
- Page 19 Selects the wash and rin_ temperature combination for the selected cycle, Press the WASH/RINSE button until the indicator light for the desired setting is lit, • Your washer features a heating element to boom the hot water temperature for Extra Hot settings, This provides improved wash performan_ water heater settings.
- Page 20 CONTROL Con_olLock be used. On_ the washer has shut off, the power button will allow the machine to be turned on, but the ccntrols will still be locked. When the controls are locked, °CL" will be displayed alternately with the estimated time remaining.
- Page 21 • Unplug the washer _fore cleaning to avoid the risk of el_tric injury, fire, electrical shock, or death. • Never use harsh chemicals, abrasive cleaners, or solvents to clean the washer. They will damage the finish. REGULAR CLEANING Cleaning the Exterior...
- Page 22 REGULAR CLEANING Cleaning the Dispenser The dispenser should be cleaned periodicafly to remove buildup of detergent and other laund_ products that can cause the dispenser not to dispense the ]aundpj product properly. 1. Pull the dispenser drawer out until it stops. 2.
- Page 23 MAINTENANCE Cleaning the Water Inlet Filters Jfthe washer detects that water is not entering the dispenser, an error message wi]] show on the display. Inletvalve fi_terscreens _uld be plugged by hard water scale, sediment in the water supply, plumbing scale, etc,...
- Page 24 MAINTENANCE (cont.) Cleaning the Drain Pump Filter Your Washer is equipped with a filter that helps prevent ex_ss lintand foreign objects like buttons, keys, and coins from causing damage to the pump. If the washer fails to drain properly, unplug the washer and allow the water to _o], if...
- Page 25 Rattling and clanking noise Check if... I Foreign objects, such as keys, coins, or safety pins, may be I Stop washer and check drum and drain filter for foreign objects. If in drum or pump. Thumping sound Check if...
- Page 26 Were bleach or softener added directly to the wash load in the drum? Washer not unloaded promptly. Clothes not properly sorted, Water in the washer drains slowly or not at all, or the display shows: Cheek if,,, Drain hose is kinked, pinched, or clogged. The drain filter is clogged.
- Page 27 For example, if the washer is paused during the hot wash portion of a sanitary cycle, the interior temperature of the drum will be very hot, so the door will not unlock. This is normal. Allow the washer to coo] until the DOOR LOCK indicator turns off on the display.
- Page 28 Then,. I Close the water Then,,, Allow the washer to stand for 30 minutes to allow the motor to cool; then restart the cycle. If the LE error code persists, call for service. Then,,, If the power to the washer has been interrupted during a cycle, the "PF"...
- Page 29 f wF- One-Year Limited Warranty When installed, o_rated and maintained according to all instructions supplied with the product, if this appliance fails due to a defect in material and workmanship within one year from the date of purchase, call 1-800o4-MY-HOME _ to arrange for free repair. If this appliance is ever used for other than private family purposes, this warranty applies for only 90 days from the date of purchase.