Bunn sure tamp steam Installation & Operating Manual
Hide thumbs
Also See for sure tamp steam:
- Installation & operating manual (11 pages) ,
- Installation & operating manual (16 pages)

Related Manuals for Bunn sure tamp steam


Summary of Contents for Bunn sure tamp steam
- Page 1 SURE TAMP STEAM INSTALLATION & OPERATING GUIDE BUNN-O-MATIC CORPORATION POST OFFICE BOX 3227 SPRINGFIELD, ILLINOIS 62708-3227 PHONE: (217) 529-6601 FAX: (217) 529-6644 45921.0000A 07/13 ©2013 Bunn-O-Matic Corporation...
- Page 2 SPECIFIED HEREIN, TO REPAIR, REPLACEMENT OR REFUND. In no event shall BUNN be liable for any other damage or loss, including, but not limited to, lost profi ts, lost sales, loss of use of equipment, claims of Buyer’s customers, cost of capital, cost of down time, cost of substitute equipment, facilities or services, or any other special, incidental or consequential damages.
-
Page 3: Table Of Contents
U.S.A., you must comply with the applicable #45718.0000 Plumbing /Sanitation Code for your area. #00824.0002 47077.0000A 8/12 ©2012 BUNN-O-MATIC CORPORATION #47077.0000 Warnings • Unplug the machine or turn off the main switch before servicing the interior components of the machine. -
Page 4: Site Requirements
SITE REQUIREMENTS Site Requirements 1. Counter able to support at least 150 pounds (68kg). 2. Counter area able to support machine placement. 3. Minimum clearance of 2˝ around machine. Electrical 1. 208VAC with ground. 2. Dedicated 30A circuit with proper breaker and receptacle. 3. -
Page 5: Installation
INSTALLATION Drain Install 1. Attach the short drain hose to the drip tray fi tting. 2. Slide drip tray onto guide rails on front of machine. 3. Attach other end of drain hose to manifold as shown. 4. Attach long drain hose to back of manifold and route to fl... -
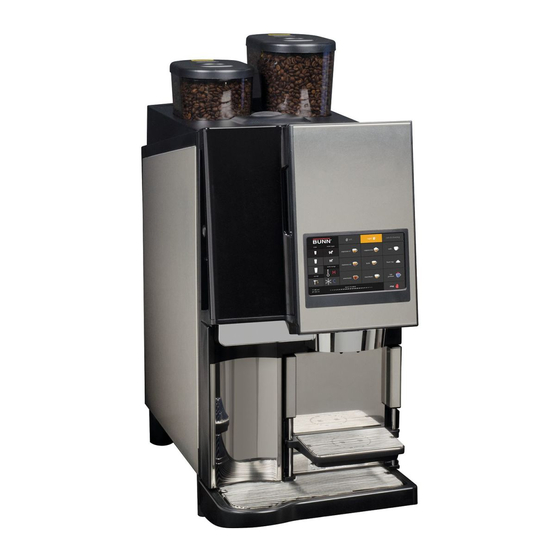
Page 6: Operating Controls
OPERATING CONTROLS 1. Bean hopper: 2. Touch screen display: 3. Dispense nozzles: 4. Small cup shelf: 5. Puck bin: 6. Drip tray: 7. Steam Wand: Start up 1. Pull puck bin out, turn the main switch on, replace puck bin. 2. -
Page 7: Operation
OPERATION DRINK TYPES 1. espresso: x1=single shot; x2=double shot; x3=triple shot. 2. americana regular; americana large. 3. ristretto Select BREWING 1. Select between left or right bean hopper from the tabs on the top of touchscreen. 2. Place appropriate size cup on drip tray or fl ip tray. 3. -
Page 8: Cleaning
RINSING/CLEANING RINSING NOTE 1: – Press the "DAILY CARE" tab to access. Press RINSE. Runs for approx. 2 seconds. NOTE 2: – The milk system has an automatic rinse feature, 5 minutes of idle time after a dispense. And then 2 hours later if still idle. -
Page 9: Menu Options
MENU OPTIONS Press and hold "BUNN" logo to enter "menu options" date and time Set date and time cup count View/reset usage of various beverages View/reset usage of water, grinders, brew machine statistics and cleaning cycles (resettable) View/reset preventive maintenance and reminders water fi... - Page 10 MENU OPTIONS date ( mm/dd/yyyy ) date and time time ( hh/mm/AM ) 1. Press to highlight box. 2. Press arrows to adjust. 3. Press "save" when fi nished. save espresso x1 espresso x2 espresso x3 reset right cup count left americano ristretto...
-
Page 11: Troubleshooting
Troubleshooting PROBLEM PROBABLE CAUSE REMEDY No water Water Lines and valves to the brewer must be open. A) Check the terminal block for 240 volts across the red No power or incorrect voltage to the brewer and black terminals. Brew cycle will not start B) Check circuit breakers or fuses.
Need help?
Do you have a question about the sure tamp steam and is the answer not in the manual?
Questions and answers