Kärcher K 3.92 M Operator's Manual
High pressure washer
Hide thumbs
Also See for K 3.92 M:
- Manual (228 pages) ,
- Operator's manual (60 pages) ,
- Operating instructions manual (20 pages)
Table of Contents
Advertisement
Quick Links
Advertisement
Table of Contents

Related Manuals for Kärcher K 3.92 M


Summary of Contents for Kärcher K 3.92 M
- Page 1 K 3.92 M 5.961-623.0 04/05...
-
Page 2: Table Of Contents
Please arrange for the proper recycling of old ap- Call: 1-800-537-4129 for help or visit pliances. Batteries, oil, and si- our website: www.karcher-usa.com milar substances must not enter the environment. Please dispose of your old appliances using appropriate collection systems. -
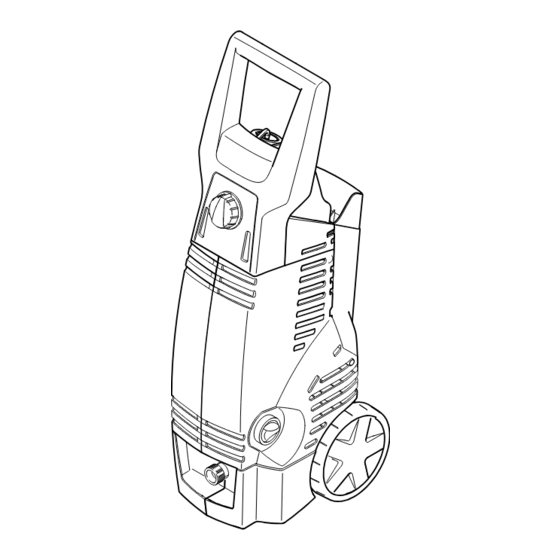
Page 3: Overview
MODEL OVERVIEW 1 Power cord with Ground Fault Circuit 11 On/OFF switch Interrupter (GFCI) 12 Vario Spray wand 2 Trigger gun 13 Dirtblaster® (Rotating spray wand) 3 Trigger gun safety lock 4 High pressure hose CAUTION 5 Water inlet with garden hose con- Follow the maintenance instructions nector specified in the manual... -
Page 4: Important Safety Instructions
IMPORTANT SAFETY INSTRUCTIONS WARNING! physical injuries to the operator and irreversible damage to the machine. When using this product basic To reduce the risk of electrocution, precautions should always be followed, keep all connections dry and off the including the following: ground. -
Page 5: Assembly Instructions
supply. Direct connection via a receiver Ground Fault Circuit Interrupter tank or backflow preventer for example, (GFCI) Protection is permitted. This product is supplied with a Ground Dirt in the feed water will damage the Fault Circuit Interrupter (GFCI) built into unit. -
Page 6: Operating Instructions
the trigger gun (C) to lock the hose in position (D). OPERATING INSTRUCTIONS STEP 1: STEP 4: " " Connect the high pressure hose to Connect garden hose to the cold wa- the unit’s high pressure outlet. ter source and turn water on comple- tely. -
Page 7: Gfci Instructions
GFCI INSTRUCTIONS STEP 1: Plug the Ground Fault Cir- " cuit Interrupter (GFCI) into a working outlet. STEP 2: Press ’’TEST’’, then press " ’’RESET’’ to assure proper connec- tion to power. Note: The actual appearance of the GFCI may be different from this illus- tration. -
Page 8: Working With Detergents
WORKING WITH DETERGENTS Detergents can only be applied at low pressure (Min.). STEP 1: " Install the vario power spray wand. Set the spray wand to the low pres- sure setting (Min.). STEP 2: " Fill the Detergent Tank with the sel- ected Ready To Use detergent. -
Page 9: Shut Down & Clean Up
SHUTTING DOWN & CLEAN-UP STEP 1: " Turn the switch to OFF (0) position and unplug cord from outlet. STEP 5: " Disconnect the high pressure hose from the high pressure outlet. STEP 2: " Turn off the water source. STEP 3: "... -
Page 10: Winterizing And Long-Term Storage10
WINTERIZING AND LONG-TERM STORAGE 1: Disconnect all water connections. freezing temperatures. DO NOT " store near furnace or other sources 2: Turn on the machine for a few se- " of heat as it may dry out the pump conds, until the water which had seals. -
Page 11: Cleaning Tips
CLEANING TIPS Deck Cleaning Cement Patios, Brick and Stone (with or without detergent). Pre-rinse (with or without detergent). Pre-rinse deck and surrounding area with fresh cleaning surface with fresh water. If water. If using Kärcher Deck Wash, ap- using Kärcher Pressure Wash or De- ply to surface at low pressure. - Page 12 When using on surfaces which might Barbecue Grills, Outdoor Power come in contact with food, flush sur- Equipment & Gardening Tools faces with plenty of drinking water. (with or without detergent). Pre-rinse cleaning surface with fresh water. If using Kärcher Pressure Wash or De- greaser, apply detergent at low pressu- re.
-
Page 13: Optional Cleaning Accessories
Excellent for of water out of a standing source, such the application of detergent. A must- as a barrel or bucket. Fits most Karcher have accessory designed for Karcher pressure washers up to 2300 PSI. pressure washers up to 2300 PSI. (bay- Part No. - Page 14 The pipe cleaner pro- back, there is no better solution than pels itself forward while simultaneously Karcher's T-Racer. It saves time by flushing out debris. For example, insert cleaning a 12" wide area gently as it...
-
Page 15: Troubleshooting
TROUBLESHOOTING Disconnect the machine from the power CAUTION source before making any repair. Symptom Cause Solution Motor will not start On/Off switch is in the “OFF” Turn switch to the “ON” (I) (O) position. position Power cord is not plugged in. Plug in power cord. Electrical outlet does not sup- Try a different outlet. - Page 16 Oil Drip. Oil seals are damaged or Call Customer Support. worn. Kärcher Customer Support USA If you encounter any additional difficul- Call: 1-800-537-4129 for help or visit ties not listed, please call for help. our website: www.karcher-usa.com English...
Need help?
Do you have a question about the K 3.92 M and is the answer not in the manual?
Questions and answers