Westinghouse WH4500 Owner's Manual
Hide thumbs
Also See for WH4500:
- Owner's manual (94 pages) ,
- Owner's manual (86 pages) ,
- Owner's manual (92 pages)
Table of Contents
Advertisement
Advertisement
Table of Contents

Related Manuals for Westinghouse WH4500


Summary of Contents for Westinghouse WH4500
-
Page 2: Congratulations On Owning A Westinghouse Generator
Purchase Receipt: (retain your purchase receipt to ensure trouble-free warranty coverage) Product Registration To ensure trouble-free warranty coverage, it is important you register your Westinghouse generator. You can register your generator by either: 1. Filling in the product registration form below and mailing to:... -
Page 4: Table Of Contents
TABLE OF CONTENTS CONGRATULATIONS ON OWNING A WESTINGHOUSE GENERATOR ............3 For Your Records: ............................3 Product Registration .............................3 Product Registration Form ..........................3 SAFETY ..................................7 SAFETY DEFINITIONS ............................7 SAFETY SYMBOL DEFINITIONS ........................7 GENERAL SAFETY RULES ..........................8 SAFETY LABELS AND DECALS ........................10 UNPACKING ................................12 UNPACKING THE GENERATOR ........................12... - Page 5 TABLE OF CONTENTS EMISSIONS CONTROL WARRANTY ........................37 FEDERAL AND/OR CALIFORNIA EMISSION CONTROL WARRANTY STATEMENT ........37 YOUR WARRANTY RIGHTS AND OBLIGATIONS ..................37 MANUFACTURER’S WARRANTY COVERAGE: ..................37 OWNER’S WARRANTY RESPONSIBILITIES: ...................37 DEFECTS WARRANTY REQUIREMENTS ....................37 WARRANTED PARTS: ..........................38 QUESTIONS: ..............................39...
-
Page 6: Safety
SAFETY SAFETY DEFINITIONS SAFETY SYMBOL DEFINITIONS The words DANGER, WARNING, CAUTION and NOTICE are used throughout this manual to highlight important information. Be certain that the meanings of Symbol Description these alerts are known to all who work on or near the equipment. -
Page 7: General Safety Rules
SAFETY GENERAL SAFETY RULES WARNING Gasoline and gasoline vapors are DANGER extremely flammable and explosive Never use the generator in a location under certain conditions. that is wet or damp. Never expose the Always refuel the generator outdoors, generator to rain, snow, water spray or in a well-ventilated area. - Page 8 SAFETY WARNING Never operate the generator if powered items overheat, electrical output drops, there is sparking, flames or smoke coming from the generator, or if the receptacles are damaged. Never use the generator to power medical support equipment. Always remove any tools or other service equipment used during maintenance from the generator before operating.
-
Page 9: Safety Labels And Decals
SAFETY SAFETY LABELS AND DECALS Figure 1... - Page 10 SAFETY Figure 2...
-
Page 11: Unpacking
WHEEL KIT ACCESSORIES Open the Wheel Kit Accessories box and verify the contents against the list below. If any parts are missing, please locate an authorized Westinghouse Generator dealer at www.westpropower.com or call 1-855-WHHELP1 (1-855-944-3571). Figure 3 – Wheel Kit Hardware... -
Page 12: Assembly
ASSEMBLY ASSEMBLY Before assembling the generator, review Safety on page 7 and the following safety messages. CAUTION Never lift the generator without assistance. The generator is heavy and lifting without assistance could result in personal injury. Never use the handles as a lifting point to support the entire weight of the generator. - Page 13 ASSEMBLY 4. Install the mounting feet to the frame using four M6 x 18 mm bolts and M6 locking flange nuts (see Figure 6). Figure 6 – Assemble Mounting Feet to Frame 1 - Mounting Feet 3 - M6 Locking Flange Nuts 2 - M6 x 18 mm Figure 8 –...
-
Page 14: Installing The Battery (Electric Start Generators Only)
ASSEMBLY INSTALLING THE BATTERY (ELECTRIC START GENERATORS ONLY) WARNING To avoid electric shock: ALWAYS connect the positive (+) battery wire (red boot) first when connecting battery wires. ALWAYS disconnect the negative (-) battery wire (black boot) first when disconnecting battery wires. NEVER connect the negative (-) battery wire (black boot) to the positive (+) post on the battery. -
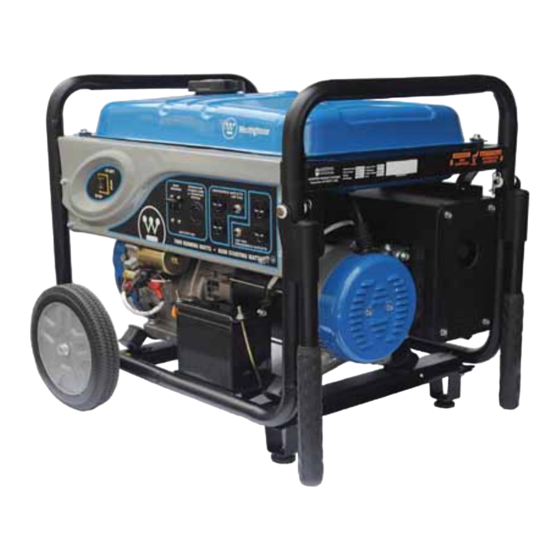
Page 15: Features
FEATURES GENERAL GENERATOR FEATURES Figure 11 1 - Engine Control Switch: Turns the engine on 5 - Battery: For electric start models only. and off. 6 - Oil Fill Plug/Dipstick: Must be removed to 2 - Fuel Cap: Close until clicking sound is heard. add and check oil. - Page 16 FEATURES Figure 12 1 - Fuel Gauge: Indicates fuel level. 5 - Choke Lever: Must be put in the ON position to start the engine and returned to the OFF 2 - Fuel Shutoff Valve: Controls the flow of fuel position once the engine is running.
-
Page 17: Control Panel Features
FEATURES CONTROL PANEL FEATURES Figure 13 – Control Panel Features 1. Engine Control Switch (RUN/STOP for 3. Main Circuit Breaker: The main circuit Manual Start Units): breaker controls total output of all outlets to protect the generator. x RUN - In the RUN position, the switch allows the generator to be started (for 4. -
Page 18: Operation
OPERATION No Connected Loads – Make sure the generator BEFORE STARTING THE has no connected loads before starting it. To ensure GENERATOR there are no connected loads, unplug any electrical extension cords that are plugged into the control panel receptacles. Before starting the generator, review NOTICE Safety on page 7. -
Page 19: Adding / Checking Engine Fluids And Fuel
OPERATION NOTICE WARNING The generator does not contain engine oil as shipped. Be sure the generator is properly Attempting to start the engine without adding connected to earth ground before engine oil can permanently damage internal engine operating. The generator must be components. -
Page 20: Starting The Generator
OPERATION NOTICE CAUTION The engine is equipped with a low oil shutdown Avoid prolonged skin contact with switch. If the oil level becomes low, the engine will gasoline. Avoid prolonged breathing of shut down and will not start until the oil is filled to the gasoline vapors. - Page 21 OPERATION 2. Move the fuel shutoff valve to the ON position (see 4. Push the engine control switch into the RUN Figure 17). position (see Figure 19). Figure 19 – Engine Control Switch 5. Firmly grasp and pull the recoil handle slowly until you feel increased resistance.
-
Page 22: Starting An Electric Start Generator
OPERATION 4. Move the choke lever to the ON position (see Starting an Electric Start Generator Figure 23). 1. Verify the battery is properly installed and both battery cables are attached (see Installing the Battery (Electric Start Generators Only) on page 15). -
Page 23: Stopping The Generator
OPERATION OTE: If the engine fails to start after 5 seconds, release the engine control switch. Let the generator sit idle for 15 seconds and then repeat step 5. If the cranking speed drops after each unsuccessful attempt, then the battery may not be adequately charged. -
Page 24: Maintenance
MAINTENANCE MAINTENANCE CAUTION Before performing maintenance Avoid skin contact with engine oil or on the generator, review Safety on gasoline. Prolonged skin contact with page 7 and the following safety engine oil or gasoline can be harmful. messages. Frequent and prolonged contact with engine oil may cause skin cancer. -
Page 25: Engine Oil Maintenance
MAINTENANCE Table 2: Maintenance Schedule - Authorized Westinghouse Service Dealer Performed After First 20 After 50 Hours After 100 Hours After 300 Hours Maintenance Before Every Hours or First of Use or Every of Use or Every of Use or Every... -
Page 26: Adding Engine Oil
MAINTENANCE Adding Engine Oil 5. Remove the oil drain plug (see Figure 29). Once removed, place the oil drain plug on a clean 1. Always operate or maintain the generator on a flat surface. surface. 2. Stop engine if running. 3. - Page 27 MAINTENANCE 2. Move the generator to a flat, level surface. 6. Pay special attention to the metal backfire plate in the upper left corner of the air cleaner assembly. 3. Turn the release knob at the bottom of the air This metal plate must be in its proper position when cleaner assembly (see Figure 30) counterclockwise installing the foam air filter element (see Figure 32).
-
Page 28: Spark Plug Maintenance
MAINTENANCE 12. Install the air cleaner cover by re-engaging the tabs on the top of the air cleaner assembly and then installing the release knob by turning clockwise (see Figure 33). Figure 34 – Removal of Spark Plug Boot 4. Clean area around the spark plug. 5. -
Page 29: Cleaning The Spark Arrestor
MAINTENANCE 7. Inspect the spark plug for: CLEANING THE SPARK x Cracked or chipped insulator ARRESTOR x Excessive wear Check and clean the spark arrestor after every 100 x Incorrect spark plug gap (outside the acceptable hours of use or 6 months. limit of 0.028 –... -
Page 30: Cleaning The Generator
MAINTENANCE Clean All Alternator Cooling Air Inlets and Exhaust CLEANING THE GENERATOR Ports – Make sure the cooling air inlets and exhaust It is important to inspect and clean the generator before ports of the alternator are free of any debris and every use. -
Page 31: Long-Term Storage
MAINTENANCE Storage Procedure for Greater Than 3 LONG-TERM STORAGE Months WARNING 1. Clean the generator as outlined in Cleaning the Generator on page 31. Never store a generator with fuel in the 2. Drain all gasoline from the fuel tank as best as tank indoors or in a poorly ventilated possible. -
Page 32: Troubleshooting
TROUBLESHOOTING TROUBLESHOOTING WARNING Before attempting to service or troubleshoot the generator, the owner or service technician must first read the owner’s manual and understand and follow all safety instructions. Failure to follow all instructions may result in conditions that can lead to voiding of the EPA certification or product warranty, serious personal injury, property damage or even death. - Page 33 TROUBLESHOOTING PROBLEM POTENTIAL CAUSE SOLUTION Generator is out of fuel. Check fuel level (see page 20). Add fuel if necessary. The low oil shutdown switch Check oil level and add oil if necessary (see pages has stopped the engine. 26 and 27). Generator suddenly stops Too much load Restart the generator and reduce the load.
-
Page 34: Warranty
WESTPRO Westinghouse unit. Should a product difficulty occur, you must, at your expense, deliver or ship your WESTPRO Westinghouse unit to a WESTPRO Authorized Service Dealer for warranty repairs (which must occur within the applicable warranty period), and arrange for pick-up or return of your unit after the repairs have been made. -
Page 35: Non-Warrantable Applications
A PARTICULAR PURPOSE OR USE and any implied warranty of MERCHANTABILITY otherwise applicable to WESTPRO’s Westinghouse line of generators. WESTPRO and its affiliated companies shall not be liable for any special, incidental or consequential damage, including lost profits. There are no warranties extended other than as provided herein. -
Page 36: Emissions Control Warranty
EMISSIONS CONTROL WARRANTY FEDERAL AND/OR CALIFORNIA EMISSION CONTROL WARRANTY STATEMENT YOUR WARRANTY RIGHTS AND OBLIGATIONS Westpro Power Systems, LLC, the United States Environmental Protection Agency (EPA), and, for those products certified for sale in the state of California, the California Air Resources Board (CARB) are pleased to explain the emission (evaporative and/or exhaust) control system (ECS) warranty on your outdoor 2012 and later small off-road spark-ignited engine and equipment(outdoor equipment engine). -
Page 37: Warranted Parts
EMISSIONS CONTROL WARRANTY Subject to certain conditions and exclusions as stated below, the warranty on emission-related parts is as follows: 1. Any warranted part that is not scheduled for replacement as required maintenance in the written instructions supplied, is warranted for the warranty period stated above. If the part fails during the period of warranty coverage, the part will be repaired or replaced by Westpro Power Systems, LLC according to subsection (4) below. -
Page 38: Questions
EMISSIONS CONTROL WARRANTY 3. Ignition System x Spark plug(s) x Magneto ignition system 4. Exhaust System x Catalytic converter x SAI (Reed valve) 5. Miscellaneous Items Used in Above System x Vacuum, temperature, position, time sensitive valves and switches x Connectors and assemblies 6. -
Page 39: Felicitaciones Por Adquirir Un Generador Westinghouse
Recibo de compra: (conserve el recibo de compra para asegurar la cobertura sin problemas de la garantía). Registro del producto: Para asegurar la cobertura sin problemas de la garantía es importante que registre el generador Westinghouse. Puede registralo haciendo lo siguiente: 1. - Page 41 ÍNDICE FELICITACIONES POR ADQUIRIR UN GENERADOR WESTINGHOUSE ............3 Para sus registros: ............................3 Registro del producto: ...........................3 Formulario de registro del producto ......................3 SEGURIDAD ................................7 DEFINICIONES DE SEGURIDAD ........................7 DEFINICIONES DE LOS SÍMBOLOS DE SEGURIDAD ..................7 NORMAS GENERALES DE SEGURIDAD ......................8 ETIQUETAS Y CALCOMANÍAS DE SEGURIDAD ....................10...
- Page 42 ÍNDICE GARANTÍA DE CONTROL DE EMISIONES ......................42 DECLARACIÓN DE GARANTÍA DE CONTROL DE EMISIONES FEDERAL Y/O DE CALIFORNIA ....42 DERECHOS Y OBLIGACIONES QUE LE CORRESPONDEN EN VIRTUD DE LA GARANTÍA ....42 COBERTURA DE LA GARANTÍA DEL FABRICANTE: ................42 RESPONSABILIDADES DEL PROPIETARIO EN RELACIÓN CON LA GARANTÍA: ........42 REQUISITOS DE LA GARANTÍA DE DEFECTOS ..................42 PIEZAS GARANTIZADAS: .........................43 PREGUNTAS: .............................44...
- Page 43 SEGURIDAD DEFINICIONES DE DEFINICIONES DE LOS SEGURIDAD SÍMBOLOS DE SEGURIDAD Las palabras PELIGRO, ADVERTENCIA, Símbolo Descripción PRECAUCIÓN y AVISO se usan a lo largo de este manual para destacar la información importante. Asegúrese de que todo aquel que trabaje con el equipo Símbolo de alerta de seguridad o cerca de él conozca el significado de estas alertas.
-
Page 44: Normas Generales De Seguridad
SEGURIDAD NORMAS GENERALES DE ADVERTENCIA SEGURIDAD La gasolina y los vapores de la gasolina son extremadamente PELIGRO inflamables y explosivos en determinadas condiciones. Nunca use el generador en lugares Siempre debe hacer la recarga mojados o húmedos. Nunca exponga de combustible del generador en el generador a lluvia, nieve, rociado exteriores, en una zona bien ventilada. - Page 45 SEGURIDAD ADVERTENCIA Nunca opere el generador si se sobrecalientan los componentes eléctricos, si cae la salida de energía eléctrica, si salen chispas, llamas o humo del generador, o si los receptáculos están calientes. Nunca use el generador para alimentar equipos de asistencia médica. Siempre retire del generador las herramientas u otros equipos de servicio que se utilicen durante el...
- Page 46 SEGURIDAD ETIQUETAS Y CALCOMANÍAS DE SEGURIDAD Figura 1...
- Page 47 SEGURIDAD Figura 2...
-
Page 48: Caja De Accesorios Del Kit De Las Ruedas
6 - Arandelas de a continuación. Si falta alguna pieza, ubique a un M6 x 18 mm nylon 20 mm DE distribuidor autorizado de Westinghouse Generator en (se usan 6) x 10.5 mm DI (se www.westpropower.com o llame al 1-855-WHHELP1 usan 8) (1-855-944-3571). - Page 49 MONTAJE MONTAJE Antes de ensamblar el generador, revise Seguridad en la página 7 y los siguientes mensajes de seguridad. PRECAUCIÓN Nunca levante el generador sin ayuda. El generador es pesado y levantarlo sin ayuda podría causarle lesiones personales. Nunca utilice las manijas como punto de elevación para sostener todo el peso del generador.
- Page 50 MONTAJE 4. Coloque los pies de montaje al bastidor usando los 8. Coloque la tuerca de brida dentada y apriete (vea cuatro pernos M6 x 18 mm y las contratuercas de la Figura 8). cierre M6 (vea la Figura 6). Figura 6 –...
- Page 51 MONTAJE INSTALACIÓN DE LA BATERÍA (SÓLO PARA GENERADORES CON ARRANQUE ELÉCTRICO) ADVERTENCIA Para evitar descargas eléctricas: SIEMPRE conecte primero el cable positivo (+) (capuchón rojo) de la batería cuando conecte los cables de la batería. SIEMPRE desconecte primero el cable negativo (-) (capuchón negro) de la batería cuando desconecte los cables de la batería.
- Page 52 MONTAJE...
Need help?
Do you have a question about the WH4500 and is the answer not in the manual?
Questions and answers