Table of Contents
Advertisement
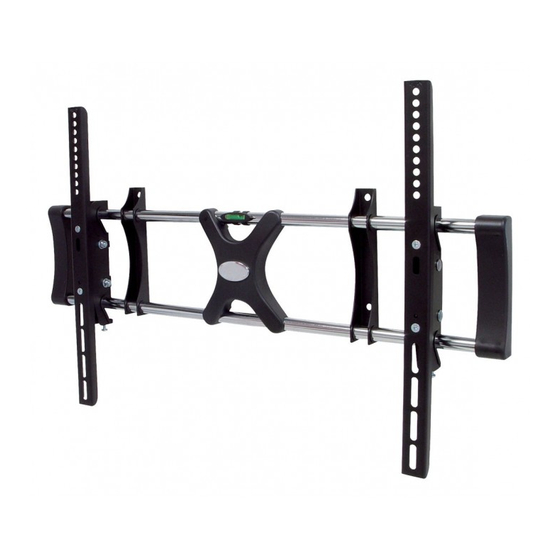
Tilting LCD/Plasma Flat Panel
• Supports most 36" - 63" LCD/Plasma Flat Panels
• Maximum weight capacity: 176 lbs.
• Supports VESA Sizes up to 700X500
This product is intended only to mount a television of the indicated size and weight.
Using this product to mount televisions heavier than the maximum weight capacity can
damage equipment and cause personal injury.
READ THIS FIRST
Read this entire manual! Do not attempt to install this product if you do not understand the
instructions. Contact a qualified mount installer if you have any doubts about a safe and
secure mount installation, or if you are not sure what specific wall materials you are at-
taching this mount to. Check all the parts carefully to make sure there are no missing
or damaged parts. Improper installation may result in damage to your TV, property, and
personal injury.
Wall Mount
Installation Guide
Model: E580TM
• Easy installation
• Low profile
• Built-in level for easy positioning
• Safety bolts lock the TV on the mount
• Easy to adjust tilt angles:
-5 to 15 degrees
Advertisement
Table of Contents

Related Manuals for Etec E580TM


Summary of Contents for Etec E580TM
-
Page 1: Installation Guide
Tilting LCD/Plasma Flat Panel Wall Mount Installation Guide Model: E580TM • Easy installation • Low profile • Built-in level for easy positioning • Safety bolts lock the TV on the mount • Easy to adjust tilt angles: -5 to 15 degrees •... - Page 2 Schoenfeld International Inc. and ETEC USA are not responsible for personal injury or product damage due to mishandling, incorrect mounting, incorrect assembly, or incorrect use of this product.
- Page 3 The actual appearance and quantity of parts may be different than shown in the illustration. Consult the table for actual quantities.
- Page 4 Step 1: Attach the left and right brackets to your TV Do not force the bolts into the mounting holes on your TV. Do not use an electric drill to tight- en these bolts on your TV. This could damage the equipment or cause personal injury. CAUTION: Do not place the TV face down on a hard surface when installing the mounting plate on the TV.
- Page 5 If your television has a curved back and mounting holes are recessed (Fig a), spacers are required. Install the spacers (M) between the display and the bracket as shown in Fig 1b. Then use the se- lected bolts (A-H) and square washers (I) to in- stall the brackets with spacers to the back of the Fig.
- Page 6 Step 3: Attach the wall mount to the wall Find and mark the best position for the wall mount on the wall. The best viewing height is parallel to the eye level of a person sitting on a couch. Normally, this is about 4 feet above floor level.
- Page 7 Wood stud walls (Fig 3b) 1. Use a pencil, awl, or a nail to mark the location of the wall stud centers (Fig 3b) after locating the stud with an electronic stud locator. The distance between marks should not be less than 16 inches (Studs must not be less than 16 inches (40.6 cm).
- Page 8 Step 4: Hang the television display A large television requires two people to lift. Schoenfeld International Inc. and ETEC USA are not responsible for equipment damage or personal injury due to mishandling. Do not release the TV until you are sure that it is securely mounted. Releasing the TV without first ensuring that it is securely installed can result in equipment damage or personal injury.
- Page 9 Step 5: Adjusting the tilt angle This patented design features an unique tilt angle mechanism that can easily be adjusted by just one person. No tools are required for this step. As shown in Fig. 5, grasp the top and bottom of the mounted flat panel and gently pull the top of the flat panel toward you or back to adjust the viewing angle.
- Page 10 LIMITED SIX-YEAR MOUNT WARRANTY ETEC USA warrants this product to be free from defects in material and workmanship for a six-year period after pur- chase. We will repair or replace the unit free of charge should it become defective under this warranty.
- Page 12 Schoenfeld International Inc and ETEC USA 823 Old Settlers Trail Suite 100 Hopkins, Minnesota 55343 ©Schoenfeld International Inc, 2009 PN: E580TM Rev 1.0 February 2009...
Need help?
Do you have a question about the E580TM and is the answer not in the manual?
Questions and answers