
Related Manuals for Strong SRT 4922A


Summary of Contents for Strong SRT 4922A
- Page 1 USER’S MANUAL High Definition Digital Satellite Television Receiver and Recorder [2013.01.04]SRT4922A 매뉴얼_english_AUS.indd 1 2013-01-04 오후 4:49:40...
-
Page 2: Table Of Contents
Contents 1. Introduction - - - - - - - - - - - - - - - - - - - - - - - - - - - - - - - - - - - - - - - - - - - - - - - - - - - - - - - 1.1 Overview - - - - - - - - - - - - - - - - - - - - - - - - - - - - - - - - - - - - - - - - - - - - - - - - - - - - - - - - 3 1.2 Main Features... -
Page 3: Introduction
1. Introduction English 1.1 Overview This satellite receiver is designed for the reception of free-to-air and encrypted channels. Depending on your location, enjoy the rich choice of up to 10,000 different channels broadcasting a large range of programs: culture, sports, cinema, news, events, etc. This receiver is assembled with high quality electronic parts. -
Page 4: Safety Precautions
2. Safety Precautions 2.1 Safety Be sure to read this user’s manual before Do not touch the power cord with wet hands starting the operation of the unit. as it may cause electric shock. Never open the cover. It is very dangerous Place the unit in a well ventilated and to touch the inside of the unit due to possible no-heat environment. -
Page 5: Precautions
2. Safety Precautions English 2.2 Precautions When installing the unit Install the unit horizontally. An uneven Do not put heavy items such as a TV set on installation may cause the unit to be damaged. the unit. That may damage the unit. Do not leave the unit where the water drops Do not put water holding items such as vases or splashes. -
Page 6: Points To Check Before Use
3. Points to Check before Use 3.1 Accessories The accessories below are included with this receiver: User’s manual Remote control Batteries (AAA type) RCA Cable The Satellite dish Your dish should be properly installed and azimuth and elevation must be precisely set up ✽... -
Page 7: Controls/Functions
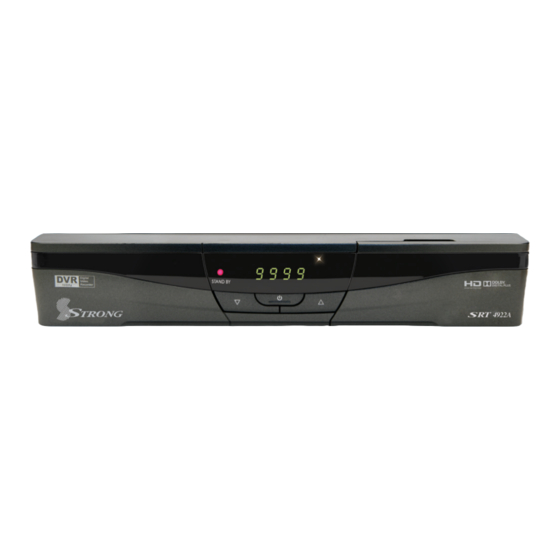
4. Controls/Functions English 4.1 Front Panel ❶ ❸ ❷ ❹ ❻ ❺ ❶ Standby/Power on Indications Lamp: Flashes red light in ‘Standby’ mode and shows no light in ‘Power ON’ mode. ❷ Power: Switches the receiver between ‘Standby’ and ‘Power ON’ modes. ❸... -
Page 8: Rear Panel
4. Controls/Functions 4.2 Rear Panel ❼ ❶ ❷ ❽ ❹ ❺ ❻ ❸ ❿⓫ ❾ Name Connector Function LNB INPUT IEC 169-24 FEMALE IF input from LNB to digital tuner ❶ LOOP OUT IEC 169-24 FEMALE IF loop-through output from digital tuner ❷... -
Page 9: Remote Controller
4. Controls/Functions English 4.3 Remote Controller ❶ POWER: To turn the receiver On/Off ❶ ❷ STAND BY: Just turn the receiver off ❷ ❸ TEXT: To show the teletext contents if ❻ ❸ ❺ teletext is transmitted ❹ ❹ SUBTITLE: To turn closed captions on or off ❺... - Page 10 4. Controls/Functions 4.3 Remote Controller ❶ Vol Up & Down: To change the volume level in non-menu mode ❷ OK: To show the Channel List in nonmenu mode and select an item or confirm in menu mode ❸ Vol Up & Down: To change the volume level in non-menu mode ❹...
-
Page 11: How To Connect
5. How to Connect English When Connecting the Receiver to a TV 1. Connect the TV antenna to TV ANT IN 2. Connect the Video and Audio of the TV to Video and Audio: connect the red and white connectors to Audio R and Audio L, and the yellow connector to Video 3. -
Page 12: Operation
6. Operation Getting Started After your receiver is powered on, proceed with installation as follows : ➊ Menu Language Setting 1. Turn on your TV and receiver. 2. The wizard menu for language selection will appear.<Figure 6.1.1> Select one language and press to proceed. -
Page 13: Antenna Setup
6. Operation English Getting Started ➋ Antenna Setup 1. Press the MENU button to display the main menu. 2. Use to move in the menu. 3. Press OK on ‘Dish Setting’. The following window will appear. <Figure 6.1.2> If you have a motorized dish, press OK on ‘Motorized Setting’. < Figure 6.1.3> ✽... - Page 14 6. Operation Getting Started (When the DiSEqC Motor parameter is set as 1.2 <Figure 6.1.4>) ▪ Satellite: Select any satellite by pressing buttons. ▪ Frequency: Displays the current TP value of the selected satellite. ▪ Move: Move the dish position to west/east by pressing buttons.
- Page 15 6. Operation English Getting Started (When the DiSEqC Motor parameter is set as USALS <Figure 6.1.6>) ▪ Sat Degree: Satellite location. ▪ Antenna Position: Press OK. ▪ Goto Reference: Move the dish to the reference 0 position. ▪ Antenna Longitude: Your longitude at present. ▪...
-
Page 16: Satellite Scan
6. Operation Getting Started ➌ Satellite Scan Through this function, the receiver searches for all the available channels and saves them in memory. ▣ Auto Scan <Figure 6.1.8> 1. Select the satellites you want to search by pressing the OK button on the remote. button and OK button on the remote. - Page 17 6. Operation English Getting Started ▣ Blind Scan <Figure 6.1.10> 1. Select the satellites you want to search by pressing the OK button on the remote. 2. Press to set the “Polarization” and “Scan Mode” options. ▪ TP: Select TP Frequency ▪...
- Page 18 6. Operation Getting Started ▣ Package Identifier (PID) Scan <Figure 6.1.12> 1. Select a transponder. 2. To change a transponder’s information (Frequency, Symbol Rate), use the NUMERIC buttons. 3. To add a new transponder, press the GREEN button. 4. To delete a transponder, press the YELLOW button with the cursor next to the Frequency parameter. 5.
-
Page 19: Channel Selection
6. Operation English Getting Started ➍ Channel Selection You can use / to navigate between channels until you find the channel you want. ▣ If you know the channel number, you can enter it with the NUMERIC buttons and wait 2 seconds until the channel is changed. - Page 20 6. Operation Getting Started ➎ Other Functions of the Remote Control ▣ Volume Control 1. While watching a program, press to control the volume. 2. You can press the MUTE button to remove the sound of the program: the mute icon will be displayed.
- Page 21 6. Operation English Getting Started ▣ Multi Picture Display <Figure 6.1.14> You can press to display multiple pictures; you can choose the number of pictures such as 1X2, 2X2, 2X3 or 3X3. Figure 6.1.14 ▣ ZOOM You can press to zoom in the video. 1.
- Page 22 6. Operation Getting Started ▣ SUBTITLE <Figure 6.1.17> You can press to select the subtitle language of current channel. ▣ SLEEP <Figure 6.1.18> You can set the your receiver to turn off after a few minutes. Press to set the sleep timer. ▪...
-
Page 23: System Setting
6. Operation English 6.2 System Setting ➊ Time Settings This submenu allows you to set your local time, wake up time, wake up channel and sleep time. <Figure 6.2.1> ▪ GMT Usage: Set this ON for the local time to be determined by adjusting the time difference with the GMT (Greenwich Meantime) according to your location. -
Page 24: Osd Settings
6. Operation 6.2 System Setting ➋ A/V Output Settings This submenu allows you to specify the audio/video output. <Figure 6.2.2> ▪ Audio Language: Set the default audio language when selecting a channel. ▪ Subtitle Language: Set the default subtitle language. ▪... -
Page 25: Security Settings
6. Operation English 6.2 System Setting Figure 6.2.3 ➍ Security Settings This submenu allows you to set password options and to lock or unlock access to menus (✽ Note: PIN code and password are the same). <Figure 6.2.4> ▪ Receiver Lock: Set ON to require entering a PIN code at powering on. ▪... -
Page 26: Database Reset
6. Operation 6.2 System Setting Figure 6.2.4 ➎ Database Reset This submenu allows you to restore the factory set values (useful when encountering problems after changing settings). <Figure 6.2.5> ▪ Delete Radio Channels: Erase all radio channels in the database. ▪... - Page 27 6. Operation English 6.2 System Setting ➏ IP Setting If the Network supports DHCP, IP settings can be allocated automatiocally. If the Network does not support DHCP, the Addresses must enter manually(Static IP). <Figure 6.2.6> ▪ DHCP Usage: On/Off to receive IP settings automatically. ▪...
- Page 28 1. Follow these instructions prior to connecting your receiver to your PC: a) Run the PC Tool program (STB Daemon) before connecting to your PC, this can be downloaded from www.strong.com.au b) Click Browser and select a sharing folder on your PC.
- Page 29 6. Operation English 6.2 System Setting c) Press 'OK' then select STB Daemon and the window will be hidden. You can see the icon on bottom right of the window screen. 2. Connect an Ethernet cable from your to your PC. 3.
-
Page 30: Channels
6. Operation 6.3 Channels ➊ Set Favorites This submenu allows you to set up favorite groups of channels. You can select TV or Radio channels in an alternative way by pressing the TV/RADIO button. The receiver supports 16 favorite groups. 1. -
Page 31: Move Channels
6. Operation English 6.3 Channels Figure 6.3.3 ➌ Move Channels This submenu allows you to move channels. You can select TV or Radio channels in an alternative way by pressing the TV/RADIO button. You can choose a channel list group by pressing the GROUP button. 1. -
Page 32: Lock Channels
6. Operation 6.3 Channels ➍ Lock Channels This submenu allows you to lock channels to control access to them. Once a channel is locked, you will be asked to enter a password whenever you try to watch it. You can select TV or Radio channels in an alternative way by pressing the TV/RADIO button. You can choose a channel list group by pressing the GROUP button. -
Page 33: Skip Channels
6. Operation English 6.3 Channels ➎ Skip Channels This submenu allows you to skip channels. Once a channel is set to be skipped, it will be whenever you navigate channels using in non-menu mode. You can select TV or Radio channels in an alternative way by pressing the TV/RADIO button. You can choose a channel list group by pressing the GROUP button. -
Page 34: Delete Channels
6. Operation 6.3 Channels ➏ Delete Channels This submenu allows you to delete channels. You can select TV or Radio channels in an alter- native way by pressing the TV/RADIO button. You can choose a channel list group by pressing the GROUP button. -
Page 35: Add Channels
6. Operation English 6.3 Channels ➐ Add Channels This submenu allows you to add channels. 1. Press on ‘Add Channels’. The following menu will be displayed. <Figure 6.3.8> 2. Press to change the parameter. ▪ Frequency: Select TP Frequency ▪ Channel Name: Press to display Keypad pop-up; Edit a channel’s name ▪... -
Page 36: Electronic Program Guide
6. Operation 6.4 Electronic Program Guide ➊ EPG This submenu allows you to access the electronic program guide when available. 1. Press the GUIDE button to display the guide menu. <Figure 6.4.1> 2. Press to see the previous/next guide. 3. Press to select another channel. - Page 37 6. Operation English 6.4 Electronic Program Guide Figure 6.4.1 Figure 6.4.2 ▪ If you want to record a program in the right side of the screen, you can select a program by using OK. The selected program will be reserved and the evnet color text will change to red. <Figure 6.4.3>.
-
Page 38: Entertainment
6. Operation 6.5 Entertainment ➊ YOUTUBE : To select Youtube movie. 2. OK: To play movie. ▪ Option: To search by Category. Viewed, Time, Location. ▪ Search: To serch by key word. ▪ Next: To move Next page. ▪ Previous: To move previous page. ▪... - Page 39 6. Operation English 6.5 Entertainment ➌ Weather Searching the Weather for City, Country. 1. Press Blue button. 2. Enter the City or Country name. 3. Press EXIT to save and exit the window. ▪ View List: To view the saved list. ▪...
- Page 40 6. Operation 6.5 Entertainment ➎ Calculator This feature allows you to use a calculator <Figure 6.5.6> ▪ Use the Numerical and the arrow buttons on the remote control. Figure 6.5.6 ➎ Calendar Figure 6.5.7 [2013.01.04]SRT4922A 매뉴얼_english_AUS.indd 40 2013-01-04 오후 4:49:58...
-
Page 41: External Device
6. Operation English 6.6 External Device ➊ Disk Manager Use the cursor keys to activate the desired functions from this menu. ▪ Default Disk: If you have additional Storage devices connected to your receiver (i.e. USB HDD) you can select which storage device is to be the default drive for playback and recording. ▪... -
Page 42: File Manager
6. Operation 6.6 External Device ➋ File Manager [Display] 1. BLUE KEY: To preview files. 2. GROUP KEY: To filter files. Figure 6.6.2 Figure 6.6.3 [File Management (Copy, Move, NewFolder, Delete, Rename)] 1. RED KEY: To select files. 2. MENU KEY: To select a function. 3. - Page 43 6. Operation English 6.6 External Device [MP3 Play] , OK in the file list. <Figure 6.6.6> 1. Select the MP3 file you want to play using the Press the EXIT button to hide the file list. Select and option using , OK.
- Page 44 6. Operation 6.6 External Device [JPG View] to select a picture then press OK button to display the selected picture. <Figure 6.6.8> 1. Press 2. Press the EXIT button to hide the file list. Select and option using , OK. <Figure 6.6.9> 3.
- Page 45 6. Operation English 6.6 External Device [VIDEO Play] , OK in the file list.<Figure 6.6.10> 1. Select the video file you want to play using the Figure 6.6.10 Figure 6.6.11 [Update (Firmware, Channel)] 1. Select the software you want to download by using in the menu.
-
Page 46: Timer Manager
6. Operation 6.6 External Device ➌ Timer Manager (Manage Existing or Add Manual Timers for Reserving or Recording of Programs) 1. Press the OK button on the desired timer number to access and modify the timers’ parameters 2. Press the arrow buttons to select timer parameters 3. -
Page 47: System Information
6. Operation English 6.7 System Information Your receiver displays current information <Figure 6.7.1> regarding model name, software version and date of manufacture. This info is useful when downloading new software. Please note if you have performed a software update you must also perform a factory reset of the receiver. -
Page 48: Conditional Access System
6. Operation 6.8 Conditional Access System ➊ Card Initializing To Enjoy CONAX CAS7 scrambled channels, you will need a Smart Card from the service provider (program distributor). If you are subscribing to services from more than one service provider, you will need a Smart Card from each one. Since a Smart Card is connected to a single service provider, a limited range of channels will be available via it. - Page 49 6. Operation English 6.8 Conditional Access System ➋ The Status of the Smart Card 1. You can access detailed information about the Smart Card using the / keys in the Main Menu to select ‘CA’ and pressing OK. <Figure 6.8.2> 2.
-
Page 50: Dvr
6. Operation 6.9 DVR ➊ File List ▣ File Playback , OK. 1. Press to show the file list. Select the file you want to play back by using 2. Press . In the left side of screen, detailed information about the selected file will be displayed. - Page 51 6. Operation English 6.9 DVR ▣ Edit Menu You will be asked to enter a password whenever you try to enter it. Press Menu. The popup menu for selection will appear<Figure 6.9.3>. Select the item that you want to edit, and set its parameters as desired 1.
-
Page 52: Trick Mode
6. Operation 6.9 DVR ➋ Trick Mode You can operate the trick mode while you are playing the recorded files. These functions are available in playback mode or time-shift mode powerfully. ▣ PLAY This button will display a time- banner. If you want to show the play list while playing the file by using ▣... - Page 53 6. Operation English 6.9 DVR ▣ RWD(Rewind) When playing the file, you can press to adjusting the playing speed. <Figure 6.9.6> The speed will change to x2, x4, x8, x16 and x32. ▣ Slow(1/2x, 1/4x) When playing the file, you can press to adjusting the playing speed.
- Page 54 6. Operation 6.9 DVR ▣ Bookmark To mark a specific place in a file for later retrieval. <Figure 6.9.8> ▪ RED: Press this button and red small triangle cursor will be placed at that position. If you want to delete the bookmarked position, press a this button once more when red small triangle cursor appear.
-
Page 55: Instant Recording
The selected program will then appear in red. ▪ Press the EXIT key to return to normal viewing. This program will automatically be recorded by the STRONG DVR. [2013.01.04]SRT4922A 매뉴얼_english_AUS.indd 55 2013-01-04 오후 4:50:08... -
Page 56: Timer Recording
6. Operation 6.9 DVR ➎ Timer Recording This function is availabe when usb device is connected. You can choose a channel to record the Program Guide menu by using (Refer to 6.4 Electric Program Guide, 2)Timer) ✽ Timer Lead In and Lead Out Times ▪... -
Page 57: Troubleshooting
7. Troubleshooting English There may be various reasons for the abnormal operation of the unit. Therefore, if the unit does not work properly, check it according to the procedures shown in the table below: Problem Possible causes Remedy The LED light on the The AC power cord is Connect the power cord properly front panel does not light... -
Page 58: Specifications
8. Specifications System capabilities Fully DVB compliant satellite Connector IEC 169-24, female LNB/Tuner input Frequency range 950MHz ~ 2150MHz Signal level -65dBm ~ -25dBm LNB supply DC 13/18V, max 400mA LNB switch control 22KHz Ver 1.0/1.1/1.2/USALS Compatible DiSEqC Demodulator Front end DVB-S/S2 QPSK, 8PSK, 16APSK, 32APSK Symbol rate DVB-S : 2~45Msps... - Page 59 8. Specifications English Conditional Access Smart Card Reader 1 Slot Interface Power supply Power consumption max 25W Supply voltage AC 100V ~ 250V Supply frequency 50Hz ~ 60Hz Rear Panel Video 1 X RCA cinch connectors Audio L/R 2 X RCA cinch S/PDIF 1 X RCA cinch(Coaxial) HDMI...
- Page 60 STRONG Australia PTY LTD. 60 WEDGEWOOD ROAD, HALLAM, VICTORIA 3803 PH: +61 3 8795 7990 FAX: +61 3 8795 7991 TECHNICAL SUPPORT: 1 800 820 030 www.strong.com.au tech@strong.com.au ©Strong Technologies Pty Ltd., 2012 [2013.01.04]SRT4922A 매뉴얼_english_AUS.indd 60 2013-01-04 오후 4:50:08...
Need help?
Do you have a question about the SRT 4922A and is the answer not in the manual?
Questions and answers
How to restore the program mistakenly deleted from database
You cannot restore a program from the database on the Strong SRT 4922A. The system allows you to delete channels or reset to factory settings, but it does not support restoring individual programs or channels once deleted.
This answer is automatically generated