Table of Contents

Related Manuals for Bissell Yikes!


Summary of Contents for Bissell Yikes!
- Page 1 U S E R ’ S G U I D E 1425 Series Thanks Safety Instructions Product View Product Features Assembly Operation Maintenence and care Troubleshooting Consumer Services Replacement Parts Accessories Warranty...
- Page 2 Services department, so, should you ever have a problem, you’ll receive fast, consid- erate assistance. My great-grandfather invented the floor sweeper in 1876. Today, BISSELL is a global leader in the design, manufacture, and service of high quality homecare products like your Yikes! Compact deep cleaner.
-
Page 3: Important Safety Instructions
3-prong grounded plug. ■ do not use for any purpose other than described ■ SAVE THESE in this User’s Guide. Use only Bissell cleaning products intended ■ INSTRUCTIONS for use in this appliance. Use only manufacturer’s recommended attach- ■... -
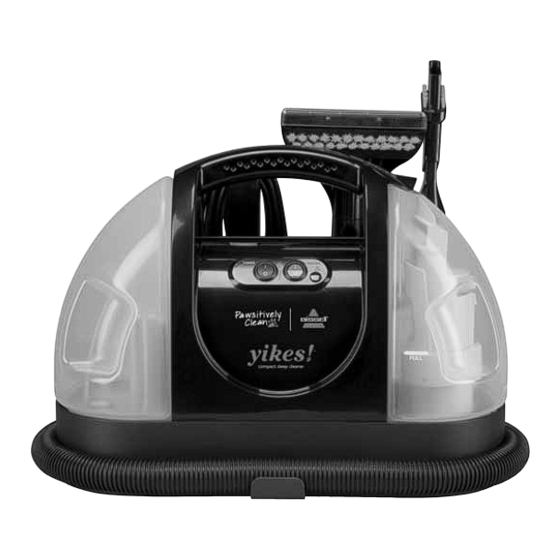
Page 4: Product View
roduct view power Switch Dirty Water tank clean Water tank Built-In Heater Switch Heat Indicator Light flex Hose flex Hose clip Deluxe 2-in-1 4" Stain Brush crevice tool ™ Quick Release cord Wrap power cord flex Hose with Spray trigger 2-in-1 crevice tool holder... -
Page 5: Product Features
Quick Release cord wrap to remove the power cord, gently twist/rotate WaRnInG: the Quick Release cord wrap clockwise Use only BISSELL or BISSELL Power cord pawsitively clean ™ compact machine formula in your cleaner. -
Page 6: Operation
ssembly assembling your yikes! compact deep cleaner is a simple process. the only thing you will need to assemble your cleaner is a phillips head screwdriver. Slide the back plate of the flex hose clip into the opening on the front of the unit. You will hear a “snap” when it is locked in place. Take the flex hose storage bracket and slide the lower plate into the opening on the back of unit. Make sure the screw holes line up. Insert screw and tighten with a screwdriver. Wrap the flex hose around unit and place hose grip into bracket. Turn bracket latch clockwise to lock in place. Slide 2-in-1 crevice tool holder into slit on flex hose storage bracket place tool on clip. peration Getting ready To fill the clean water tank. - Page 7 peration Getting ready (continued) Twist the quick release cord wrap clockwise to unwrap the power cord completely from onboard cord storage and plug into 120 Volt, 60 Hz grounded outlet as described in Important safety Instructions, page 3. Press power switch to ON position. Press the red heater switch to “ON”. Within 30 seconds, the heat indicator light will illuminate, indicating the heater has reached the proper temperature. power Switch Heater Switch Begin by pressing the spray trigger for 5-10 seconds to allow the non-heated water to travel through the heater. Spray trigger Press and hold spray trigger—spray will start in a few seconds. Raise the tool slightly to check for spray. Pre-treating cleaning effectiveness will be enhanced if you pre-treat heavily stained or highly-soiled areas. Here’s how to do it: Hold the cleaning tool just above the surface of the carpet or upholstery to be cleaned. Press the trigger to release a spray of cleaning solution...
-
Page 8: After Cleaning
aintenence and care After cleaning Retainer Lever Turn power switch to OFF position. Unplug power cord from outlet. note: If a significant amount of formula and clean water remains, it is all right to leave it in the clean water tank for your next clean- ing task. Empty and rinse the dirty water tank after each use, OR when dirty water reaches the indicated maximum fill line. To remove the tank, lift up the dirty water tank retainer lever and remove the tank from the unit. -
Page 9: Troubleshooting
BISSELL is happy to be of service. contact us directly at 1-800-237-7691 w w w . b i s s e l l . c o m... - Page 10 Grand Rapids MI 49501 ATTN: Consumer Services Or visit the PawsitivelyClean website - www.pawsitivelycleanpet.com When contacting Bissell, have model number of unit available. please record your model number: ___________________ please record your purchase date: ___________________ notE: please keep your original sales receipt. It provides proof of date of purchase in the event of a warranty claim.
- Page 11 eplacement parts - Item part no. part name 203-7158 Clean Water Tank (includes cap and insert assembly) 2 203-7144 Dirty Water Tank (includes the airstack and float assembly) 3 203-7302 Quick Release Cord Wrap 4 203-7295 2-in-1 Crevice Tool Holder 5 203-7304 Flex Hose Clip 6 203-5014 Cap & Insert Assembly 7 203-7297 Vacuum Flex Hose Storage Bracket (includes screw for assembly) ccessories - Item part no. part name 1 203-6653 4” Stain Brush 2 203-6654 Large Mess Tool 3 203-0116...
-
Page 12: Warranty
Bissell HomecaRe, inc. is noT liaBle FoR incidenTal oR conseQUenTial damaGes oF anY naTURe associaTed WiTH THe Use oF THis pRodUcT. Bissell’s liaBiliTY Will noT eXceed THe pURcHase pRice oF THe pRodUcT. Some states do not allow the exclusion or limitation of incidental or consequential damages, so the above limitation or exclusion may not apply to you.
Need help?
Do you have a question about the Yikes! and is the answer not in the manual?
Questions and answers