Table of Contents
Advertisement
Available languages
Available languages
Use & Care Guide
Manual de Uso y Cuidado
English / Espa_ol
Models/Modelos:
796.6927#,796.7927#
Kenmore Elite
vu
OF
_N
MFL62512818
Sears Brands
Management
Corporation,
Hoffman
Estates,
IL 60179
USA
www.sears.com
www.sears.ca
Protocol P154
Sanitization
Performance
of
Residential
Clothes dryer
Protocolo
P154
Ejecucion de Saneamiento en la
zona residencial Secadoras
Advertisement
Table of Contents

Related Manuals for Kenmore ELITE 796.7927#


Summary of Contents for Kenmore ELITE 796.7927#
- Page 1 Use & Care Guide Manual de Uso y Cuidado English / Espa_ol Models/Modelos: 796.6927#,796.7927# Kenmore Elite MFL62512818 Sears Brands Management Corporation, Hoffman Estates, IL 60179 Sanitization www.sears.com www.sears.ca Residential Ejecucion de Saneamiento en la zona residencial Secadoras Protocol P154 Performance...
-
Page 2: Table Of Contents
Master Protection Agreements Congratulations on making a smart purchase. Your new 3--6 Kenmore <"_ p roduct is designed and manufactured for years of dependable operation. But like all products, it may require preventive maintenance or repair from time to time. That's when having a Master Protection Agreement can save you money and aggravation. -
Page 3: Safety Messages
Flexible venting trap lint. These conditions will obstruct clothes dryer airflow • Do not store or use gasoline or other flammable vapors and liquids in the vicinity of this appliance or any other appliances. • Installation and service must be performed by a qualified supplier. - Page 4 BASIC SAFETY PRECAUTIONS WARNING: To reduce the risk of fire, electric shock, or injury to persons when using this appliance, follow basic precautions, including the following: • Read all instructions before using the dryer • Before use, the dryer must be properly installed as described in this manual •...
-
Page 5: Safety Instructions
SAFETY INSTRUCTIONS ,& WARNING: To reduce the risk of fire, electric shock, or injury to persons when using this appliance, follow basic precautions, including the following: • Properly ground dryer to conform with all governing codes and ordinances. Followdetails in the installation instructions. - Page 6 SAFETY INSTRUCTIONS WARNING" To reduce the risk of fire, electric shock, or injury to persons when using this appliance, follow basic precautions, including the following: • Do not open the dryer door during steam cycles. Failure to follow these instructions can result in a burn hazard.
-
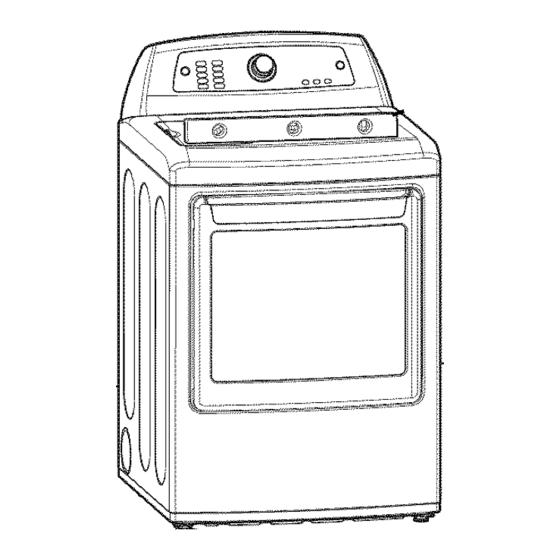
Page 7: Key Parts And Components
KEY PARTS AND COMPONENTS There are several important components that are referenced in this manual. EASY-TO-USE CONTROL PANEL Rotate the Cycle Selector Knob to select the desired dry cycle. Add cycle options or adjust settings with the touch of a button. TIME AND STATUS DISPLAY The easy-to-read LED display shows cycle status and estimated time remaining. -
Page 8: Key Dimensions And Specifications
KEY DIMENSIONS AND SPECIFICATIONS Description Dryer (Gas and Electric) Electrical Requirements Please refer to the rating label. Gas Requirements* Natural: 6-8 inches WC Gas Requirements* Propane: 10-13 inches WC Dimensions 27" (W) X 28 154 6" (D) X 45" (H), 50 1/4" (D With door open) 68.60m (W) X 73.4 cm (D) X 114.10m (H), 127.5 cm (D With door open) Net Weight Electric : 147 lb. -
Page 9: Optional Accessories
OPTIONAL ACCESSORIES Use the side vent kit for venting directly on either side or on the bottom. Kit # D26-49670 NOTE: Gas dryers can not be vented to the right Use the LP CONVERSION KIT for changing the dryer gas connections from Natural Gas (NG) to Liquefied... -
Page 10: Gas Requirements
GAS REQUIREMENTS (GAS MODELS ONLY) CONNECTING GAS DRYERS ,A WARNING" To reduce the risk of fire, electric shock, or injury to persons when using this appliance, follow basic precautions, including the following: • Gas supply requirements: As shipped from the factory, this dryer is configured for use with (NG) natural gas. - Page 11 CONNECTING GAS DRYERS ,& WA RN IN k._" To reduce the risk of fire, electric shock, or injury to persons when using this appliance, follow basic precautions, including the following: • Installation and service must be performed qualified installer, service agency, or the gas supplier.
-
Page 12: Electrical Requirements
ELECTRICAL REQUIREMENTS CONNECTING ELECTRIC DRYERS ,A WARNING: To help prevent fire, electric shock, serious injury, or death, the wiring and grounding must conform to the latest edition of the National Electrical Code, ANSI/NFPA 70 and all applicable local regulations. Please contact a quali- fied electrician to check your home's wiring and fuses to ensure that your home has adequate elec- trical power to operate the dryer. - Page 13 CONNECTING ELECTRIC CONNECTING ELECTRIC DRYERS ,A WARNING . Connect the power cord to the terminal Each colored wire should be connected color screw. Wire color indicated on manual is con- nected to the same color screw in block. Failure to follow these instructions may result in a short or overload.
-
Page 14: Venting The Dryer
VENTING THE DRYER CHECK YOUR EXHAUST PROBLEMS The most common cause of dryer problems is poor exhaust venting. Before you install your new dryer, check the items listed below to make sure you get the best possible performance. This can save you time and money by reducing cycle times and increasing energy efficiency. - Page 15 In the United States, only those foil-type flexible ducts, if any, specifically identified for use with the appliance by the manufacturer and that comply with the Outline for Clothes Dryer Transition Duct, Subject 2158A, shall be used. ,dk WARNING...
-
Page 16: Leveling The Dryer
LEVELING THE DRYER ,A WARNING • Wear gloves during installation. • Failure to follow these instructions can result in injury. • The appliances are heavy. Two or more people are required when installing the dryer. There is a risk of serious back injury or other injuries. To ensure that the dryer provides optimal drying performance, it must be level. -
Page 17: Reversing The Door
_REVERSING THE DOOR ,A WARNING: THE DRYER DOOR IS VERY LARGE AND HEAVY. Failure to follow the instructions below can result in damage to the dryer, property damage or personal injury. O Open the door and remove the two plastic hole caps on the catch side by gently prying up with a flat blade screwdriver. -
Page 18: Final Installation Check
FINAL INSTALLATION Once you have completed the installation of the dryer and it is in its final location, confirm proper operation with the following steps and tests. O Is gas turned ON? (Gas Models only) O Is dryer plugged in? Dryer should always be plugged into the proper outlet. -
Page 19: Important Safety Instructions
WARNING" To reduce the risk of fire, electric manual, including the Important Safety Instructions, before operating this dryer. CONTROL PANEL FEATURES POWER (On/Off) BUTTON Press to turn the dryer ON. Press again to turn the dryer OFF. NOTE: Pressing the Power button during a cycle will cancel that cycle and any load settings will be lost. -
Page 20: Operating The Dryer
OPERATING THE DRYER POWER Normal Bulky/Bedding Casual HeClvy Du_y Towels Sanitize _:bgt _r_ _÷f_ START/PAUSE CLEAN THE LINT FILTER If the lint filter has not already been cleaned, lift out the filter and remove the lint from the last load. This will help ensure mance. -
Page 21: Cycle Guide
CYCLE GUIDE The cycle guide below shows the options and recommended fabric types for each cycle. = available option * Note • This is the default time and actual time will vary depending on the size of the load and moisture content. Comforter,shirts,Trousers Steam Refresh 1 - 5 garments (DO NOT... -
Page 22: Sorting Loads
,A WARNING" To reduce the risk of fire, electric shock, or injury to persons, read this entire manual, includ- ing the Important Safety Instructions, before operating this dryer. SORTING LOADS Fabric Care Labels Most articles of clothing feature fabric care labels that include instructions for proper care. -
Page 23: Time And Status Display
TIME AND STATUS DISPLAY The Time and Status Display shows the estimated time remaining, cycle progress, and vent status. When the dryer is turned on, the display will illuminate. MoreTime _ -MyCyc_e_l Less Time Wrinkle Guard POWER ESTIMATED TIME REMAINING When a cycle is selected, the display will indicate the default time for that cycle. -
Page 24: Cycle Modifier Buttons
CYCLE MODIFIER BUTTONS Each cycle has default settings that are selected automatically. You may also customize some of these settings using the cycle modifier buttons. AUTO DRY cycles are designed to properly care for specif- ic fabrics and loads. As a result, not all settings are avail- able for each cycle selection. -
Page 25: Cycle Options And Special Features
CYCLE OPTIONS Your dryer features several additional cycle options and special features to meet your individual needs. features, see the following pages. STEAM FEATURES All steam functions are described on pages 26-27. To Add Cycle Options to a Cycle: OTum on the dryer. OTurn the Cycle Selector Knob to select the desired cycle. -
Page 26: Steam Functions
STEAM FUNCTIONS ,A WARNING: • Do not open the dryer door during Steam Cycles. Steam can cause severe burns. • Do not fill the steam feeder with gasoline, dry- cleaning solvents, or other flammable or explosive substances.They give off vapors that could explode. -
Page 27: To Fill The Steam Feeder
STEAM FUNCTIONS To Fill the Steam Feeder O Pull out the drawer. O Slide the lever forward to the OPEN position and lift out the steam feeder. IMPORTANT NOTES ABOUT Before using a Steam Cycle, the steam feeder must be filled with water up to the filter screen. -
Page 28: Regular Cleaning
,A WARNING" To reduce the risk of fire, electric shock, or injury to persons when using this appliance, follow basic precautions, including the following: • Unplug the dryer before cleaning to avoid the risk of electric shock. Failure to follow this warning can cause serious injury, fire, electrical shock, or death. -
Page 29: For Service
BEFORE CALLING CHECK VENT INDICATOR Check if... • This warning light is not a dryer failure and is not covered by the dryer warranty. Contact a duct cleaning service to set up an appointment to have your exhaust system cleaned and inspected. Vent duct is crushed behind the dryer Ductwork is too long or has too many turns/restric- tions. - Page 30 BEFORE CALLING Drying time is not consistent Check if... Heat settings, load size, or dampness of clothing is not consistent. Clothes take too long to dry Check if... Exhaust ducts blocked, dirty, or duct run is too long. Load is not properly sorted. Large load of heavy fabrics.
- Page 31 BEFORE CALLING Clothes are wrinkled Check if... Clothes dried too long (overdried). Clothes left in dryer too long after cycle ends. Clothes are shrinking Check if... Garment care instructions are not being followed. Display shows error code tEl or tE2 Check if...
-
Page 32: Before Calling For Service
BEFORE CALLING Steam Features Not Working Check if... Steam is not generated and no error code is displayed Garments are still wrinkled at the end of the STEAM REFRESH cycle. There are no creases in garments after the STEAM REFRESH cycle is used. Water drips from the door during steam cycles. -
Page 33: Optional Accessories
OPTIONAL ACCESSORIES Use the side vent kit for venting directly side or on the bottom. Kit # D26-49670 NOTE: Gas dryers can not be vented on either to the right Use the LP CONVERSION for changing the dryer gas connections from Natural Gas (NG) to Liquefied Propane Gas... -
Page 34: Side Venting Kit Installation
SIDE VENTING List of Parts The following parts are included with the pedestal. • Duct Outlet (A) (blower - elbow) • Duct Elbow • Duct Outlet (B) (elbow - outlet) • Cover Plate • Installation Instruction • Screw Tools Needed The following tools are needed for installation. -
Page 35: Warranty
One-Year Limited Warranty When installed, operated and maintained according to all instructions supplied with the product, if this appliance fails due to a defect in material and workmanship within one year from the date of purchase, call 1-800-4-MY-HOME C'_ to arrange for free repair. If this appliance is ever used for other than private family purposes, this warranty applies for only 90 days from the date of purchase. - Page 38 Para solicitar la instalaci6n instalaci6n de apertura y otros electrodomesticos al 1-800-4-MY-HOME_L maestro de proteccion por realizar una compra inteligente. Su nuevo Kenmore _"_' ha sido dise_ado y fabricado para aSos de funcionamiento fiable. Pero, como puede necesitar un mantenimiento o reparaciones puntuales.
-
Page 39: Antes De Usar
LSA TODAS LA INSTRUCCIONSS este manual para minimizar el riesgo de incendio o explosi6n, da_os a la propiedad, lesiones personales o muerte. Su Seguridad y la de los dem; s son de suma importancia. En este manual yen su electrodom_stico con todos los mensajes de seguridad. -
Page 40: Ley Ejecutiva Para La Seguridad Del Agua Potable Y Los Toxicos De California (California Safe Drinking Water And Toxic Enforcement Act)
Precauciones basicas de seguridad ADVERTENClA: minimizar el riesgo de incendio o explosion, descarga electrica, o para prevenir da_os a la propiedad, lesiones personales o muerte. • Lea todas las instrucciones antes de usar la secadora. • Antes de usar, la secadora debe estar correctamente instalada como se describe en este manual. - Page 41 INSTRUCCIONES IMPORTANTE ADVERTENClA: electrodomestico, siga las precauciones • Conecte la secadora adecuadamente a tierra segun todos los c0digos y las regulaciones vigentes. 5iga los detalles en las instrucciones de instalaci0n. Si la secadora no se encuentra adecuadamente conectada a tierra se pueden producir descargas electricas. •...
- Page 42 INSTRUCCIONES DE SEGURIDAD ,A ADVERTENCIA: cuando utilice este artefacto, deben seguirse precauciones basicas de seguridad, •No abra la puerta de la secadora durante los ciclos de vapor. No seguir estas instrucciones puede provocar un peligro de quemaduras. • No seque articulos que previamente se hayan limpiado, lavado, sumergido o manchado con gasolina, solventes para limpieza en seco u otras sustancias...
- Page 43 PIEZAS Y COMPONENTES Existen varios componentes importantes a los que se hace referencia en este manual. PANEL DE CONTROL Gire el mando selector de ciclo para seleccionar el ciclo de secado que desee. ASada opciones de ciclo o ajuste los valores tocando un bot6n. PANTALLA DE TIEMPO La pantalla LED de f&cil lectura muestra el estado...
- Page 44 DIMENSIONES Y ESPECIFICACIONES Descripci6n Requerimientos el_ctricos Requerimientos de gas* NG: Requerimientos de gas* LP: Dimensiones Peso neto Capacidad de secado *$61o modelos de gas. REQUISITOS DE UBICACION IMPORTANTE: Lea pot competo todas las instrucciones de instalaci6n antes de instalar y poner en funcionamiento su secadora! Es importante que revise pot completo este manual antes de instalar y...
- Page 45 ACCESORIOS Utilice el kit de ventilacion lateral para ventilar directamente desde cualquiera de los lados o desde la base. Kit # D26-49670 NOTA: No esta disponible ventilacion lateral en los modelos a. OPCIONALES Utilice el KIT DE ADAPTACION para cambiar conexiones de gas de la secadora...
- Page 46 REQUERIMIENTOS CONEXION DE LAS SECADORAS ADVERTENCIA: a incendio, descargas electricas o lesiones a terceros durante el uso de este electrodomestico, siga las precauciones b_.sicas de seguridad, incluidas las expuestas a continuaci6n: • Requerimientos del suministro de gas: Esta secadora viene confi.gurada de fabrica para utilizar gas natural (NG) Esta puede adaptarse para que utihce gas LP (propano licuado) gas no debe sobrepasar las 8 pulgadas de columna...
- Page 47 CONEXION DE LAS SECADORAS ADVERTENCIA: descargas el_ctricas o lesiones a terceros durante el uso de este electrodom_stico siga las precauciones nc u das as expues_as a cont nuac 6n: • La instalacion y mantenimiento instalador cualificado, empresa de servicios o el distribuidor de gas.No hacerlo podr[a conllevar ries- gos de explosi6n, incendio o, incluso, peligro de muerte.
- Page 48 REQUERIMIENTOS CONEXION DE LAS SECADORAS DE ELI_CTRICAS ADVERTENCIA incendios, descargas electricas, lesiones graves o incluso la muerte, el cableado y la puesta a tierra deben cumplir la edici6n m_.s reciente del National Electrical Code, ANSI/NFPA 70 y todas las normativas locales de aplicaci6n.
- Page 49 CONEXION DE LAS SECADORAS ,A ADVERTENCIA oConectar el cable de alimentacion al bloque de ter- minales. Cada cable de un color en concreto debe El cable del color indicado en el manual esta conectado al tornillo del mismo color en el bloque. No acatar estas instrucciones tocircuitos o sobrecarga.
- Page 50 VENTILACION COMPRUEBE LA EXISTENCIA DE PROBLEMAS EN SU SISTEMA DE EVACUACION La causa mas habitual de problemas lar su nueva secadora, compruebe los elementos enumerados a continuaci6n ble. Hacerlo puede ahorrarle tiempo y dinero al reducir los ciclos y aumentar la eficacia energ_tica. O CONDUCTOS DE EVACUACION SUClOS O DANADOS.
- Page 51 Estados Unidos, s61o deben utilizarse conductos flexibles tipo aluminio identificados especificamente con este electrodom_stico pot el propio fabricante y que cumplan la normativa Clothes Dryer Transition Duct, Subject 2158A. ADVERTENCIA: ces tendrA como resultado un rendimiento deficiente, fallos del producto y/o podria producir incendios o riesgo de muerte.
- Page 52 NIVELACION DE LA SECADORA ADVERTENCIA • Utilice guantes durante la instalaci6n. • No acatar estas instrucciones lesiones fisicas. Para asegurarse de obtener un rendimiento 6ptimo de la secadora, debe estar nivelada. Para minimizar la vibraci6n, ruidos y movimientos no deseados, la superfi- cie del suelo debe set firme y estar nivelada.
- Page 53 _INVERSION DE LA PUERTA ADVERTENCIA LA PUERTA DE LA SECADORA pueden producir daSos en la secadora, a la propiedad, o bien lesiones personales. Cubierta de _J / agujero O Abra la puerta y retire las dos cubiertas de plfistico que cubren el agujero en la zona de sujeci6n;...
- Page 54 COMPROBACION Una vez completa la instalaci6n y ubicada en su posici6n final, compruebe que la secadora funciona correctamente realizando los siguientes pasos y pruebas. O _,Esta ABIERTO el gas? (S61o modelos de gas) O _,Esta enchufada la secadora? La secadora debe estar siempre enchufada a una toma de pared adecuada.
- Page 55 4k ADVE RTEN C IA: Para reducir el fisicas, lea completamente antes de porter en funcionamiento FUNCIONES DEL PANEL DE CONTROL r More Time_ My Cycle [ iels-Time- _ Wri----nkl--;Guar---d _ Easy iron Static Shield - IDa_p-_yiign a- i] -Ch_m e- [-D_umLight ControlLoc BOTON POWER...
- Page 56 FUNCIONAMIENTO __*Ill' POWER Normal Bulky/Bedding Heavy Duty Towels Sanitize START/PAUSE DE LA SECADORA LIMPIAR EL FILTRO DE PELUSAS Si ann no ha limpiado el filtro de pelusas, extr&igalo y elimine las pelusas procedentes de la _ltima carga. Esto le ayudar& a asegurarse un funcionamiento r&pido y eficiente de secado.
- Page 57 GUJA DE CICLOS La siguiente gufa de ciclos muestra las opcionesy los tipos de tejidos recomendados para ¢ada ciclo. = opci6n disponible * Nota : El tiempo predeterminado y real variar_.ndependiendo del tama_o de la ¢arga y su contenido de humedad. ,"...
-
Page 58: Carga De La Secadora
ADVERTENCIA: pletamente este manual, incluyendo las instrucciones importantes de seguridad, antes de poner en funcionamiento esta secadora. CLASIFICACION Etiquetas de prendas delicadas La mayoria de las etiquetas de las prendas incluyen instrucciones para sus cuidados especificos. Secadoa ro--_ mfquina Sec0 Normal Suave"m"... - Page 59 PANTALLA DE TIEMPO Y ESTADO La pantalla de tiempo y estado muestra el tiempo restante estimado, el proceso del ciclo y el estado de ventilaci6n. AI encender la secadora, la pantalla se iluminarA. MoreTime MyCycle Less Time _j[ Wrlnkle Guard Easy Iron Statlc Shield...
- Page 60 BOTONES MODIFICADORES Cada ciclo dispone de ajustes predeterminados que son seleccionados autom_.ticamente. Tambien puede personalizar estos ajustes utilizando los botones modificadores de ciclo. Los ciclos de SECADO POR SENSOR est_.n dise_ados para el cuidado especffico de ciertos tejidos y cargas. Por Io tanto, no todos los ajustes est_.n disponibles para todos los ciclos.
-
Page 61: Wrinkle Guard (Anti-Arrugas)
OPCIONES DEL ClCLO Su secadora dispone de opciones de ciclo adicionales de varias funciones, asi como de funciones especiales para adaptarse a sus necesidades particulares. FUNCIONES DE VAPOR Todas las funciones de vapor estan descritas en las pAginas 62 ~ 63. Para a_adir opciones a un cicIo: 0 Encienda la secadora. -
Page 62: Acerca Del Vapor
FUNCIONES DE VAPOR ADVERTENCIA: • No abra la puerta de la secadora durante los ciclos de vapor. El vapor puede provocar quemaduras graves. • No rellene el alimentador de vapor con gasolina, dis- olventes de limpieza en s.eco u otras sustancias inflamables o explosivas.Estas que podrian explotar. -
Page 63: Funciones De Vapor
FUNCIONES DE VAPOR Para rellenar el alimentador 0 Tire del compartimento. 0 Extraiga el alimentador de vapor. NOTAS IMPORTANTES ACERCA Antes de utilizar un ciclo de vapor, el alimentador de vapor debe rellenarse con agua hasta la linea de nivel MAX. Si no Io hace, parpadeara el indicador ADD WATER (afiadir agua). Asegurese de que el alimentador de vapor este Ileno de agua y su compartimento por completo. -
Page 64: Limpieza Regular
ADVERTENCIA: durante el uso de este electrodom_stico, continuaci6n: • Desenchufe la secadora antes de proceder a su limpieza para evitar riesgos de descarga electrica. No acatar estas advertencias puede provocar lesiones graves, incendios, descargas el_ctricas o, incluso, peligro de muerte. •... -
Page 65: Antes De Solicitar
ANTES DE SOLICITAR COMPRUEBE SI EL INDICADOR Compruebe si... El conducto tiene demasiada Iongitud o demasiados cambios de direcci6n/restricciones. Existen bloqueos en el conducto poracumulaciones de pelusas u otros productos extrafios. La secadora no se enciende Compruebe si... El cable de alimentaci6n no esta enchufado de forma adecuada. - Page 66 ANTES DE SOLICITAR El tiempo de secado no es consistente Compruebe si... Los ajustes de calor, tamafio de la carga o humedad en las prendas no son consistentes. Las prendas tardan mucho en secarse Compruebe si... Existen conductos de ventilaci6n bloqueados, sucios o de Iongitud excesiva.
- Page 67 ANTES DE SOLICITAR Las prendas estan arrugadas Compruebe si... Las prendas estan secAndose demasiado tiempo (secadas en exceso). Las prendas han permanecido en la secadora demasiado tiempo una vez terminado el ciclo. Las prendas han encogido Compruebe si... Las instrucciones para el cuidado de las prendas no se han tenido en cuenta.
- Page 68 ANTES DE SOLICITAR Las funciones de vapor no estan operativas Compruebe si... No se genera vapor y la pantalla no muestra c6digos de error. Las prendas siguen estando arrugadas al terminar el ciclo STEAM REFRESH (refresco por vapor). No existen arrugas en las prendas tras utilizar el ciclo STEAM REFRESH.
- Page 69 ACCESORIOS OPCIONALES Utilice el kit de ventilacion lateral para ventilar directamente desde cualquiera de los lados o desde la base. Kit # D26-49670 NOTA: No esta disponible ventilacion lateral en los modelos Utilice el KIT DE ADAPTACION para cambiar conexiones de gas de la secadora de Gas natural...
- Page 70 INSTALACION Listado de piezas Las siguientes piezas estan incluidas con el pedestal. • Salida del conducto (A) (ventilador - codo) • Codo del conducto • Salida del conducto (B) (codo - salida) • Tapa de cubierta • Instrucciones de instalaci6n •...
- Page 71 Garantia limitada de un a_o Si, tras ser instalado, operado y mantenido segun todas las instrucciones electrodomestico sufriera averias debidas a defectos de material y mano de obra, dentro del periodo de un a_o desde la fecha de compra, Ilame al 1-800-4-MY-HOME *_para su reparacion gratuita. Si este electrodomestico fuera utilizado con fines distintos a los domesticos, able durante 90 dias desde la fecha de compra.
- Page 72 For troubleshooting, For repair - in your home - of all major brand appliances, lawn and garden equipment, no matter who made it, no matter who sold it! For the replacement owner's manuals that you need to do-it-yourself. For Sears professional and items like garage door openers and water heaters.
Need help?
Do you have a question about the ELITE 796.7927# and is the answer not in the manual?
Questions and answers
Where is the fuse and heating element located