Table of Contents
Advertisement
Quick Links
Advertisement
Table of Contents

Related Manuals for Lab.gruppen LUCIA Series


Summary of Contents for Lab.gruppen LUCIA Series
- Page 1 LUCIA® Compact installation amplifiers Operation Manual...
-
Page 2: Important Safety Instructions
1. Important safety instructions 1. Important safety instructions Before using your LUCIA Series amplifier, be sure to carefully read the applicable items of this Operation Manual and the Safety Instructions. 2. Approvals Read these instructions. Keep these instructions Heed all warnings. -
Page 3: Warnings
3. Warnings 3.2 Warnings 3.3 User responsibility 3.1.1 Mains connection grounding To reduce risk of fi re or electric shock, do not expose this apparatus to rain or moisture. Your amplifi er must be connected to a grounded socket outlet. Français: Pour réduire les risques d’incendie ou de choc électrique, n’exposez pas l’appareil à... -
Page 4: Table Of Contents
5.3. Additional features on LUCIA 120/2M and 240/2M only 6. Unpacking and visual checks 7. Installation 7.1. Wall mounting 7.2. Rack shelf mounting 7.3. Lab.gruppen rack shelf kit 8. Cooling and fan operation 9. Operating voltage 10. Grounding 11. Front panel 12. - Page 5 4. Table of Contents 14. LUCIA application browser 14.1. Introduction 14.2. Software download and installation 14.3. Overview 14.4. Factory presets 14.5. Application presets: Selection and custom configuration 14.5.1. Configuration in application view 14.5.2 Configuration in block diagram view 14.5.2.1. Input block 14.5.2.2.
-
Page 6: Introduction
All LUCIA amplifiers incorporate a digital, firmware-controlled front end coupled to a robust, durable and highly efficient Lab.gruppen output stage, all of which make it the best sounding compact amplifier in its category. LUCIA amplifiers install quickly and easily, with the supplied wall-mount bracket enabling discreet on-wall placement behind video displays. -
Page 7: Unpacking And Visual Checks
10-20 mm after mounting. 7.3. Lab.gruppen rack shelf kit A special dedicated rack mount shelf designed to hold two LUCIA amplifiers is available from Lab.gruppen as an accessory. It includes all necessary accessories, screws, and mounting instructions. -
Page 8: Cooling And Fan Operation
8. Cooling and fan operation 8. Cooling and fan operation Ensure that there is sufficient open space on at least two ventilating surfaces (top, bottom, front and rear) of the amplifiers to allow for free air flow. Please refer to the Thermal Dissipation Chart (Section 15.4) when installing large numbers of amplifiers in air conditioned spaces. -
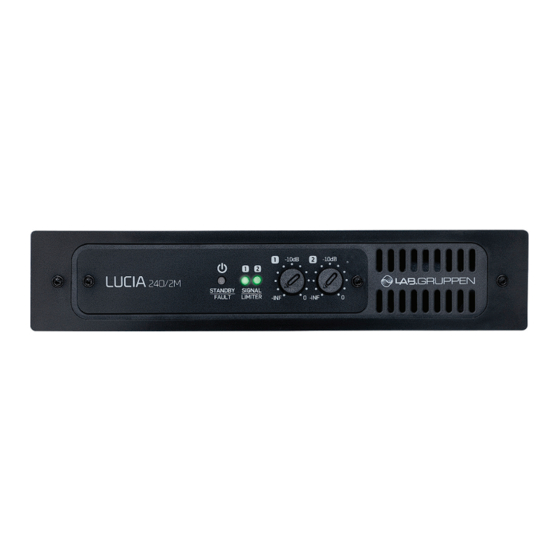
Page 9: Front Panel
11. Front panel 11. Front panel The front panel presents the following amplifier status indicators: 1 Standby/On LED indicator – A three-color LED illuminates amber when amplifier is in standby power mode and illuminates green when the amplifier is on. When the amplifier enters Protection Mode, the LED flashes red and the speaker outputs are muted. -
Page 10: Rear Panel
12. Rear panel 12. Rear panel The following features (1-7) are located on the rear panel of all LUCIA amplifiers: 1 Balanced audio inputs (1 & 2) – Connect balanced inputs using 3-pole Euroblock connectors. Correct polarity (+, -) and ground terminations are shown on the rear panel. Observe polarity to avoid low frequency cancellation loss, especially if mixing to mono in in the matrix. -
Page 11: Set-Up And Operation
13. Set-up and operation 13. Set-up and operation 13.1. Auto standby / Power-up LUCIA amplifiers do not have a power switch. The amplifier will turn on automatically when AC power is connected to the unit; it will go into standby mode if no signal is present at any input for 20 minutes. When in standby, the amplifier will power up in 0.9 seconds when a signal above the preset threshold (-54 dBu default) is present at any channel input. -
Page 12: Protection Mode
14.2. Software download and installation The LUCIA Application Browser software is available for free download from the Support section of the Lab.gruppen web site. Select Software & Firmware from the left-hand menu. You must be registered to access the download pages. -
Page 13: Overview
14. LUCIA application browser 14.3. Overview The LUCIA Application Browser opens to a single main window. All device confi guration is accomplished using this one view. The window is divided into three columns: Application Selector column – The left-hand column lists all application presets currently available for downloading to LUCIA devices. -
Page 14: Application Presets: Selection And Custom Configuration
14. LUCIA application browser 14.5. Application presets: Selection and custom confi guration 14.5.1. Confi guration in application view Select the factory application or existing user application that is closest to the requirements of the new application. If necessary, add one or more additional devices to the application. Parameter presets for multiple units can be saved as one application fi le. -
Page 15: Input Block
14. LUCIA application browser 14.5.2.1. Input block Each of the four inputs offers an option for either fl at response (Line) or insertion of a low-cut fi lter optimized for speech input (Vocal 100 Hz CUT). Select the option appropriate for your application. The May 2014 release will offer “Custom”... -
Page 16: Output Block
14. LUCIA application browser 14.5.2.3. Output block In the Outputs section you can confi gure the output processing of individual channels for optimal response from the connected loudspeakers. Factory presets – Presets are provided with output equalization optimized for many Tannoy loudspeakers. Additional presets are provided for generic full-range loudspeakers, with each offering a selection of low-cut fi lters. -
Page 17: Control Block
14. LUCIA application browser Edit the output fi lters by (as appropriate) selecting an alternative fi lter type and entering new values in the parameter boxes. (Only those parameters applicable to the fi lter type will be accessible.) To save the custom fi lter, click on OK. To exit without saving changes, click CANCEL. ADLC (Automatic Dynamic Loudness Contouring) –... -
Page 18: Saving And Storing Custom Applications
14. LUCIA application browser 14.6. Saving and storing custom applications 14.6.1. Saving applications Once you have completed configuration of a custom Application, click on the Save button. A dialog window will open which allow you to enter a file name, author and a description of the Application preset. Click on the Save button in the dialog window to save the Application file. -
Page 19: Online Mode
14. LUCIA application browser Press the Program button A confi rmation dialog will show when the settings have been successfully transferred to the device. The dialog also shows an option to Enable Synchronization. If you want to further edit parameters in real time, click the button and then click “OK.”... -
Page 20: Appendices
15. Appendices 15. Appendices 15.1. Configuration for LUCIA base models GPI1 GPI2 +6 dB IN 1 SPK 1 IN 2 SPK 2 +6 dB 15.2. Default configuration for LUCIA M models GPI 1 GPI 2 +6 dB IN 1 SPK 1 IN 2 SPK 2 +6 dB... - Page 21 A resistor ladder selector can be used to perform selection of up to 4 different alternatives. The total impedance should be between 1k and 100k ohm and one way to do it is as illustrated below (this is also how the Lab.gruppen accessory is made).
-
Page 22: Thermal Dissipation
15. Appendices 15.4. Thermal dissipation LUCIA 120/2 Mains Line Level Load Output power Watt *1) Thermal Dissipation voltage current Dissi- BTU/hr kCal/hr pated 0.032 0.88 Standby w. remote Power Off. 0.027 0.77 0.028 0.76 0.21 11.9 Power on, Idling 0.19 13.0 0.22 13.1... - Page 23 15. Appendices LUCIA 240/2 Mains Line Level Load Output power Watt *1) Thermal Dissipation voltage current Dissi- BTU/hr kCal/hr pated 0.032 0.88 Standby w. remote Power Off. 0.027 0.77 0.028 0.76 0.12 11.9 Power on, Idling 0.19 13.0 0.22 13.1 0.29 34.4 16 Ω...
Need help?
Do you have a question about the LUCIA Series and is the answer not in the manual?
Questions and answers