Miele KM 5947 Operating And Installation Instructions
Ceramic cooktop with induction
Hide thumbs
Also See for KM 5947:
- Operating and installation instructions (60 pages) ,
- Operating and installation instructions (84 pages)

Related Manuals for Miele KM 5947


Summary of Contents for Miele KM 5947
- Page 1 Operating and Installation instructions Ceramic Cooktop with induction KM 5947 / KM 5954 en - CA To prevent accidents and appliance damage, read these instructions before installation or use. M.-Nr. 07 367 870...
-
Page 2: Table Of Contents
KM 5947........ - Page 3 Contents Cleaning and care ..........33 Programming .
-
Page 4: Important Safety Instructions
Important safety instructions Proper use This cooktop complies with all Only use the cooktop for household applicable safety laws and use, and for the purposes described in regulations. However, improper use this manual. can result in personal injury and Other uses are not allowed and can be material damage. - Page 5 Important safety instructions Children around the appliance Make sure that children will not be able to grab and topple any cookware Use the system lock to prevent on the cooktop. ALWAYS turn pot/pan children from inadvertently switching on handles inward so that they do not the cooktop or changing the settings.
- Page 6 Important safety instructions Technical safety Do not under any circumstances open the cooktop housing. Before installing the cooktop, check Any contact with connections carrying for externally visible damage. NEVER voltage, or changes to the electrical or operate a damaged appliance. A mechanical set-up, will endanger you damaged appliance can endanger your and may impair the functioning of the...
- Page 7 Defective components should be However, it is wise to consult with your replaced by genuine Miele replacement cardiologist or the manufacturer of the parts only. Only these parts are pacemaker if there is any doubt.
- Page 8 Important safety instructions Protect your hands when working NEVER use the appliance to heat up with a hot appliance - wear oven mitts, closed containers, e.g., canned foods. and use potholders, etc. Make sure the The increased pressure can cause the material is not wet or damp.
- Page 9 Important safety instructions If sugar, sugary foods, plastic, or Note that metal objects stored in a aluminum foil fall onto a hot cooking drawer under the cooktop can become zone, switch the appliance off. Immedi- hot when the appliance is in heavy use. ately, while the zone is still hot, use a Always cook food thoroughly.
-
Page 10: Description Of The Appliance
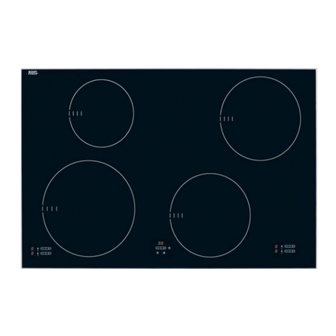
Description of the appliance KM 5947 a Cooking zone with Twin Booster bc Cooking zones with Single Booster d Cooking zone controls and display (refer to the corresponding section in the manual) e Timer controls and display (refer to the corresponding section in the manual) - Page 11 Description of the appliance KM 5954 a Cooking zone with Twin Booster bcd Cooking zones with Single Booster e Cooking zone controls and display (refer to the corresponding section in the manual) f Timer controls and display (refer to the corresponding section in the manual) g Indicator light for lock h Touchpad for lock i Touchpad to turn cooktop ON/OFF...
-
Page 12: Cooking Zone Controls And Display
Description of the appliance Cooking zone controls and display (Example) a Display: = Availability of cooking zone = Holding levels 1 to 9 = Power level = Booster I = Booster II = Residual heat ß = Missing or unsuitable cookware (see section "Induction") = Fault (refer to the section on "Safety cut-out") = Automatic parboil when the power-setting range has been extended... -
Page 13: Timer Controls And Display
Description of the appliance Timer controls and display a Touchpad for switching on, changing between functions, and selecting a cooking zone for automatic switch-off. b Touchpad for setting the time c Time display d Indicator light for automatic switch-off, e.g., right rear cooking zone e Indicator light for minute minder f Indicator light for half hours, for minute minder times of more than 99 minutes... -
Page 14: Cooking Zone Data
Description of the appliance Cooking zone data Cooking zone KM 5947 minimum to maximum Rating in Watts at 230 V** C in cm* 18 - 28 normal: 2400 with Booster I: 3000 with Booster II: 3700 14 - 20 normal:... -
Page 15: Before The First Use
Before the first use Breaking in the appliance Read the section on the "Data plate" and attach the plate, which is included For facetted cooktops (with bevelled with the appliance documents, in the glass edging): location specified in "Technical Ser- In the first few days after installation, vice". -
Page 16: Induction
Induction How induction works If suitable cookware is placed on the induction zone within 3 minutes, the Under each induction cooking zone, ßgoes out, and you can continue as there is an induction coil. When the usual. cooking zone is switched on, the coil generates a magnetic field that acts If no cookware or unsuitable cookware directly on the bottom of the pot/pan to... -
Page 17: Noise
Induction Noise To extend the life of the electronics, the appliance is equipped with a cooling When you use an induction cooking fan. If the appliance is under heavy zone, the following noises may occur, use, the fan will start, and you will hear depending on the the type and shape it whirring. -
Page 18: Cookware
Induction Cookware Size of cookware For optimal efficiency, select cookware Type of cookware that fits between the innermost and outermost markings on the cooking Suitable cookware is made of: zone. If the pot/pan is smaller than the – Stainless steel with a magnetizable innermost marking, the induction may bottom not work. -
Page 19: Operation
Operation Sensor switches Switching on The control panel on your ceramic Begin by switching on cooktop and cooktop is equipped with electronic thean the desired cooking zone. sensor switches. They respond to finger Do not leave the appliance contact. unattended during operation! To operate the cooking zones, simply touch the corresponding sensor Switching on the cooktop... -
Page 20: Setting Ranges
Operation Setting ranges Setting range* factory settings expanded** (9 power levels) (17 power levels) Hold Melt butter 1 - 2 1 - 2. Dissolve gelatin Warm small quantities of liquid 3 - 3. steam rice, thaw frozen vegetables Warm liquid/semi-solid dishes 4 - 4. -
Page 21: Auto-Heat
Operation Auto-heat When automatic parboil is activated, the cooking zone switches on Continued Auto-heat time automatically to full power (boil setting) cooking setting* in minutes and and then switches to the continued seconds cooking setting you have selected. The (approx.) parboil time depends on the continued cooking setting chosen (see Table). -
Page 22: Booster Function
Operation Booster function In order to supply the Booster power needed, another cooking zone will The cooking zones are equipped with a operate at reduced power while the Single (I) or Twin (I/II) booster (see Booster function is on. In other words, Description of the appliance). - Page 23 Operation Switch on Booster I Switching off the Booster. ^ Switch the desired cooking zone on. The Booster function can be switched off early. ^ Touch the sensor areaB for the ^ To do so, keep tapping the B sensor associated cooking zone.
-
Page 24: Hold
Operation Hold Tips Each cooking zone has a hold setting. Use only cookware (pots/pans) for keeping food warm. Cover the If it has been activated, the cooking cookware with a lid. zone switches off after a maximum of two hours' operation. It is not necessary to stir the food while it is being kept warm. -
Page 25: Switching Off And Residual Heat Indicator
Operation Switching off and Residual The bars in the residual temperature display gradually disappear as the heat indicator cooking zones cool down. The last bar goes out when the cooking zones can Switching off a cooking zone be touched again without danger. ^ At the same time, tap the - and + sensors. -
Page 26: Timer
Timer Minute minder The timer can be used for two different functions: Setting the minute minder – setting a minute minder You can set the timer whether the – to set a cooking zone to switch off cooktop is switched on or off. automatically. -
Page 27: Switching Off A Cooking Zone Automatically
Timer ^ Touch the - or + sensors until the Switching off a cooking zone desired amount of time is displayed, automatically for example: 15 minutes. In order to be able to program the auto- matic shut-off, you must first set the cooking zone to a particular power setting. -
Page 28: Using Timer Functions At The Same Time
Timer Using timer functions at the same time The timer and the automatic switch-off can be used simultaneously. If you have one or more switch-off times programmed and would like to use the minute minder as well: touch the m sensor repeatedly until indicator light for the minute minder flashes. -
Page 29: Safety Features
Safety features Safety lock / System lock Activation ^ Touch the $ sensor until the To prevent cooktop and cooking zones from being inadvertently switched on or associated indicator light appears. their settings changed, your appliance The indicator light will go out after a is equipped with a safety lock. -
Page 30: Stop And Go
Safety features Stop and Go Activation ^ Touch the $ sensor until you hear Your appliance is equipped with a feature which, when activated, enables two immediately consecutive signal you to simultaneously reduce the power tones. Take care not to touch the $ sensor levels of all active cooking zones to level1. -
Page 31: Safety Switch-Off
Safety features Safety switch-off If the sensors are covered Your cooktop is equipped with a safety Your cooktop will switch off switch-off. automatically if one or more of the sensors remains covered for longer For too-long operating time than approximately 10 seconds, for example by finger contact, food boiling If one of the cooking zones is heated over, or by any object laid on top of... -
Page 32: Overheat Protection
Safety features Overheat protection The overheat protection can be triggered if: All induction coils and the cooling elements for the electronics are fitted – Empty cookware is being heated. with overheating protection. Before the – Fats or oils are heated at high power induction coils or the cooling elements settings. -
Page 33: Cleaning And Care
Cleaning and care To avoid damaging the surfaces, do NEVER use a steam cleaner to not use any clean this appliance. The steam can – cleaning products that contain reach the electrical components and washing soda, acids/alkali, ammonia, cause the appliance to short circuit. or bleach, Clean the entire appliance after each –... - Page 34 Cleaning and care Glass ceramic Spots from lime residue, water, and aluminum deposits (shimmering First wipe down the surface with a metallic spots) can be removed with a damp cloth to loosen soiling, then glass ceramic and stainless steel remove stubborn crusting with a glass cleanser.
-
Page 35: Programming
Programming You can change the programming of To store the new settings in memory, touch the ON/OFF cooktop sensor s your appliance (see Table). until the displays go out. If you do not ^ With the cooktop switched off, wish to store the displays in memory, simultaneously touch the ON/OFF touch the safety lock sensor $ until the cooktop sensor s and the safety... - Page 36 Programming Program* Status** Setting Demonstration mode and Demonstration mode on factory default settings Demonstration mode off Reinstate factory default settings Stop and Go Power setting range 9 power settings (1, 2, 3 ... to 9) 17 Power settings (1, 1., 2, 2., 3 ... to 9) If the auto heat-up setting is selected: an A will flash alternate with the...
- Page 37 Programming Program* Status** Setting One-finger locking using $ Safety lock Three-finger locking using $ and + of both right-hand cooking zones System lock Manual activation of system lock Automatic activation of system lock Auto-heat 6. Touchpad speed of Slow response normal (300 ms) Fast * Programs not listed are not stored.
-
Page 38: Troubleshooting
Troubleshooting ... If there is a smell or vapor formed Repairs to electrical appliances when a new appliance is switched should only be carried out by a qualified professional. Work The smell and any vapors given off do performed by unqualified persons not indicate a faulty connection or can place the user at considerable defective appliance, and are not... - Page 39 Troubleshooting ... One of the following has occurred: ... The cooling fan continues to run after switch-off. – The Booster has automatically de-activated ahead of time. That is not a malfunction. The fan runs until the appliance is cooled down, and –...
-
Page 40: Technical Service
Technical Service For replacement parts or a fault which you cannot easily fix yourself, please contact the Miele Technical Service Department at the address on the back of this booklet. When contacting Technical Service please quote the serial number and model of the appliance. -
Page 41: Optional Accessories
However, to achieve that goal, there must be a perfect interplay of all factors. That is why Miele has put together a comprehensive line of accessories that harmonize optimally with our appliances. These care products are tailored to the specific appliance. -
Page 43: Important Safety Instructions - Installation
Installation Instructions IMPORTANT: SAVE FOR THE LOCAL ELECTRICAL INSPECTOR'S USE... -
Page 44: Important Safety Instructions - Installation
Please contact the Miele Technical Service Department with specific requirements. The appliance must not be installed over a dishwasher, washer, dryer, refrigerator or freezer. - Page 45 IMPORTANT SAFETY INSTRUCTIONS - INSTALLATION Safety distances above the appliance If there is more than one appliance beneath a hood (e.g. wok burner and electric cooktop), and they have different minimum safety distances, always observe the greater distance. The minimum safety distance given by the hood manufacturer must be maintained between the cooktop and the hood above it.
- Page 46 IMPORTANT SAFETY INSTRUCTIONS - INSTALLATION Safety distances to the sides and rear of the cooktop If you are installing a cooktop, it is allowed to have cabinets or walls of any height on one side and at the rear, but on the other side there must be no appliance or furniture standing higher than the cooktop (see illustrations).
- Page 47 IMPORTANT SAFETY INSTRUCTIONS - INSTALLATION Safety distance underneath the cooktop To ensure sufficient ventilation of the appliance, a certain gap must be left between the underside of the cooktop and any oven, intermediate shelf or drawer. The minimum distance from the underside of the cooktop to –...
-
Page 48: Cooktops With Frame Or Bevelled Edges
IMPORTANT SAFETY INSTRUCTIONS - INSTALLATION Safety distance when installing the appliance near a wall with trim or a back splash A minimum distance of 2" (50 mm) between the trim or back splash and the countertop cut-out if required. This distance is only necessary if these items are made of combustible materials e.g. - Page 49 Installation KM 5947 5 0 4 5 7 4 ß 4 9 0 2 0 9 a Front b Installation depth c Installation depth, power cord d Power cable, Lenght = 1440 mm...
-
Page 50: Installation
Installation KM 5954 5 1 4 7 9 4 ß 5 0 0 2 0 9 a Front b Installation depth c Installation depth, power cord d Power cable, Lenght = 1440 mm... -
Page 51: Preparing The Countertop
Installation Preparing the countertop Inserting the cooktop ^ Use the template to make a work ^ Feed the appliance power cord cut-out. downward through the cut-out. Be sure to observe the minimum ^ Place the cooktop centered in the distance from the rear wall and cutout. -
Page 52: Sealing Advice
Installation Sealing advice Tiled countertop Grout lines a and the hatched area underneath the cooktop frame must be The cooktop must not be permanently smooth and even, so that the frame will sealed into the countertop when sit flush with the countertop and the installed. -
Page 53: Electrical Connection
Electrical connection Connection CAUTION: Before installation or The cooktop is ready for connection to servicing, disconnect the power a grounded power supply. supply by either removing the fuses, shutting off the power main or 208/240 V, 60 Hz, 40 A fuse rating. manually "tripping"... -
Page 54: Help Protect Our Environment
Help protect our environment Disposal of packing materials Disposal of an old appliance The cardboard box and packing Old appliances contain materials that materials are biodegradable and can be recycled. Please contact your recyclable. Please recycle. local recycling authority about the possibility of recycling these materials. - Page 56 Alteration rights reserved / xx10 M.-Nr. 07 367 870 / 01 For the most updated manual see the Miele web site.
Need help?
Do you have a question about the KM 5947 and is the answer not in the manual?
Questions and answers