Avaya 1140E Install Manual
Ip deskphone with sip software
Hide thumbs
Also See for 1140E:
- Software user's manual (298 pages) ,
- User manual (280 pages) ,
- Quick reference manual (3 pages)
Table of Contents
Advertisement
Quick Links
Advertisement
Table of Contents

Related Manuals for Avaya 1140E


Summary of Contents for Avaya 1140E
- Page 1 Avaya 1140E IP Deskphone with SIP Software Install Guide...
-
Page 2: Table Of Contents
Configuring the dialpad to alphanumeric dialing .......... 44 Entering text using the USB keyboard............. 45 Accessing the IP Deskphone ..................47 Logging on ........................47 Automatic login ......................48 Selecting a language ....................48 Logging on to your A v ay a 1140E IP Deskphone ..........49... - Page 3 Configuring the duration of the login ..............52 User Profile ........................53 Logging off from the IP Deskphone ................54 Configuring the Avaya 1140E IP Deskphone ............... 55 Adjusting the display screen contrast ..............55 Creating the idle screen text display ..............57 Configuring the Backlight ..................
-
Page 4: Welcome
Welcome Welcome Welcome Your Avaya 1140E IP Deskphone brings voice and data to your desktop. The IP Deskphone connects directly to a Local Area Network (LAN) through an Ethernet connection. The SIP IP Deskphone communicates using Session Initiated Protocol (SIP) after the firmware (FW) is upgraded to a SIP-enabled version. - Page 5 Welcome • graphical, high-resolution LCD display, backlit, with adjustable contrast • high-quality speaker IP Deskphone • volume control keys for adjusting the ringer, speaker, handset, and headset volume • six specialized feature keys: — Quit — Directory — Inbox — Outbox —...
-
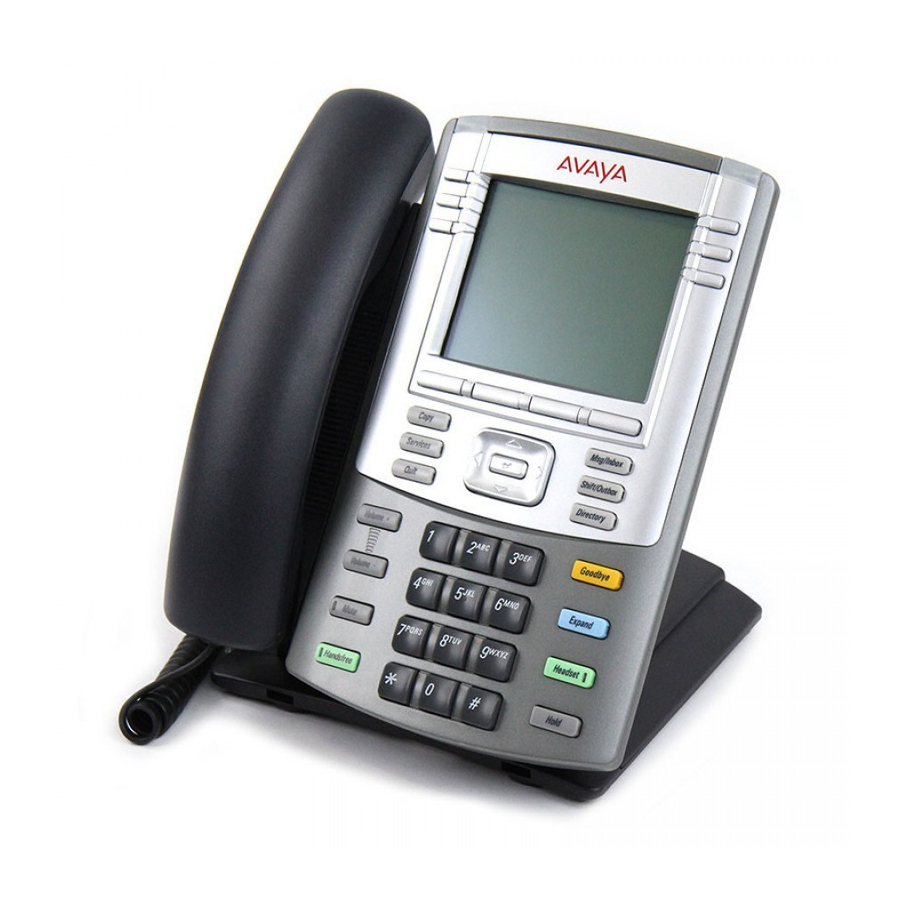
Page 6: Ip Deskphone Controls
Inbox • the capacity to attach up to three Expansion Modules for IP Deskphones 1100 Series, adding up to 54 programmable feature keys IP Deskphone controls Figure 2 shows the Avaya 1140E IP Deskphone. Figure 2: Avaya 1140E IP Deskphone... - Page 7 Welcome This section describes the controls on your IP Deskphone. Your IP Deskphone can have fixed keys with icons or with labels. This document presents both versions of the fixed key. The keys on either side of the LCD display area User-defined feature keys, with labels on the LCD.
- Page 8 Welcome Welcome Press the Handsfree key to activate the built-in speaker and microphone of the IP Deskphone. Note: The Handsfree LED indicator on the Handsfree key lights to indicate when handsfree is active. Use the Navigation Key Cluster to scroll through menus and lists that appear on the LCD display screen or for text entry.
- Page 9 Welcome Press the Headset key to answer a call using the headset or to switch a call from the handset or handsfree to the headset. Note: The Headset LED indicator on the Headset key lights to indicate that the headset is in use. Press the Hold key to put an active call on hold.
- Page 10 Welcome Welcome Press the Services key to access the following features: 1. Search—search in the local directory (personal Address Book) and the global directory (network Address Book for names and telephone numbers) 2. Login—log in to your IP Deskphone only when the call server supports multiple user logins.
- Page 11 Welcome Press the Inbox key to access your call inbox. The call inbox stores all incoming calls on an active IP Deskphone. Note: This key does not function to send Instant Messages. Press the Outbox key to view a record of all outgoing calls.
-
Page 12: Avaya 1140E Ip Deskphone Display
Welcome Welcome Avaya 1140E IP Deskphone display Your IP Deskphone has three display areas: • The upper display area provides line and feature key status. • The middle display area contains single-line information for items such as caller number, caller name, menu items, feature prompt strings, user- entered digits, date and time information, and phone information. -
Page 13: Context-Sensitive Soft Keys
Welcome Context-sensitive soft keys Your IP Deskphone has four context-sensitive soft keys beneath the LCD screen. The context-sensitive soft keys access different features and menus depending on the state of the IP Deskphone and the menu you access. Figure 4 shows the context-sensitive soft keys while the IP Deskphone is in the idle state. - Page 14 Welcome Welcome Table 1 lists the context-sensitive soft keys that you can use to access menu items. Table 1: Menu items accessed through context-sensitive soft keys (Part 1 of Item Function Press the Redial context-sensitive soft key to redial the last dialed number. Redial or NewCall If there is no stored redial number, the NewCall...
- Page 15 Welcome Table 1: Menu items accessed through context-sensitive soft keys (Part 2 of 6) Item Function More… Press the More… context-sensitive soft key to select a new menu list of context- sensitive soft keys (three menu lists are available). When you press the More…...
- Page 16 Welcome Welcome Table 1: Menu items accessed through context-sensitive soft keys (Part 3 of 6 Item Function Press the CallFwd context-sensitive soft CallFwd key to forward all calls to a specified address. Press the context-sensitive soft key to block all calls. Retrve Press the Retrve...
- Page 17 Welcome Table 1: Menu items accessed through context-sensitive soft keys (Part 4 of 6 Item Function Presnce Press the Presnce context-sensitive soft key to configure the presence status for your IP Deskphone. Prefs Press the Prefs context-sensitive soft key to display the Preferences menu. The menu items include the following: 1.
- Page 18 Welcome Welcome Table 1: Menu items accessed through context-sensitive soft keys (Part 5 of 6 Item Function Prefs 4. Language—use to change the interface language. 5. Misc Options—use to access the following options: — Alpha Dialing — Search Method — Incoming Privacy —...
-
Page 19: Idle Display Screen After Dial Pad Input
Welcome Table 1: Menu items accessed through context-sensitive soft keys (Part 6 of 6 Item Function Prefs 8. User Settings - use to modify the following: — Call Settings — IM Settings — Voice Mail Settings — Change Location More… Press the More... - Page 20 Welcome Welcome Table 2 lists the context-sensitive soft keys that you can use to access menu items after dial pad input. Table 2: Menu items accessed after dial pad input through context- sensitive soft keys Item Function Send Press the Send context-sensitive soft key to dial out the user input using the primary...
-
Page 21: In-Call Context-Sensitive Soft Keys
Welcome In-call context-sensitive soft keys When a call is active, use the context-sensitive soft keys to access the menu items shown in Figure Figure 6: In-call context-sensitive soft keys Table 3 lists the context-sensitive soft keys you can use to access menu items during an in-call session. - Page 22 Welcome Welcome Table 3: Menu items accessed during an in-call session through context-sensitive soft keys (Part 2 of 10) Item Function Press the Audio context-sensitive soft Audio key to access the following features: Tones • Ring Pattern — Select test patterns from 1 to •...
- Page 23 Welcome Table 3: Menu items accessed during an in-call session through context-sensitive soft keys (Part 3 of 10) Item Function Voice Audio • Set the volume for the following: — Handset Volume — Headset Volume — Handsfree Volume Codecs Select the Audio Codecs: •...
- Page 24 Welcome Welcome Table 3: Menu items accessed during an in-call session through context-sensitive soft keys (Part 4 of 10) Item Function Bluetooth Setup • Enable Bluetooth (enable or disable) • To unpair Device select UnPair. If Bluetooth is enabled, select: •...
- Page 25 Welcome Table 3: Menu items accessed during an in-call session through context-sensitive soft keys (Part 5 of 10) Item Function Activate context-sensitive soft key Activate appears when the call is not active. The most common usage of this key is when the call displayed onscreen is a call that was parked against the user (or a call that the user placed on hold).
- Page 26 Welcome Welcome Table 3: Menu items accessed during an in-call session through context-sensitive soft keys (Part 6 of 10) Item Function • More… If you press the More… context-sensitive soft key once from the first menu list, you access the following context- sensitive soft keys: [NewCall] [Park] [Retrve] [More.…]...
- Page 27 Welcome Table 3: Menu items accessed during an in-call session through context-sensitive soft keys (Part 7 of 10) Item Function Press the Park context-sensitive soft Park key to park the current call to the server or another user (not available for all call servers).
- Page 28 Welcome Welcome Table 3: Menu items accessed during an in-call session through context-sensitive soft keys (Part 8 of 10) Item Function 2. Audio—use to adjust tones and Prefs volume settings, to configure a USB headset, and to access the Bluetooth wireless technology setup.
- Page 29 Welcome Table 3: Menu items accessed during an in-call session through context-sensitive soft keys (Part 9 of 10) Item Function 6. Network—use to access the Prefs following: — Server Settings — Device Settings — Diagnostics — Disable screensaver — Licensing —...
- Page 30 Welcome Welcome Table 3: Menu items accessed during an in-call session through context-sensitive soft keys (Part 10 of 10) Item Function More… Press the More… context-sensitive soft key to return to the first menu list of context-sensitive soft keys. The next available menu list contains the following context- sensitive soft keys: [Conf] [Trnsfer] [Audio]...
-
Page 31: Using Your Ip Deskphone
IP Deskphone. Before you begin CAUTION Damage to Equipment Do not plug your Avaya 1140E IP Deskphone into a regular telephone jack. This can result in severe damage to the IP Deskphone. Consult your system administrator to ensure that you plug your IP Deskphone into a 10/100/1000 BaseT Ethernet jack. -
Page 32: Connecting The Components
Using your IP Deskphone Connecting the components Figure 7 shows the connections on the Avaya 1140E IP Deskphone. Figure 7: IP Deskphone connections Accessory Expansion PC Ethernet port Module port LAN Ethernet port Tilt Lever Link lamp Connector AC Adapter jack... - Page 33 • “Wall-mounting the IP Deskphone (optional)” Figure 8: Wall-mount lever Wall-mount lever WARNING Your Avaya 1140E IP Deskphone is shipped with the base locked in position. To avoid damaging your Deskphone , press the wall-mount lever, located under the Handsfree key as indicated in the previous figure, to release...
-
Page 34: Removing The Stand Cover
Figure 9: Remove the stand cover Connecting the AC power adapter (optional) Your 1140E IP Deskphone supports AC power or Power over Ethernet (PoE) options, including IEEE 802.3af standard power. To use local AC power, use only the Avaya-approved Global Power Supply (NTYS17xxE6). -
Page 35: Connecting The Handset
Using your IP Deskphone To use PoE, where power is delivered over the CAT5 cable, your connected LAN must support PoE. If you use PoE, you do not require an AC adapter. WARNING If you are connected to a PoE connection, do not use the AC power adapter. -
Page 36: Connecting The Headset (Optional)
Using your IP Deskphone Connecting the headset (optional) Perform the following procedure to connect the optional headset to the IP Deskphone. 1. On the back of the IP Deskphone, plug the headset connector into the RJ-9 headset jack marked with the ) symbol. 2. -
Page 37: Connecting The Lan Ethernet Cable
Using your IP Deskphone Perform the following procedure to select a headset. 1. Press Prefs. 2. Select Audio. 3. Select Headset Type. Connecting the LAN ethernet cable Note: Your IP Deskphone supports both AC power and PoE options, including IEEE 802.3 standard power. To use local AC power, you can order the optional AC adapter separately. -
Page 38: Installing Additional Cables
Method A Wall-mounting the IP Deskphone (optional) You can mount your Avaya 1140E IP Deskphone on a wall either by: (method A) using the mounting holes on the bottom of the IP Deskphone stand or (method B) using a traditional-style wall-mount box with an RJ- 45 connector and 15 centimeter (cm) (6-inch) RJ-45 cord (not provided). - Page 39 Using your IP Deskphone Method A: 1. Press the wall-mount lever, and pull the IP Deskphone away from the stand, as shown in Figure 2. Use the stand cover (the part you removed in “Removing the stand cover”), to mark the wall-mount holes by pressing the bottom of the stand cover firmly against the wall in the location where you wish to install the IP Deskphone.
-
Page 40: Entering Text
Deskphone towards the base until you hear an audible click. Ensure the IP Deskphone is securely locked in position. Attention: To add an Expansion Module for Avaya 1100 Series IP Deskphones, see Expansion Module for Avaya 1100 Series IP Deskphones (SIP Firmware) User Guide (NN43110-301). -
Page 41: Entering Text Using The Ip Deskphone Dialpad
Using your IP Deskphone Entering text using the IP Deskphone dialpad For applications that offer text input, when you use the dialpad to enter text the system activates the abc/123 context-sensitive soft key. You can toggle between numeric and alphabetic input as follows: •... - Page 42 Using your IP Deskphone • To enter the next letter, press the dialpad key 6 twice to cycle to the letter r. When entering alphanumeric information, the key on the dialpad represents the characters in Table 4. To enter a special character, press the dialpad number to cycle through the characters until you reach the one you need.
-
Page 43: Enabling And Disabling The # Ends Dialing Feature
Using your IP Deskphone Table 4: Alphanumeric characters for dialpad key 1 (Part 2 of 2) Character Name semi-colon tilde equal plus numeral 1 Note: No letters are associated with the 0 key. Enabling and disabling the # Ends Dialing feature You can enable the IP Deskphone to use the octothorpe (#) symbol to immediately dial the address or phone number. -
Page 44: Configuring The Dialpad To Alphanumeric Dialing
Using your IP Deskphone To disable the # Ends Dialing feature: To turn off # Ends Dialing, press the Prefs context-sensitive soft key, and Prefs then select Misc Options. Highlight Ends Dialing and press the Change context-sensitive soft key. 2. Choose one of the following: Back —... -
Page 45: Entering Text Using The Usb Keyboard
Using your IP Deskphone To disable alphabetic mode and set numeric mode as the default: 1. Press the Prefs context-sensitive soft key, and then select Misc Prefs Options. Highlight Alpha Dialing, and then press the Change context-sensitive soft key. 2. Choose one of the following: Back Press the context-sensitive soft... - Page 46 Using your IP Deskphone Table 5: USB keyboard functions (Part 1 of 2) IP Deskphone Fixed Key Keyboard Key Quit Services Expand Inbox Outbox Address Book Copy Volume Down Table 5: USB keyboard functions (Part 2 of 2) IP Deskphone Fixed Key Keyboard Key Volume Up Mute...
-
Page 47: Accessing The Ip Deskphone
Accessing the IP Deskphone Accessing the IP Deskphone You require a log on ID and a password to log on to a server with your IP Deskphone. Logging on Whenever you log on to your IP Deskphone you must do the following: •... -
Page 48: Automatic Login
• “Automatic login” • “Selecting a language” • “Logging on to your Avaya 1140E IP Deskphone” • “Configuring the duration of the login” • “User Profile” Note: The system automatically logs you back on after a power outage or firmware upgrade. -
Page 49: Logging On To Your Avaya 1140E Ip Deskphone
Logging on to your Avaya 1140E IP Deskphone You need to log on to your Avaya 1140E IP Deskphone when you first install and restart your IP Deskphone and anytime you log off or reboot. Note: When you log on to the IP Deskphone for the first time, the system prompts you for a location. - Page 50 If Authentication is enabled by your system administrator, you can enter your authentication ID independent of your user ID. The authentication ID is used when the server challenges the IP Deskphone. To logon to the Avaya 1140E IP Deskphone: 1. Press the abc/123...
- Page 51 Accessing the IP Deskphone 4. Enter your password by using the dialpad. Note 1: When you enter your password, the last character entered appears. However, all previous characters are hidden. Note 2: When you enter your password and you use the navigation key to backspace, you erase all the characters and must completely reenter your password...
-
Page 52: Configuring The Duration Of The Login
Accessing the IP Deskphone Configuring the duration of the login After you enter your logon ID and password the Duration screen appears. You can enter the maximum length of time of the session. If you choose to use the default duration Permanent, you remain logged on to the IP Deskphone until you log off. -
Page 53: User Profile
Your User Profile contains your specific settings and data. You are prompted to create a User Profile the first time you log on to your Avaya 1140E IP Deskphone. If you delete your User Profile, the IP Deskphone reboots, and you must log on and create a new User Profile. -
Page 54: Logging Off From The Ip Deskphone
Accessing the IP Deskphone Logging off from the IP Deskphone To log off from the IP Deskphone: 1. Press the Services fixed key, and then select Logout from the menu. 2. Press the abc/123 context-sensitive soft key to toggle between alphabetic or numeric input. -
Page 55: Configuring The Avaya 1140E Ip Deskphone
Configuring the Avaya 1140E IP Deskphone Configuring the Avaya 1140E IP Deskphone You can adjust a few settings of the Avaya 1140E IP Deskphone to conform to the environment where you want to use the phone. These settings are saved to your User Profile. - Page 56 Configuring the Avaya 1140E IP Deskphone Apply Cancel 3. Choose one of the following: — Press the Apply context-sensitive soft key to save the changes and return to the Display menu. — Press the Cancel context-sensitive soft key to keep the existing...
-
Page 57: Creating The Idle Screen Text Display
Configuring the Avaya 1140E IP Deskphone Creating the idle screen text display You can create a text to display on the screen, while the phone is idle. To create the idle screen display text: Prefs 1. Press the Prefs context-sensitive soft... -
Page 58: Configuring The Backlight
Configuring the Avaya 1140E IP Deskphone Configuring the Backlight Note: Configuring the length of time the LCD screen remains backlit on the IP Deskphone also adjusts the Expansion Module backlight time if you have an Expansion Module connected to your IP Deskphone. -
Page 59: Configuring Menu Auto Back-Out
Configuring the Avaya 1140E IP Deskphone Configuring Menu Auto back-out You can use the Menu Auto back-out feature to configure the time interval required for the IP Deskphone to go back to the idle screen when the IP Deskphone is left inactive. - Page 60 Configuring the Avaya 1140E IP Deskphone 4. Choose one of the following: Select or Back — Press the Select context- sensitive soft key to configure the Auto back- out time to the selected (highlighted) value and return to the Display menu.
-
Page 61: Selecting A Ring Pattern
Configuring the Avaya 1140E IP Deskphone Selecting a ring pattern You can use the ring pattern feature to select the ring pattern for an incoming call. To select the ring pattern for an incoming call: Prefs 1. Press the Prefs... -
Page 62: Adjusting The Volume
Configuring the Avaya 1140E IP Deskphone Adjusting the volume You can adjust the volume of the IP Deskphone for the following: • Ring Volume • Handset Volume • Headset Volume • Handsfree Volume • Paging Ring Volume A sliding scale appears on the LCD screen display when you adjust the volume. -
Page 63: Adjusting The Ring Volume
Configuring the Avaya 1140E IP Deskphone Adjusting the ring volume You can adjust the ring volume for an incoming call. To adjust the ring volume for an incoming call: Prefs 1. Press the Prefs context-sensitive soft key, select Audio, select Tones, and then... -
Page 64: Adjusting The Volume Of The Handset, Headset, And Handsfree Mode
Configuring the Avaya 1140E IP Deskphone Adjusting the volume of the Handset, headset, and Handsfree mode You can adjust the volume for the handset, headset, and the handsfree speaker of the IP Deskphone. To adjust the volume of the handset: Prefs 1. - Page 65 Configuring the Avaya 1140E IP Deskphone You can adjust the headset volume on the IP Deskphone. To adjust the headset volume Prefs 1. Press the Prefs context-sensitive soft key, select Audio, select Voice, and then select Headset. 2. To adjust the handset volume use one of the following methods: —...
- Page 66 Configuring the Avaya 1140E IP Deskphone You can adjust the handsfree mode volume on the IP Deskphone. To adjust the handsfree mode volume: Prefs 1. Press the Prefs context-sensitive soft key, select Audio, select Voice, and then select Handsfree. 2. To adjust the handsfree volume use one of the following methods: —...
-
Page 67: Selecting A Language
Configuring the Avaya 1140E IP Deskphone Selecting a language The display is available in multiple languages. A maximum of five languages are accessible through the IP Deskphone. The system administrator determines which languages are available for your IP Deskphone. To select a language: Prefs 1. -
Page 68: Selecting The Date And Time Format
Configuring the Avaya 1140E IP Deskphone Selecting the date and time format Several date and time formats are available. Formats are based on the 12-hour and 24-hour clocks. To select a date format: Prefs 1. Press the Prefs context-sensitive soft... - Page 69 Configuring the Avaya 1140E IP Deskphone You can select a time zone for your IP Deskphone. To select a time zone: Prefs 1. Press the Prefs context- sensitive soft key, select Misc Options, and then select Time. Change 2. Press the...
- Page 70 Configuring the Avaya 1140E IP Deskphone You can select the time zone format for your IP Deskphone. To select a time format: Prefs 1. Press the Prefs context-sensitive soft key, select Misc Options, and then select Time. Change 2. Press the...
Need help?
Do you have a question about the 1140E and is the answer not in the manual?
Questions and answers