Table of Contents
Advertisement
Quick Links
Advertisement
Table of Contents

Related Manuals for jWIN JD-VD509


Summary of Contents for jWIN JD-VD509
- Page 1 HOME DVD PLAYER V10M10_IM_EN_08072006 DVD Player with 5.1Channel Audio Output and Progressive Scan Feature JD-VD509 INSTRUCTION MANUAL Please read this manual carefully before operating and save it for future reference. Have a question? Please visit www.jWIN.com www.jWIN.com...
-
Page 2: User Safety Guide
HOME DVD PLAYER USER SAFETY GUIDE IMPORTANT SAFETY PRECAUTIONS The lightning flash with an arrowhead symbol within an equilateral triangle is intended to alert the user of the presence of un-insulated “dangerous voltage” within the unit’s cabinet that may be of sufficient magnitude to constitute a risk of electric shock. -
Page 3: Important Safety Instructions
HOME DVD PLAYER USER SAFETY GUIDE IMPORTANT SAFETY INSTRUCTIONS READ INSTRUCTIONS – All the safety and operating instructions should be read before the appliance is operated. RETAIN INSTRUCTIONS – The safety and operating instructions should be retained in a secure place for future reference. -
Page 4: Table Of Contents
Location of controls on the remote control …………………………………………………11 Installing the remote control batteries ………………………………………………………12 Notes on using the remote control ………………………………………………………… 12 Brief instructions on installing the DVD player …………………………………………… 13 About the audio outputs …………………………………………………………………… 14 About the video outputs ………………………………………………………………………14 Connecting to a TV set with 2-channel audio input ………………………………………... -
Page 5: Getting Started
HOME DVD PLAYER GETTING STARTED Thank you for purchasing JD-VD509. Unpack the unit and make sure all the accessories are put aside so they will not be lost. We recommend that you retain the original carton and packaging materials for future use, should you transport or ship the unit in the future. -
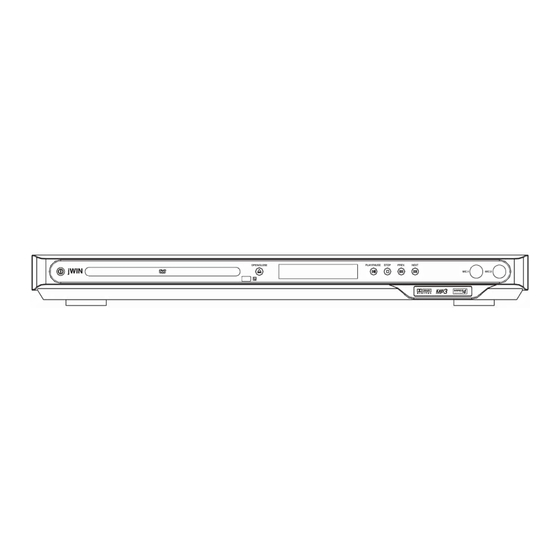
Page 6: Location Of Controls On The Main Unit
HOME DVD PLAYER GETTING STARTED Location of Controls on the Main Unit [Front Panel] Power button Disc loader Remote control sensor Open / Close button VFD screen 10. Microphone jacks [Rear Panel] 6 7 9 11 12 3 4 8 10 13... -
Page 7: Installing The Remote Control Batteries
Do not leave the remote control in an extremely hot or humid place. Do not spill water or put any liquid on the remote control. Do not expose the remote control sensor of the DVD player to a strong light source, such as direct sunlight. -
Page 8: About The Audio Outputs
HOME DVD PLAYER GETTING STARTED About the Audio Outputs This unit supports the three-way audio connection: 2-channel (stereo) audio connection, 5.1- channel surround audio connection, and digital coaxial audio connection. If you plan to connect this unit directly to your 2-channel audio or video device, you only need to connect the audio cable to the FL (Front Left) and FR (Front Right) audio output jacks on the back of this unit. -
Page 9: Connecting To An Audio Amplifier With Digital Audio Input
HOME DVD PLAYER GETTING STARTED Notes on the Connection Diagram – Continued After making the video connection of your choice, please ensure that your TV is in the proper mode as well. If you choose the component VIDEO connection, your TV must be in the component mode. -
Page 10: Preparing The Unit And Attached Devices
HOME DVD PLAYER GETTING STARTED Preparing the Unit and Attached Devices After all the hardware connections are done, you can now connect the power cord of this unit and the attached devices. Please take a special caution while connecting the power cords to the outlet, and carefully read and follow the instructions in the user safety guide section in this manual while connecting power cords. -
Page 11: About The Language Setup
HOME DVD PLAYER GETTING STARTED About the System Setup – Continued VIDEO: Used to select the video format according to your choice of the video connection. INTERLACE–YUV: Select this option if you made the component VIDEO connection between this unit and your TV, but your TV doesn’t support the progressive-scan video format. -
Page 12: About The Audio Setup
HOME DVD PLAYER GETTING STARTED About the Language Setup – Continued MENU LANG: Used to select the menu language of a DVD disc. The correct performance of this option depends on the menu language supported by a DVD disc. If you select a language, which isn’t supported by a DVD disc, this unit will use the... -
Page 13: About The Speaker Setup
HOME DVD PLAYER GETTING STARTED About the Video Setup – Continued SATURATION: Used to adjust the color saturation of a movie SHARPNESS: Used to adjust the sharpness of a movie EXIT SETUP: Used to exit the setup menu. About the Speaker Setup The speaker setup menu is composed of the following setup options: DOWNMIX, SUBWOOFER, CENTER DELAY, REAR DELAY, and BASS MODE. -
Page 14: Operating With A Remote Control [Standby] Button
HOME DVD PLAYER GETTING STARTED About the Digital Setup – Continued DYNAMIC RANGE: Used to lower the volume to avoid an annoying trembling sound without changing the original tone when the “LINE OUT” option is selected above. DUAL MONO: Used to select the way of the audio output when this unit is connected to a 2-channel audio device. -
Page 15: ] Button
HOME DVD PLAYER OPERATING WITH A REMOTE CONTROL ] Button While playing back a DVD or CD disc, press the [ ] button to play back the video or audio contents fast backward. Each press will change the playback speed as follows: Press the [PLAY] button to resume the normal playback. -
Page 16: Operating With A Remote Control (Continued)
HOME DVD PLAYER OPERATING WITH A REMOTE CONTROL [LANGUAGE] Button While playing back a DVD disc, press the [LANGUAGE] button to select an audio language or format. This function depends on a DVD disc. [SUBTITLE] Button While playing back a DVD disc, press the [SUBTITLE] button to turn on the subtitle and to select the language for the subtitle. -
Page 17: [Goto] Button
HOME DVD PLAYER OPERATING WITH A REMOTE CONTROL [TIME] Button – Continued Press the [TIME] button again to see the remaining playback time. Current title Total number of titles [GOTO] Button While playing back a DVD disc, press the [GOTO] button to skip to a certain point in the movie. -
Page 18: Advanced Featuresnal Features
HOME DVD PLAYER ADVANCED FEATURES Playing MP3 CDs When a MP3 CD is loaded, you will see the special screen for the MP3 file display as below: Current directory Select this button to list the MP3 files when a disc contains other types of files, such as JPEG files. -
Page 19: Troubleshooting Guide
HOME DVD PLAYER TROUBLESHOOTING GUIDE No picture or no sound • Ensure whether the [POWER] button on the front panel is on. • Ensure whether the power cord is connected properly. • Ensure the power outlet is working. Picture but no sound •... - Page 20 HOME DVD PLAYER V10M10_IM_EN_08072006 HOME DVD PLAYER V10M10_IM_EN_08072006 TEL: 516-626-7188 FAX: 516-626-7105 website: www.jWIN.com © 2006 jWIN Electronics Corp. All rights reserved. No portion of this printing material or product enclosed herewith including design, shape and graphics, may be not reproduced or transmitted in any form without the expressed written consent of jWIN Electronics Corp.
Need help?
Do you have a question about the JD-VD509 and is the answer not in the manual?
Questions and answers