
Related Manuals for Kaba SIMPLEX 900 Series


Summary of Contents for Kaba SIMPLEX 900 Series
-
Page 1: Installation Instructions
900 SERIES INSTALLATION INSTRUCTIONS Kaba Access Control 2941 Indiana Avenue Winston-Salem, NC 27105 USA Tel: (800) 849-8324 (336) 725-1331 Fax: (800) 346-9640 (336) 725-3269 www.kabaaccess.com PKG1819 0307... -
Page 2: Table Of Contents
" (41 mm) Hole saw with pilot drill Dealer: cause any damage. ⁄ " (22 mm) Hole saw with pilot drill Name: KABA is not responsible for any ⁄ " (3 mm) Drill bit damage caused by installation. Telephone: Hammer... -
Page 3: Determining The Lock Handing
A. DETERMINING THE LOCK HANDING C. DRILLING THE HOLES Many of the installation instructions refer to the CAUTION: Positioning and drilling must be done straight to avoid excessive handing of your door, so you should determine the force being exerted on the lock which may result in the premature wearing of hand before starting the installation. -
Page 4: Installing The Lock
Installing the key cylinder: E-5 Remove the three screws holding the lock housing to the door, then remove the lock D-4 (See Figure 4-3). Insert the cup flange (A) into housing. ⁄ " (22 mm) hole on the inside of the door so that the hole in the flange of the cup (D) is E-6 Slide the holding edges of the face plate (D) over the... -
Page 5: Testing The Lock'soperation
Outward Opening Door (wood frame) - mount flat G. TESTING THE LOCK’S strike OPERATION F-8 Place the strike (A) on the door frame (B) in IMPORTANT: The following steps must be line with the lock (See Figure 6-2). performed while the DOOR IS OPEN. F-9 Trace the outline of the strike on the frame (B). - Page 6 Kaba Access Control analysis to be defective during this period. Our only liabili- ty, whether in tort or in contract, under this warranty is to repair or replace products that are returned to Kaba Access Control within the one (1) year war- ranty period.
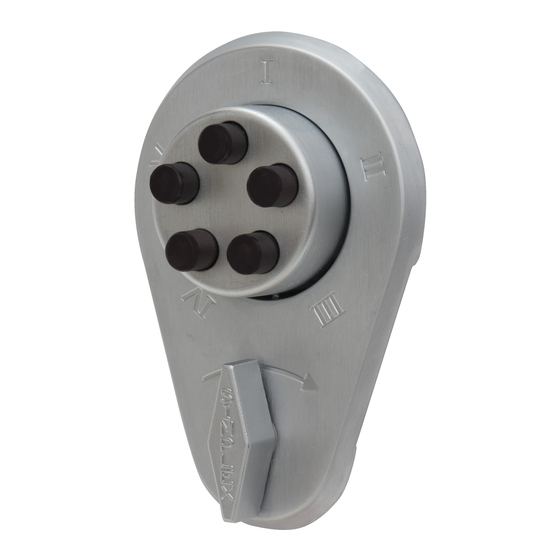
- Page 7 H-2 Enter the existing combination (See Figure 8-2). On new installations, use the factory-set combination: depress II and IV simultaneously, (release), then III (release). You should feel a slight click as each button is depressed. H-3 Use the Allen wrench (item d on checklist) to remove the screw from the top of the lock housing (See Figure 8-3).
-
Page 8: Disassembling The Lock/Reversing The Latch
(See Figure I-1 to I-4). I-1 Remove the lock housing (A) from the inside of To remove the 3-sided dust cover marked "Kaba Simplex," place the the door by removing the three mounting combination chamber in the position below. -
Page 9: Lever Handle/Panic Hardware Kits Assembly Instructions
(open position) (See Figure 10-3). Inside knob only retracts latch/bolt partially or not at all. Reinstallation: Replace the 3-sided dust cover marked “Kaba Simplex.” Make sure the staked joints on both end plates fit through the slots on the dust Holes were not drilled straight or were not drilled in proper location. - Page 10 Door handing should be determined before door prep is started to avoid incorrect door preparation. Notes TOP FOR LEFT HAND DOORS Attach to inside surface of shut door...
Need help?
Do you have a question about the SIMPLEX 900 Series and is the answer not in the manual?
Questions and answers